If You Give a Mouse a Cookie...

Thanks noober, yeah I didn't think that putting a little too much oil in the case would hurt but it wasn't showing up in the little window as I was pouring so I didn't stop early enough. Just thought I'd mention it in case. I guess I'm gonna have to take the cove off - tomorrow, I'm goin ridin tday
sport-1.gif

hahaa thats a awesome smiley!! yeah it was crazy when freek had his problem.. he had good clutch then all of a sudden it was just gone. all it took was a few turns on that screw and away we went...
 
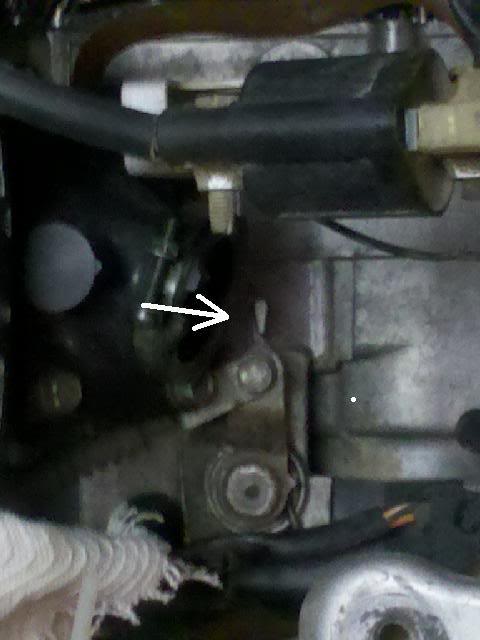
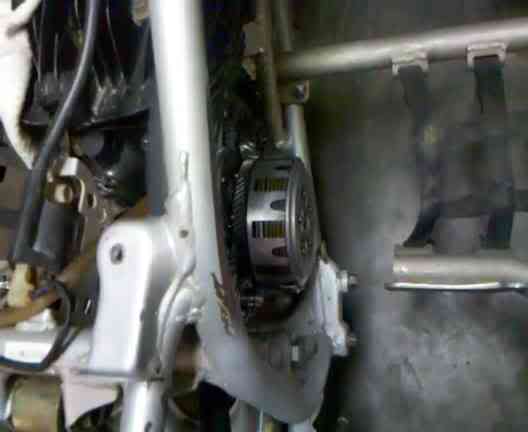
here we go again, lucky im just copy and pastin this............... it took me 4 or 5 times to get this right, very frustrating, do all this with the cable disconnected at the hand lever so it doesnt effect the internal adjustment, open her up, again!!!, loosen the locknut and screw, back it out a little, (the adjustment shaft in the middle of the clutch basket) then where the cable connects to the motor lever,theres a notch that lines up, look on the engine lever for the little point and a mark on the case, line these up, make sure it doesnt move while adjusting, a freind would be good here, then move to the other side, tighten the rod in with a small straight screwdriver till you feel it touch, then i think i read somewhere to back it off 1/2 a turn,then tighten the locknut, <<<<definately use locktite here, mine almost came loose, and thats disaster, then reconnect the cable to the hand lever, and adjust your slack i also did this with the wheels off the ground, so i could spin them with the clutch lever pulled in,to see if the wheels spun free, or if there was engine lag as i released it, before i put it all back together
 
AWK, first off, thanks for the info. Btwn what you gave me and what I got from my Clymer's manual, I don't think it could have been tweaked any more accurately. Take a look at the engine clutch lever and the arrows (the pic wasn't directly over the arrows so it looks a little off, but it is actually as perfect as can be):

1-Arrowslinedup.jpg


I adjusted the free play in the clutch lever at the handle bars and and took this video (<30 sec). the plates actually separate and I used a flat blade screw driver to gently make sure all of them separate. Watch the plates, they do separate, I also use a flat blade screwdriver to gently separate all the plates and they seem fine. Only as sticky as you'd expect form the oil:


Then I put the tranny in 1st gear and rocked the bike to test the clutch and it still wouldn't let go
bangwall.gif
:


I will get clutch plates if I have to but this was working b4 I tore it down in August. Waht else is there to check?!?!?!
 
Hello All the 2nd pics in the last post are vids. (Click to view) Sorry abt the repeat verbage but if I edit the post the photobucket links stop working. any and all advice is welcome.
 
Re: Clutch stuck

It's ALIVE
Tazz-1.gif
OK, I got it all back together and started it up, just a few kicks and it's running. Got the air bleed set and the idle screw adjusted but I can't ride it b/c the clutch wont work.

The clutch was working for the 5 minutes I rode it before I tore it down back in August. Yesterday, I set the pointer on the clutch lever to line up with the pointer on the crankcase but pulling in the clutch handle up on the handle bars doesn't disengage the motor. I tried adjusting the screw on the perch out further and further until i couldn't go out any more but the clutch won't work. If I'm not in neutral, the wheels are connected to the crankshaft, clutch pulled in or not. Any ideas?

OK, I'm back in business. Took the clutch plates apart and the friction plates were sticking to the metal clutch plates. Peeled them apart and there were some faint rust stains on the clutch plates where the friction plates were stuck so there must have been some moisture in there. Just gotta go back in there and fix the kick starter now and I should be good to go.

Just gotta get the jetting right and I'll be ridin this weekend I:I
 
waitin for updates on the ride

Hey Scot,

Well yesterday I got the kick starter spring to stay in the hole in the case long enough to get the cover back on. So my kick starter is back to normal. Set my starting point for my jets and needle clip (btw the needle has 6 positions so it's not stock. Anyone know who's needle that might be? It was probably installed when the DG pipes were put on if that means anything).

Took the Frankenblaster out long enough to get it good and warm and
icon_spitball.gif
pissed off the neighbors a bit, but they didn't call the cops this time so I guess their becoming acclimated.

This is pretty much my first experience with a blaster and it was pretty cool I:I . It's gonna take some getting used to the short wheel base and lower power than I'm used too but I think it'll make me a better rider. I'm gonna really have to watch my weight distribution and revs on hills and acceleration or I'm gonna end up on my a$$ !! I will say that so far, my Banshee brakes are awesome! Lock the back wheels right up if I want and plenty of pedal throw for precise control I:I

I'm planning on taking it out for a better test ride tomorrow or Saturday depending on the weather (been raining and supposed to continue tomorrow). So I'll get back to you with some pics and ride results. Teamchaos stopped by last night to take a look at it and seemed to like it so far. I still have to have the frame PC'd but I want to make sure what I've done so far works the way I want and I may stretch the swinger and add that YFZ450 shock I picked up.
 
My Frankenblaster

headbang.gif
The first real ride was awesome and the blaster is nimble as hell!
headbang.gif


We ripped through the woods, up and down some rocky hills, It was all good!
smiley-dance018.gif

Power is fine and the rear end width is OK. I'm still thinking about turning the rear wheels in to get the width back down. Right now, it's an inch wider than my Banshee. I'll have to try that on the next ride. Nice thing about those offset wheels on the Banshee axle; it gives me some options. Like they can be flipped back and forth whenever I feel like it for whatever type of riding I might do. Here's the latest pic. Sorry I didn't get any video clips for you picture hounds, but we were having too much fun to think about it :D

2010-11-27_14-10-27_538.jpg
 
OK, after a little more ride time, I've decided the stock rear shock sucks. So I'm gonna take some time to install the YFZ450 shock I picked up a while ago. I'm also gonna fab a swing arm using the link I found on here:
http://www.blasterforum.com/suspension-14/swinger-home-made-24533/index1.html

and use Phragle's Suspension geometry 101 to get the most out of the whole thing:
http://www.blasterforum.com/do-yourself-20/suspension-geometry-101-a-11155/

Question is: Does anyone know where I can get a hold of some 1" x 2", 0.125 wall thickness stock? I checked MSC and McMaster Carr and they have the tube but only go up to 0.063 wall thickness.
 
looks good. it came a long way

Thanks Motor Mouth,

Still a long way to go. After riding this basically stock blasty over some really rough terrain (frozen, rutted mud on an oval track - practically cinder blocks) I decided I HAVE to improve the suspension (esp. the rear). So, I ordered the 1" x 2" steel tubing to build myself a +3 swing arm. I've got another one that I can chop up so I'll be able to build it without disabling my Frankenblaster.

While I'm at it, Phragle's Suspension Geometry 101 ^^^^ will be my guide to fit the YFZ450 rear shock so I should be able to get as close to a Cadillac ride as I'm gonna get and all for under $100. I'll post up some pics for Phragle's thread while I'm at it. Once I'm satisfied with the ride, I'll tear the whole thing down and PC the frame and swinger.

My goal is to make it look like it was born this way - so stay tuned I:I
 
Last edited:
I love all of this forum but this thread by far is my favorite so far. I'm happy that someone is not only putting this much work into a Blaster and telling people but actually documenting all of the mods so that it is easier down the road for someone else. Thank you for actually posting these things on here. It really helps! This site needs more Muggzy's. Give that son of yours a Blaster and show him this thread. Good job on the build and thanks for the help. =]
 
I love all of this forum but this thread by far is my favorite so far. I'm happy that someone is not only putting this much work into a Blaster and telling people but actually documenting all of the mods so that it is easier down the road for someone else. Thank you for actually posting these things on here. It really helps! This site needs more Muggzy's. Give that son of yours a Blaster and show him this thread. Good job on the build and thanks for the help. =]

Wow, thanks Blasterboy! Glad to help.
 
good thing i can always come see this thing in person, looks great so far George, I'm going to swing by one of these days to see it in person again I:I
 
man where did you get that awesome green powdercoated fender bracket lol...... im curious to see how u make out on the yfz 450 shock because im debating using the one off my project yfz when i build my swingarm. dunno how i missed your thread but looking good so far man, keep up the good work!!