The piston kit gasket and jet kit was order tuesday of last week read tha posts... n they were here friday but seals didnt come till monday of this week so idk where u r gettin 3 days from.only thing that wasnt done was rebuit crank..second i already had yamabond made my own flywheel puller...i have the manual and followed it step by step. The bearings were also replaced. The jet kit was already shipped br i heard about not using a kit build ur own..i didnt. Do rebuild my uncle hasbeen and is very good at itOne of 4 things is going to happen here.
1. You do an improper rebuild and come back wondering why it failed.
2. You do an improper rebuild and tell everyone that it was our fault for giving you incorrect information.
3. You stop and go back and do a proper rebuild.
4. You abandon the project.
There is a best option among those 4. (HINT: It's isn't option 1, 2, or 4)
From "how to do the rebuild" to "it's almost complete" in 3 business days. That has to be an A+ for parts delivery. Especially considering that you only mentioned a time for receiving seals and not things like Yamabond, gaskets, crank servicing, boring, piston, flywheel puller, etc. I assume that you didn't mention those things because they were all shipped next day and the seals didn't make it at the same time as the other parts, which is why only the seals were mentioned. Did your "machinist" clean the bearings?
It just doesn't add up. Most people doing these kind of builds ask how to get the cases apart or what to seal the case surfaces back together with. You've skipped from "how to build it" to "do I do what the jet kit says?" Under most circumstances, I'd like to give you a thumbs up. However, people that generally skip questions like those are people that research. I'm not sure why you would have researched some of the least commonly asked questions and not have researched how to jet your carb. I know you didn't research the last one because I know for a fact that you would have stumbled upon something that said, "DO NOT USE A JET KIT, ASSEMBLE YOUR OWN."
We would truthfully really like to see you succeed, but it doesn't actually affect us if you fail. Another way of putting that is this: We'd be more than happy to give you every bit of information that you could ever ask for, but we're going to be riding no matter your outcome. If you have access to this site, failure is on you.
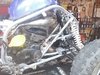
Awaiting build pics.
changed exhaust now boggs down and cuts out...please help
- Thread starter jtmoney61585
- Start date
You are using an out of date browser. It may not display this or other websites correctly.
You should upgrade or use an alternative browser.
You should upgrade or use an alternative browser.
The piston kit gasket and jet kit was order tuesday of last week read tha posts... n they were here friday but seals didnt come till monday of this week so idk where u r gettin 3 days from.only thing that wasnt done was rebuit crank..second i already had yamabond made my own flywheel puller...i have the manual and followed it step by step. The bearings were also replaced. The jet kit was already shipped br i heard about not using a kit build ur own..i didnt. Do rebuild my uncle hasbeen and is very good at itOne of 4 things is going to happen here.
1. You do an improper rebuild and come back wondering why it failed.
2. You do an improper rebuild and tell everyone that it was our fault for giving you incorrect information.
3. You stop and go back and do a proper rebuild.
4. You abandon the project.
There is a best option among those 4. (HINT: It's isn't option 1, 2, or 4)
From "how to do the rebuild" to "it's almost complete" in 3 business days. That has to be an A+ for parts delivery. Especially considering that you only mentioned a time for receiving seals and not things like Yamabond, gaskets, crank servicing, boring, piston, flywheel puller, etc. I assume that you didn't mention those things because they were all shipped next day and the seals didn't make it at the same time as the other parts, which is why only the seals were mentioned. Did your "machinist" clean the bearings?
It just doesn't add up. Most people doing these kind of builds ask how to get the cases apart or what to seal the case surfaces back together with. You've skipped from "how to build it" to "do I do what the jet kit says?" Under most circumstances, I'd like to give you a thumbs up. However, people that generally skip questions like those are people that research. I'm not sure why you would have researched some of the least commonly asked questions and not have researched how to jet your carb. I know you didn't research the last one because I know for a fact that you would have stumbled upon something that said, "DO NOT USE A JET KIT, ASSEMBLE YOUR OWN."
We would truthfully really like to see you succeed, but it doesn't actually affect us if you fail. Another way of putting that is this: We'd be more than happy to give you every bit of information that you could ever ask for, but we're going to be riding no matter your outcome. If you have access to this site, failure is on you.
Awaiting build pics.
Gonna start with the 300...only mod is pro circuit exhaust and silencerWhat size jet will you be using, and list your complete modifications.
Did leak down test last night and good news no leaks...only thing left is to jet tha carb today and hopefully start it
The piston kit gasket and jet kit was order tuesday of last week read tha posts... n they were here friday but seals didnt come till monday of this week so idk where u r gettin 3 days from.only thing that wasnt done was rebuit crank..second i already had yamabond made my own flywheel puller...i have the manual and followed it step by step. The bearings were also replaced. The jet kit was already shipped br i heard about not using a kit build ur own..i didnt. Do rebuild my uncle hasbeen and is very good at it
If you reference the 3rd page...
You said you ordered a piston before you were advised that it needed a bore. You still used a jet kit that we advised you not to use. You were also advised to have the cases split and the cases crank bearings cleared of debris or replaced. Did you have the bore matched to the piston? What is your cylinder to piston clearance? Did you have the head re-machined? Do you know for a fact that your cases are free of piston fragments?
You'd know that I read the posts if you went back and read because I've got at least one comment on just about every page.
My 3 day thesis was because you REALLY needed to have the piston matched to the bore properly, and it was stated a few times. Then you went ahead with the piston you purchased anyway. If it is too tight, you'll have a very high risk of seizure. If it's too loose, you'll have piston slap and break a skirt. Again, I'd like to ask what your piston to cylinder clearance is.
Again, I'd like to ask what your piston to cylinder clearance is.
At what point? Top, middle, or bottom? Side to side or front to back?

Six points a used bore should be measured.
I have only put a new piston in an old hoe once, and I still regret it 15 yrs later. Not that I had problems, but just 'cause.
You get the most service life out of a new piston with a fresh bore. When you're at that point cost wise, what's another $60 (+-)
Didnt measure clearance. .the bore still measured within specs after it was honed so piston should b fine right?the cases were split if u will go bk n look and bearings sprayed with pressure washer thn dried with compressed air.the bearings looked clean and rolled freely without ne friction.the jet kit was already ordered b4 i knew about not usin a kit otherwise i wouldnt haveIf you reference the 3rd page...
You said you ordered a piston before you were advised that it needed a bore. You still used a jet kit that we advised you not to use. You were also advised to have the cases split and the cases crank bearings cleared of debris or replaced. Did you have the bore matched to the piston? What is your cylinder to piston clearance? Did you have the head re-machined? Do you know for a fact that your cases are free of piston fragments?
You'd know that I read the posts if you went back and read because I've got at least one comment on just about every page.
My 3 day thesis was because you REALLY needed to have the piston matched to the bore properly, and it was stated a few times. Then you went ahead with the piston you purchased anyway. If it is too tight, you'll have a very high risk of seizure. If it's too loose, you'll have piston slap and break a skirt. Again, I'd like to ask what your piston to cylinder clearance is.
Last edited:
This is wat was done from start to where i am now...keep in mind i have 5 kids and not a big budhet to do this....first i took everything of down to bare frame n repainted evething on it..then we took motor apart and split cases. Then i pressure washed the cases all bearings and crank then dried with compresses air they looked clean and had no friction when turned.once the seals got here monday we put in seals as we went along in the rebuild eventually putting cases back together (with yamabond) after we lapped the case.honed the cylinder and it measured within specs...installed piston kit...cleaned up tha head..with motor back together we leaked tested and there was no leaks..its all bk together except for chain throttle cable and carb...will rejet carb today and try to start it...ne thing else i need to do?
Yes also put a lil silicone on seals to help hold it inYeah! There we go! Did you oil the internals during assembly?
Did you have the head re-cut or machined back to factory spec?
Those detonation pits equate to greater heat absorption of the heat from the flame path due to increased surface area and can increase the risk of detonation. Unless you're running some high compression or approaching a lean mixture, I think you'll be fine.
Those detonation pits equate to greater heat absorption of the heat from the flame path due to increased surface area and can increase the risk of detonation. Unless you're running some high compression or approaching a lean mixture, I think you'll be fine.
I cleaned it up with a wire brushDid you have the head re-cut or machined back to factory spec?
Those detonation pits equate to greater heat absorption of the heat from the flame path due to increased surface area and can increase the risk of detonation. Unless you're running some high compression or approaching a lean mixture, I think you'll be fine.
I am afraid that a simple cleaning with a wire brush is not really going to cut rubber.
It would pay to have the blemishes cut out!
It would pay to have the blemishes cut out!
No need to plug chop under 3/4 throttle if your float level, needle and idle settings are correct.
The main jet only comes into play at 3/4 throttle and above.
The main jet only comes into play at 3/4 throttle and above.
Ok...its running now so im gonna run 2 tanks of fuel at half throttle then change plug and plug chop...i have the 300 main in nowNo need to plug chop under 3/4 throttle if your float level, needle and idle settings are correct.
The main jet only comes into play at 3/4 throttle and above.
Before you make the plug chop run it is important that the float level is correct, the idle is set correctly and there are no air leaks in the system, otherwise the smoke ring may lie about the AFR.
WHEN ALL OF THE ABOVE ARE CORRECT PROCEED WITH THE FOLLOWING.
Warm up motor to operating temp.
Fit new B8ES plug, ride WOT through the gears and hold WOT in 5th or 6th gear for 10 seconds, or as long as you can safely.
Switch off the motor and pull in the clutch, apply brakes to come to a stop quickly.
Take the plug out and replace the old one for the ride home.
Carefully cut the threaded end off the plug to expose the insulator.
There should be a smoke ring of a cardboard or biscuit colour around the insulator.
If it is non existant or a very light colour, you are lean and require a larger main jet.
If it is a lot darker you are rich and may go down a size in main.
I prefer to run a little on the darker side, I may loose a little power but it is worth it for the peace of mind that I won't need a rebuild so soon.
You have to get up a reasonable speed so that you can get the motor to pull strongly.
Then hold it Wide Open Throttle (WOT) for 10 secs or as long as you can.
The idea is not to get speed but to make it pull strong at full throttle to get onto the main jet circuit.
I find I can safely do it on a short run by applying the brakes some.
If you have not enough room you can use 4th or 5th gear with good results.
G
Ive ran almost 2 tanks at only half throttleyesterday and today i go full throttle n it still boggs down but the 3/4 throttle problem is gone...wat could it b now and should i go bk to stock exhaustBefore you make the plug chop run it is important that the float level is correct, the idle is set correctly and there are no air leaks in the system, otherwise the smoke ring may lie about the AFR.
WHEN ALL OF THE ABOVE ARE CORRECT PROCEED WITH THE FOLLOWING.
Warm up motor to operating temp.
Fit new B8ES plug, ride WOT through the gears and hold WOT in 5th or 6th gear for 10 seconds, or as long as you can safely.
Switch off the motor and pull in the clutch, apply brakes to come to a stop quickly.
Take the plug out and replace the old one for the ride home.
Carefully cut the threaded end off the plug to expose the insulator.
There should be a smoke ring of a cardboard or biscuit colour around the insulator.
If it is non existant or a very light colour, you are lean and require a larger main jet.
If it is a lot darker you are rich and may go down a size in main.
I prefer to run a little on the darker side, I may loose a little power but it is worth it for the peace of mind that I won't need a rebuild so soon.
You have to get up a reasonable speed so that you can get the motor to pull strongly.
Then hold it Wide Open Throttle (WOT) for 10 secs or as long as you can.
The idea is not to get speed but to make it pull strong at full throttle to get onto the main jet circuit.
I find I can safely do it on a short run by applying the brakes some.
If you have not enough room you can use 4th or 5th gear with good results.
Similar threads
- Replies
- 3
- Views
- 390
- Replies
- 5
- Views
- 231