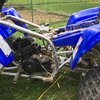
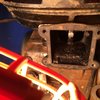
Which seal is that and how can I order a new one? I bought my first four wheeler a few days ago ( 2000 blaster) it drives good and starts and idles but blows some white smoke till I drive it when I start it. So I made a leak down tester thanks to all the info on here !! Anyways I found some glue/ caulk on the very bottome on the engine under some old grease that I didn't see when I bought it. I apologize I don't really know what's what but if you are looking at the bottom it's in the bottom middle where the two sides come together it looks like there's a plug near by it was bubbling when I did the leak down test.
Seal on bottom middle?
- Thread starter Scheel
- Start date
You are using an out of date browser. It may not display this or other websites correctly.
You should upgrade or use an alternative browser.
You should upgrade or use an alternative browser.
I know! But I put it all up for the night I'll get one tmrw. Basically I think the crank case is on the bottom? But it's the seal that connects the two sides if you spilt it in half
there is no seal or gasket between the cases, just a thin coat of yamabond between lapped flat case halves.
it sounds like the previous owner dropped a piston skirt at some point, which pieces got jambed thru the cases by the crank, then jury rigged it and made it your problem.
you either try to keep that sealed....if you like playing the lottery
or do it right and tear it down and replace whichever case halve is broke.
So should I buy something like this and replace everything while it's open or is there a better kit
https://www.amazon.com/gp/aw/d/B00NP79KSI?pc_redir=T1
http://www.motosport.com/product?ps...=WIS-CR-YZ85&gclid=CLCn_rWXic0CFQcMaQodWUAP1w
https://www.amazon.com/gp/aw/d/B00NP79KSI?pc_redir=T1
http://www.motosport.com/product?ps...=WIS-CR-YZ85&gclid=CLCn_rWXic0CFQcMaQodWUAP1w
Don't spend $522 on a wiseco crank.
There are terrible reviews about their cranks.
Call Ken at ... http://kenoconnorracing.com/
Way better prices and done CORRECTLY!
Rebuild that stock crank and smile.
The stock crank is the one you want...Japanese quality!
Give Ken a call and see how much you cand save while doing it CORRECTLY.
There are terrible reviews about their cranks.
Call Ken at ... http://kenoconnorracing.com/
Way better prices and done CORRECTLY!
Rebuild that stock crank and smile.
The stock crank is the one you want...Japanese quality!
Give Ken a call and see how much you cand save while doing it CORRECTLY.
Sorry to inform you but you will have to split the case open to fix that leak.
You may need to lap the two halves.
You may need to lap the two halves.
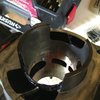
It looks like this piston is shot right? Also had a hell of a time getting the piston pin out.
And should there be play in the rod left to right?
The bearing the the piston pin went through also just fell out when I got the piston off
And what's up with all the black stuff behind the reed valve
And should there be play in the rod left to right?
The bearing the the piston pin went through also just fell out when I got the piston off
And what's up with all the black stuff behind the reed valve
Attachments

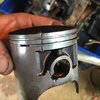

That's just pant, clean any loose stuff !!!It looks like this piston is shot right? Um, doesn't look good does it ?
Also had a hell of a time getting the piston pin out. Not totally uncommon, Clymers Repair Manual shows how to do it easily. Rigged up puller of sorts.
And should there be play in the rod left to right?
Small end or big end ?? Big end side clearance, .016-.028 , radial clearance .0008- .0014 (up/down wiggle) small end side play .031 - .039" all spec's in inches.
The bearing the the piston pin went through also just fell out when I got the piston off
Piston pin bearing just kind of floats in the small end .
And what's up with all the black stuff behind the reed valve
Looks like you got a bit of work ahead of you
 Either get a Clymers Repair Manual or find the online PDF, plus O'CONNOR vids on Utube. Now for the bad news You REALLY should have cleaned the outside of the engine far better BEFORE taking it apart Grains of sand are 10X bigger than clearance on most internal parts. A human hair is bigger than the piston to cylinder clearance.
 Listen to what Larry is saying. Good...no,... make that great advice.
That piston looks like it had a circlip migrate to the comustion chamber, or possibly a roller from the rod bearing. Have any photos of the cylinder bore to see the damage?
Now here's my take on things, and what I would do...
This engine will need a full top to bottom "go- through".
That doesn't mean breaking the bank, that just means putting your hard earned money where it counts.
REQUIRED PARTS \/ \/ \/
1... New piston "kit" matched to a PROPERLY machined and honed cylinder.
2... "PROPERLY" rebuilt stock crank shaft. (stock cranks = HIGH QUALITY)
3... New "QUALITY" seals. I prefer OEM.
4... OEM cylinder base gasket.
5... Have the case halves "Lapped" for proper sealing.
Send it here for the best price you'll find for QUALITY work which includes a quick turn around time. You will be surprised!
http://kenoconnorracing.com/ (860) 230 - 5003
The reason I mention Ken, is because he does more blaster engines than ANYBODY, so he know them well.
Just give him a call and see where it takes you. Do it ONCE properly, not 2, 3, 4 times or more because your trying to save that elusive dollar.
I/we know you can do it! Your about 1/3 of the way there right now!
Go baby go!
Your right I should have cleaned it before won't do that again! I plan on dipping evening in diesel and cleaning before reassemble.
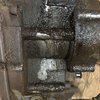
You can see where the piston scored the cylinder on the pic I think. Does this mean it will need bored?
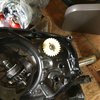
Also they took out the oil system and were running the mixed fule so I can I just take out the plastic gear?
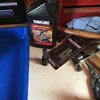
And a local shop had a flywheel puller! Ha
Thanks everyone
You can see where the piston scored the cylinder on the pic I think. Does this mean it will need bored?
Also they took out the oil system and were running the mixed fule so I can I just take out the plastic gear?
And a local shop had a flywheel puller! Ha
Thanks everyone
Attachments
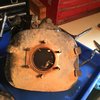
more possible good news is....I don't see the cases broken, unless it's hiding under all that goo ?
so you may not have to buy a case halve(s) ?
get them apart and cleaned and let us have more pics of the bottom cases to look for damage
you'll need a flywheel removal tool, a clutch holding tool and a 2/3 jaw harmonic puller.
others may disagree, but a hammer is not one of my rebuilding tools.
some helpful threads/vids:
http://www.blasterforum.com/threads/blaster-engine-disassembly-vid.42997/
http://www.blasterforum.com/threads/kor-engine-assembly-vids-no-crank-puller-needed.51169/
http://www.blasterforum.com/threads/flywheel-to-crank-lapping-vid.58463/
yes, remove gearwere running the mixed fule so I can I just take out the plastic gear?
I'm almost certain from the condition of the rest of the engine, you'll need a new bore/piston.
let who ever is doing your work determine that (better than us guessing from pics)
Similar threads
- Replies
- 3
- Views
- 697