That sucks, i hate to see people spend there hard earned money on motor work and end up getting F!@#$%!
metal slivers in new build
- Thread starter liminlime_2005
- Start date
You are using an out of date browser. It may not display this or other websites correctly.
You should upgrade or use an alternative browser.
You should upgrade or use an alternative browser.
Well I hope it all works out for you bro. Just don't make any hasty decisions you will regret later (like selling it for dirt cheap.) I know it gets frustrating at times, but that's what makes it all worth it in the end.
I’m pretty sure I know what you’re dealing with. The rod of a 3mm stroker crank will hit the cases on some engines. Vito’s suggests adding some clearance at the top of the cases to correct this problem. The only way to know if the rod is going to hit is to assemble the engine. Knowing this up front, we automatically add the clearance on our stroker builds and do a mock up assembly to make sure we’re not going to have any clearance issues. Once we know we’re all set, we disassemble the engine and put it together for real. My bet is that your “builder” assembled your top end and found he had a clearance problem so he removed the cylinder and ground the cases with crankshaft still installed. Some of the filings fell into the crankcase and made their way into the cylinder. Keep in mind that if the shards are in the cylinder, they’re probably in your exhaust pipe as well and will continue to show up in the cylinder if you don’t clean the pipe. I suggest a complete disassembly to remove the aluminum chips. Pictures would really help Boss.

I read this and thought to myself, what a sh*tty deal this poor guy got.
I PM'd him and told him to ship his engine to the shop and we would get him fixed up.
Delmas paid for the ride both ways and I agreed to sell him the parts he needed at my cost with NO LABOR CHARGE. I have no warranty work so I figured what the hell. LET’S HOOK A BROTHER UP!
My buddy Dave pulled the engine apart and documented everything that he found wrong. The following is a list of his findings and what we did to correct them.
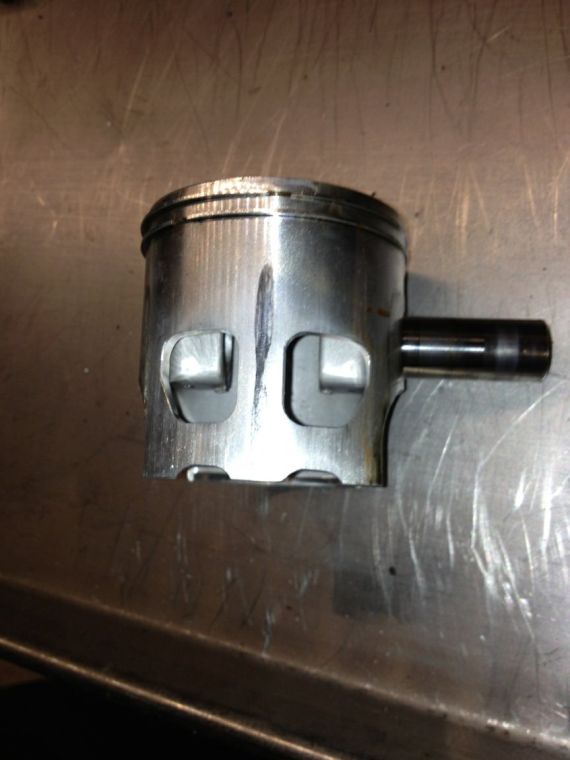
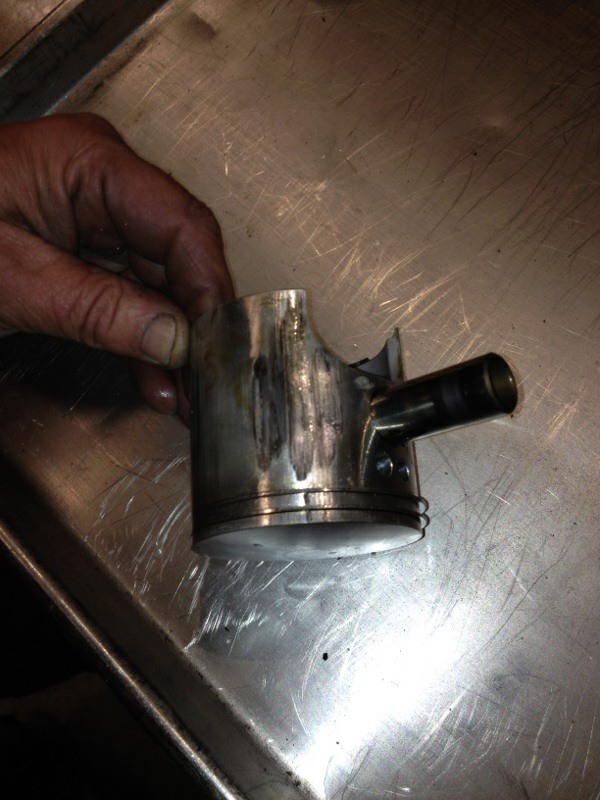
The first two pictures are of the piston we pulled out of the engine. The piston is galled and seized. This was nothing that Demlas did wrong. We measured the piston to cylinder wall clearance and found that we had .0012” of clearance. Wiseco recommends .002” for their Blaster pistons. Any engine in the state of tune that Delmas paid for should be running .003”. This is where all of the metal flakes came from.
We bored the cylinder to an oversize piston and set the clearance to .003’.
The next picture is of the primary crank seal. It’s a bit fuzzy but the seal is sticking out of the case by .125 Sloppy work at best.
We installed new seals and set them at the proper dimension.

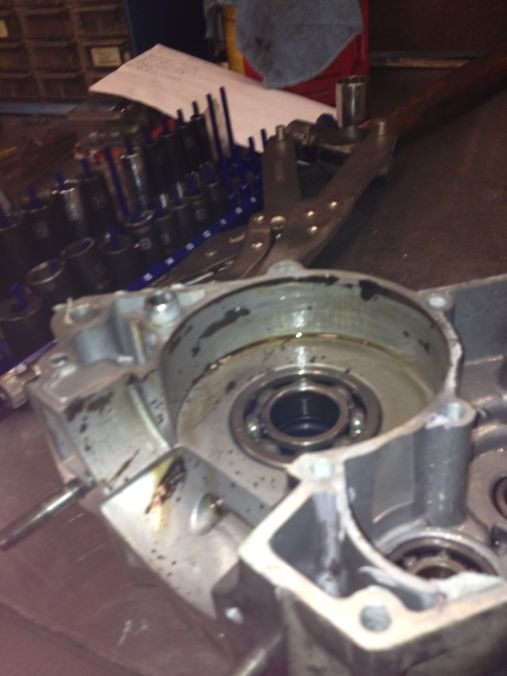
The next picture is a shot of the transmission bearing sticking out of the case. That bearing should be flush with the surface of the case. Not his problem but it was going to be another issue down the road.
We set the bearing to the proper dimension, used Locktight on the outer race and peened the case around the bearing.

Next shot is of the crap that the builder left in the cases. Yamabond is my best guess. Here’s my philosophy, “If you charge a guy over $1000 to build an engine……………….clean the thing”!!!!!
We used the ultrasonic cleaner to clean all of the engine parts.
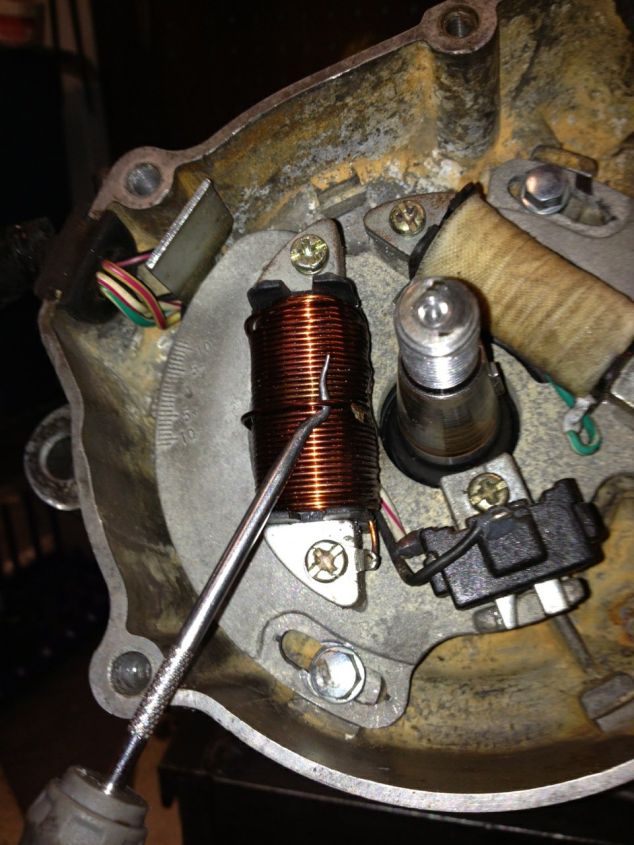
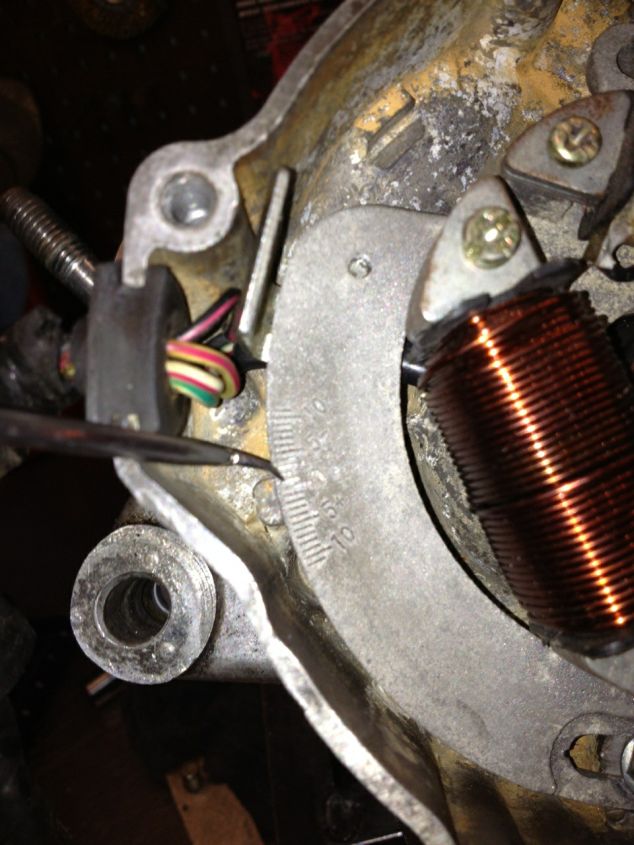
Here’s where I tossed my lunch. The next picture is of the stator plate. This was a Ricky Stator plate. The “builder” didn’t set the plate inside of the three guides. The picture shows how the plate was installed on top of the alignment boss. This caused the plate to distort and break one of the coil wires as seen in the next picture.
We couldn’t fix this. I gave Delmas a used stator plate.

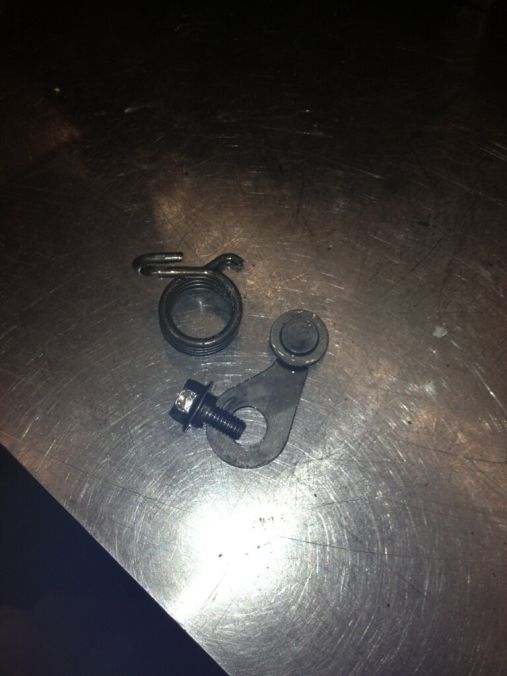
The next shot is of the shift cam bolt. No locktight.
We installed it and used Locktight on the bolt.
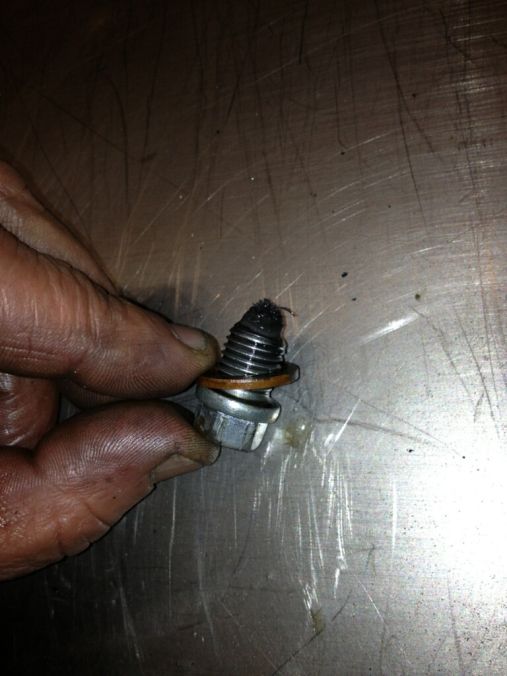
The last shot is just the drain plug with a bunch of crap on it. My guess is that it was never removed during the assembly.
Here are a few of my observations.
The porting was clean and looked professional. Delmas requested a trail port. I tossed my degree wheel on it and found the exhaust port duration to be at 200 degrees and the transfers to be at 130 degrees. These are drag porting numbers boys. No doubt it’s fast but good luck in the tight stuff or up long hills.
We did nothing to correct this.
The finish cut on the cylinder head was horrible.
I cut the head so it would seal properly.
The new engine was filthy. Here’s my philosophy “If you’re paying good money to have an engine rebuilt, it should be returned to you working perfect and clean as a surgical instrument.
The end of the crankshaft on the stator side was cut down. I see no reason to do this other that the crank was pounded out of the engine at some point in its life.
The builder (Wildcard) charged Delmas for new main bearings. The retaining cage on one of the bearings was cracked. The bearings were used. I installed new bearings and told Delmas not to worry about it. On me.
We shipped the engine back to Delmas after checking it on our kicking stand to insure it was at 160psi.
I called him on Saturday and all is well.
My summation of this build is that it was rushed by the previous builder and he could care less about his work or his customers. Too busy, too tired or too lazy to do the job right. Very sloppy work at best. We’re glad we could help Delmas sort this mess out. It was also cool to see the work our “competition” is shipping to their customers. If what we saw is par for the course, KOR will be on top of the pile for a very long time.
I PM'd him and told him to ship his engine to the shop and we would get him fixed up.
Delmas paid for the ride both ways and I agreed to sell him the parts he needed at my cost with NO LABOR CHARGE. I have no warranty work so I figured what the hell. LET’S HOOK A BROTHER UP!
My buddy Dave pulled the engine apart and documented everything that he found wrong. The following is a list of his findings and what we did to correct them.
The first two pictures are of the piston we pulled out of the engine. The piston is galled and seized. This was nothing that Demlas did wrong. We measured the piston to cylinder wall clearance and found that we had .0012” of clearance. Wiseco recommends .002” for their Blaster pistons. Any engine in the state of tune that Delmas paid for should be running .003”. This is where all of the metal flakes came from.
We bored the cylinder to an oversize piston and set the clearance to .003’.
The next picture is of the primary crank seal. It’s a bit fuzzy but the seal is sticking out of the case by .125 Sloppy work at best.
We installed new seals and set them at the proper dimension.
The next picture is a shot of the transmission bearing sticking out of the case. That bearing should be flush with the surface of the case. Not his problem but it was going to be another issue down the road.
We set the bearing to the proper dimension, used Locktight on the outer race and peened the case around the bearing.
Next shot is of the crap that the builder left in the cases. Yamabond is my best guess. Here’s my philosophy, “If you charge a guy over $1000 to build an engine……………….clean the thing”!!!!!
We used the ultrasonic cleaner to clean all of the engine parts.
Here’s where I tossed my lunch. The next picture is of the stator plate. This was a Ricky Stator plate. The “builder” didn’t set the plate inside of the three guides. The picture shows how the plate was installed on top of the alignment boss. This caused the plate to distort and break one of the coil wires as seen in the next picture.
We couldn’t fix this. I gave Delmas a used stator plate.
The next shot is of the shift cam bolt. No locktight.
We installed it and used Locktight on the bolt.
The last shot is just the drain plug with a bunch of crap on it. My guess is that it was never removed during the assembly.
Here are a few of my observations.
The porting was clean and looked professional. Delmas requested a trail port. I tossed my degree wheel on it and found the exhaust port duration to be at 200 degrees and the transfers to be at 130 degrees. These are drag porting numbers boys. No doubt it’s fast but good luck in the tight stuff or up long hills.
We did nothing to correct this.
The finish cut on the cylinder head was horrible.
I cut the head so it would seal properly.
The new engine was filthy. Here’s my philosophy “If you’re paying good money to have an engine rebuilt, it should be returned to you working perfect and clean as a surgical instrument.
The end of the crankshaft on the stator side was cut down. I see no reason to do this other that the crank was pounded out of the engine at some point in its life.
The builder (Wildcard) charged Delmas for new main bearings. The retaining cage on one of the bearings was cracked. The bearings were used. I installed new bearings and told Delmas not to worry about it. On me.
We shipped the engine back to Delmas after checking it on our kicking stand to insure it was at 160psi.
I called him on Saturday and all is well.
My summation of this build is that it was rushed by the previous builder and he could care less about his work or his customers. Too busy, too tired or too lazy to do the job right. Very sloppy work at best. We’re glad we could help Delmas sort this mess out. It was also cool to see the work our “competition” is shipping to their customers. If what we saw is par for the course, KOR will be on top of the pile for a very long time.
nice nice nice, I hate sloppy engine builders like the one delmas had to deal with, this is why I don't trust my quad to any motorcycycle shop
That is awesome Ken! You are one hell of a guy. I'm sure Delmas was happier than a camel on hump day I:I
That is awesome Ken! You are one hell of a guy. I'm sure Delmas was happier than a camel on hump day I:I
Last edited by a moderator:
I love that commercial!
Man you guys out did your selves (ken and crew). My motor I have never seen this clean. When i recieved my engine from the stroker build, it was hosed and sprayed paint ontop of dirt. You guys really hooked me up. I got it mounted and it sounds so clean and smooth. Before it was always really noisy. Finished my heat cycles and have been jetting my carb when I have time. She runs like a beast though. Thanks a million ken
Would anyone be interested in talking me through jetting my pj 34mm carb? I have a lot of jets but their not genuine jets. I bought oem style jets from jetsrus.com. I have a few differ needles as well.
Would anyone be interested in talking me through jetting my pj 34mm carb? I have a lot of jets but their not genuine jets. I bought oem style jets from jetsrus.com. I have a few differ needles as well.
i run that carb, break it down into seperate steps and jetting doesn't seem to bad, start at the bottom with float height, then work up thru the jetting ranges.
do not move to the next range until you get each one correct. plug chops for the main jet last
1. be sure it's spotless...
http://www.blasterforum.com/carburetor-138/how-clean-your-carb-pics-209/
2. set/check float height, it must be within the spec'd range...
http://www.blasterforum.com/carburetor-138/float-heights-how-adjust-them-50565/
(16mm for that PJ)
3. 45-50 pilot, adjusted like this......
http://www.blasterforum.com/carburetor-138/adjusting-your-airscrew-pilot-jet-51060/
4. "DGH" or "CEL" needle,
i've tried both
@ 1800+ ft. elevation, mine likes the leaner DGH.
lower elevations may require the CEL
start in the middle clip position, tune 1 position up or down according to the symptoms if needed until it pulls hard.
drop the clip 1 to give it more fuel, if the symptoms get worse, go 1 above middle to lean it a little
if you need to be in the top or bottom clip position, you've got the wrong needle, IMO
5. 155 - 165 main jets, start large and plug chop each, working down until perfect......
http://www.blasterforum.com/carburetor-138/how-plug-chop-53237/
Our bike with a 34pj is just about the same as AWK's specs. We run a 55 pilot, 155 main, cel needle on second slot, and 1.25 turns out on the air screw. The jetting is perfect FOR US at sea level. Your bike may differ some. The carb works great.
wow thanks yall. with the easy to follow step by step, should have no probs getting my carb tuned in. i will doing some jetting tomorrow, i will post back and you yall know how its going.
don't forget, the choke knob screws out(up) to act as the idle adjust.
even with a 6.0 slide, mine likes the slide pulled up slightly with the throttle cable adjusted tight at the thumb throttle to idle nicely ?
don't be afraid to try that if idle gives you trouble, then fine tune with the choke knob
even with a 6.0 slide, mine likes the slide pulled up slightly with the throttle cable adjusted tight at the thumb throttle to idle nicely ?
don't be afraid to try that if idle gives you trouble, then fine tune with the choke knob
damn i need a micrometer or something to measure the float bowl. i was gonna buy one but way 45.00+ tax for something i may use just a few times.
damn i need a micrometer or something to measure the float bowl. i was gonna buy one but way 45.00+ tax for something i may use just a few times.
Try an auto store or something, my shop teacher got carbon fiber ones for $10 each. We got ours for like $12
Similar threads
- Replies
- 0
- Views
- 60