Newb 94 blaster resurrection
- Thread starter tbrooks
- Start date
You are using an out of date browser. It may not display this or other websites correctly.
You should upgrade or use an alternative browser.
You should upgrade or use an alternative browser.
What mods are you going to be running? 300 might not be too big, but that'll be determined by the first question. If you mentioned it sooner, just tell me because my internet is just a touch over dial up speed lol.
The last Blaster that I ported ran a 310 with a pipe, filter, and no airbox lid. Granted, that was with a mild port.
The last Blaster that I ported ran a 310 with a pipe, filter, and no airbox lid. Granted, that was with a mild port.
Yeah it was the long post before my last one, but here it is again so you don't have to look: I've got lid removed, uni filter with outerwears cover, full fmf, premix 32:1, and Ken just bored it to 66.5, no porting or mods, just didn't have the cash  My break-in period will mostly be around 3200 feet, but there maybe a trip or 2 to a nearby park at 2000 feet and a friends property (actually close to the park) which varies from 4000 to 5000. I figured I would go with a 290 for now and maybe go to 300 if I go to the park or do you think that's too rich? Oh and I didn't mention temps in summer time normally run in the 80's
My break-in period will mostly be around 3200 feet, but there maybe a trip or 2 to a nearby park at 2000 feet and a friends property (actually close to the park) which varies from 4000 to 5000. I figured I would go with a 290 for now and maybe go to 300 if I go to the park or do you think that's too rich? Oh and I didn't mention temps in summer time normally run in the 80'sThanks man. Just so you know your knowledge is appreciated around here, I've read a lot of your posts, its good stuff. So since I got you here, I read awhile back you posted about the timing advance, and from what I remember that seems it would not be much to my benefit? Honestly I'm not really worried so much on the performance end near as much as reliability and longevity
That's a day maker. I really appreciate it!
Now for timing, I've always liked to adjust timing for the RPM range where I'm going to be using the engine the most. Advancing the timing to anything before top dead center will put extra stress on the piston, pin, bearings, rod, big end bearings, crank, and crank bearings, but the reality is that 99% of all internal combustion engines run advanced timing and function perfectly well for very long periods of time. It will affect reliability, but this effect is so negligible with all but extreme cases that component failure will almost always be caused by another factor. A reduction in timing will always shift the emphasis to the lower RPM range whereas an increase in advance will do the same for higher revs.
Take ECU tuning for example.
The method we used when I was still involved was to set the timing across the board, 200rpm-redline and 14 other points in-between, as well as throttle openings for 0-100%, and boost levels at 16 ranges to zero. Once we made a pull, we'd adjust timing by 2-3 degrees and make another pull. Once power started dropping at any one range OR we saw detonation, we'd reduce timing to the previous setting for that block. 100% of my experience shows that the lower RPM ranges required less timing for optimum power and the higher RPM range required more. This varied by as much as -5 for startup (240rpm, typically) to over 30 advance at 8k.
Though it is unrelated, I think you and a few others will get a kick out of this.
We used to set the timing way back (sometimes delayed) for the tables that had 90% or higher throttle openings, under a certain RPM range, and less than 1psi of boost. This made the charge burn so late that it was still burning in the exhaust port and header, which would spool the turbo much quicker. In one instance, we used an ECU that had no launch settings and used an extra analog input that was routed to a clicker that was mounted to the clutch pedal. When the clutch pedal was depressed and the ECU saw load (throttle opening), the ECU would hold back timing by a huge amount to spool the turbo without having to rev the engine to the moon to do so. When the driver saw boost levels that he wanted to see, he'd drop the clutch which would release the switch, throwing the code off at the ECU, adding the timing back and making full power at full boost. AKA, boiling rear tires in most cases.
In the instances where the driver needed to continue to rev we'd held back the timing by just a small amount and add fuel to create the same late burning effect while still allowing the engine to rev and respond due to the timing. This was generally useful for situations where the driver was already moving and just stabbed the throttle. The key to this with street cars was to make this range where the driver could still get to 90mph while cruising (say 25% throttle) and not dump tons of fuel so that he could see decent gas mileage. As a result, we generally wouldn't hold back timing or add fuel unless the ECU read a load of 5% more than typical cruising throttle opening.
Of course, we'd do all that was necessary to make full power with 100% openings. If the owner wanted to make full power without race gas or ethanol, we would often run into a situation where we might have to add fuel to combat knock because the timing requirement for max power was so high. 11:1 AFR and 25deg timing might not make as much power as 10.5:1 AFRs and 27 degrees of advance. The glory of race gas is that we could run that 11:1 AND the 27 degrees of advance AND more boost.
Just a few thoughts.
As for static ignition, static fuel, N/A applications like a Blaster, getting the AFRs correct and then adjusting timing would be the optimum route. Also, a more efficient head will allow for less timing to make full power, which would result in even more power due to a decrease in pumping losses. If I was you, I'd go ahead and tell KOR that you wanted the head cut for whatever he charges. IIRC, he charges $60. Best $60 that you'll ever spend.
Last edited by a moderator:
I wish that I could, but I've already put a lot into what was a "free" blaster and my budget just won't allow. Just too many other things that are much more important, granted its only $60, but I was already a good bit over on what I wanted to spend with Ken. And then I would have wanted port and polish, lightened flywheel, etc lol. That's my fault for not taking on the bottom end myself, but I'm not as mechanically advanced as many on here and being my first 2 stroke vehicle I just wanted it done right the first time.
As to your timing knowledge, most is just barely in my realm of understanding, but that does sound pretty interesting what you did. From what I gather as to my own applications, since I will be riding "trails" (which are actually mostly old logging or forest service roads), it sounds as though I should just leave it be. I believe I will have more than enough low end power with the FMF, and I don't think I would really use extra in the higher end.
Thanks again man you are wealthy with engine knowledge. If you ever need help fixing anything on a house I'm your man lol
Thanks brooks! I may or may not have this house thing going on lol
I believe that most applications don't require or won't benefit from any timing changes. That being said, it can be done for relatively free and allows a bit more fine tuning. For trails, stock timing is best IMO.
I believe that most applications don't require or won't benefit from any timing changes. That being said, it can be done for relatively free and allows a bit more fine tuning. For trails, stock timing is best IMO.
Alright, finally got to here her run today Took a little work though. Last weekend when I got her together when I turned the fuel on it started coming out the overflow. So let me tell you before I put this together, I cleaned the carb 3 times, got a tors eliminator kit and installed, cleaned 2x again. Set my float, with a ruler and gasket in, tried to adjust for it, but that didn't work. So after the overflow prob, I brought it home and put the rebuild kit in (that I had bought for air screw spring). Set the float again, this time with my calipers and gasket out. I had also taken out the petcock and checked the tank filters and swished a little diesel in it to rinse it, hooked it back up and let some gas flow through b4 hooking to the carb. So put it all back together, turned the fuel on today and dribble dribble again. Turned the carb, took the bowl off and checked floats again, and they were dead on. Put it back together and all was well Tried to start her up. 4 or 5 kicks and nothing, turned the key off (to make sure it has continuity the right way since its new) and kicked again and it sounded different Then it occurred to me it was prob flooded from the float sticking, so pulled tank and plug and kicked away. Got it all back together, kicked and blam!! backfire. Kicked a couple more times and she was running After a couple revs it blew out the copper rtv on my fmf. It was a little smoky, but I figured it was from all the oil ken used in assembly. Ran it for about 30 seconds or so and it started bogging when I hit the throttle and then died. Left it alone til tomorrow, in the morn I'll pull the pipe off and clean it and the flange and try some more copper rtv. Do you guys think it was the exhaust leaking that caused it to bog and die? Hopefully tomorrow I'll get it outside and get some pics for all you junkies
Took a little work though. Last weekend when I got her together when I turned the fuel on it started coming out the overflow. So let me tell you before I put this together, I cleaned the carb 3 times, got a tors eliminator kit and installed, cleaned 2x again. Set my float, with a ruler and gasket in, tried to adjust for it, but that didn't work. So after the overflow prob, I brought it home and put the rebuild kit in (that I had bought for air screw spring). Set the float again, this time with my calipers and gasket out. I had also taken out the petcock and checked the tank filters and swished a little diesel in it to rinse it, hooked it back up and let some gas flow through b4 hooking to the carb. So put it all back together, turned the fuel on today and dribble dribble again. Turned the carb, took the bowl off and checked floats again, and they were dead on. Put it back together and all was well Tried to start her up. 4 or 5 kicks and nothing, turned the key off (to make sure it has continuity the right way since its new) and kicked again and it sounded different Then it occurred to me it was prob flooded from the float sticking, so pulled tank and plug and kicked away. Got it all back together, kicked and blam!! backfire. Kicked a couple more times and she was running After a couple revs it blew out the copper rtv on my fmf. It was a little smoky, but I figured it was from all the oil ken used in assembly. Ran it for about 30 seconds or so and it started bogging when I hit the throttle and then died. Left it alone til tomorrow, in the morn I'll pull the pipe off and clean it and the flange and try some more copper rtv. Do you guys think it was the exhaust leaking that caused it to bog and die? Hopefully tomorrow I'll get it outside and get some pics for all you junkiesAssembly oil and flooding can be a reason for excessive smoke the first time starting after a rebuild.
You should fit a new donut seal in the exhaust, not rely on RTV, it is not a substitute for a compressible gasket.
Can I be so bold as to ask if the inlet is air tight.
You should fit a new donut seal in the exhaust, not rely on RTV, it is not a substitute for a compressible gasket.
Can I be so bold as to ask if the inlet is air tight.
I have a proper oem exhaust gasket, it is between the fmf pipe and flange that it was leaking. Leaktest was good, but I may do it again since that backfire. I have my suspicion about the clamp on the reed boot for the carb. It looks to me like factory, its one that has a screw and nut so it only tightens so far, and the screw tightens all the way til it meets the 2 halves. It would make me feel better if I felt some tension on the screw before that happens. I may take it off and throw on a regular hose clamp, but it would be wider and not fit in the groove around the boot properly.
Since I got home I've been pondering as to weather I had the fuel turned on or not lol, surely I did just can't remember now. I was in a rush to get home so the babysitter could leave
the way you desribed it dying is classic "fuel not turned on"
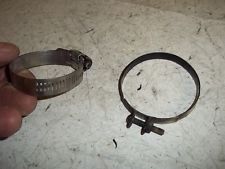
It is like the clamp on the right
those larger clamps have a tendency to weiner sideways when tightened over the groove, and been known to cut into the boot.
how bout a ty-rap with the locking head cut off, wrapped around under the original clamp ?
(never tried that, just came to me)
the way you desribed it dying is classic "fuel not turned on"
That's what it seemed like after I thought about it, but surely I'm not that dumb lol. I do tend to forget things when excited/rushed. The first thing they taught us in electronic engineering is when on a call check all the o-n/o-f-f switches.
That's kinda what I thought about the larger clamp. I'll redneck engineer something for itthose larger clamps have a tendency to weiner sideways when tightened over the groove, and been known to cut into the boot.
how bout a ty-rap with the locking head cut off, wrapped around under the original clamp ?
(never tried that, just came to me)
well my gf got home so I ran back to the shop for a few. Loosened the screws and turned the carb and nothing came out the overflows doh! Took the exhaust off and cleaned it and the flange and got it back on with some copper rtv. Kinda scared to put a lot, that it might get sucked back in the engine, so hopefully that does it. After I get the hub and cv axle in my car tomorrow I'll be putting the finishing touches on this bad boy and come sunday I'll be back on heat cycles
doh! Took the exhaust off and cleaned it and the flange and got it back on with some copper rtv. Kinda scared to put a lot, that it might get sucked back in the engine, so hopefully that does it. After I get the hub and cv axle in my car tomorrow I'll be putting the finishing touches on this bad boy and come sunday I'll be back on heat cyclesFirst heat cycle is done!! Found some cable ties and used under both clamps. Its apain to get em in there but it works well! I may tape em to the boots to make it easier. She ran well, still smoky at first but it cleared up pretty quick. Doesn't want to idle though. I have tors eliminater, the new idle screw doesn't seem to start doing anything till there's only a 1/4" of it left and all the way in it opens about a 3/16" gap, looking from the filter side, does that sound about right? Cap is on oil nipple, top was tight. Its got a new rebuild kit in it, only thing I didn't put was the needle, clip, pilot, and choke seal, but I'm gonna do the latter 2 now and clean everything again. Exhaust seal appears to be holding good now. 2nd heat cycle after lunch and then I'm putting new sway bar links in the gf car and hopefully it will cool off by 3 so I can heat cycle before I bring the baby home for a nap
Heat cycles are done!! Gonna let it cool and hopefully my gf won't be working too late. May have to take the baby back with me to re-torque and leak test. Still can't get it to idle. Couldn't replace the pilot jet cause I didn't have the right screwdriver here, so when I go back over I'll do that and get the carb cleaned one more time.
My key switch won't kill it either. Keeps it from starting though. I have no clue why that is, unless its my cdi. Key wires, one goes straight to b/w on cdi other end goes str8 to ground. Starts first kick every time. I even left the gas on after the second heat cycle to double check and make sure it wasn't gonna flood again.


Ken painted my clutch cover and stator cover He called to ask me but I was pouring concrete that day and couldn't get back to him, guess he didn't like my green. I'm not worried about it now just wanna be done. Still gotta get a bar pad, a couple decals, and a rear six pack rack. Just gotta get my ebay funds back up. And gotta get my other set of pegs painted so I can double em up, already got em cut. Someday I'll get rid off those crap yellow stock shocks, but they gotta stay for now... Maybe another teardown this winter if I get ebay rich lol
Gonna let it cool and hopefully my gf won't be working too late. May have to take the baby back with me to re-torque and leak test. Still can't get it to idle. Couldn't replace the pilot jet cause I didn't have the right screwdriver here, so when I go back over I'll do that and get the carb cleaned one more time.My key switch won't kill it either. Keeps it from starting though. I have no clue why that is, unless its my cdi. Key wires, one goes straight to b/w on cdi other end goes str8 to ground. Starts first kick every time. I even left the gas on after the second heat cycle to double check and make sure it wasn't gonna flood again.
Ken painted my clutch cover and stator cover
He called to ask me but I was pouring concrete that day and couldn't get back to him, guess he didn't like my green. I'm not worried about it now just wanna be done. Still gotta get a bar pad, a couple decals, and a rear six pack rack. Just gotta get my ebay funds back up. And gotta get my other set of pegs painted so I can double em up, already got em cut. Someday I'll get rid off those crap yellow stock shocks, but they gotta stay for now... Maybe another teardown this winter if I get ebay rich lolSimilar threads
- Replies
- 11
- Views
- 699
- Replies
- 3
- Views
- 387