Kilowatt Monster

Hey Guys

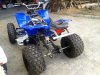
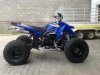
Here are some photo's of my progress. The swingarm fits like a glove! Was really easy to put in. Fitted better then I expected :)

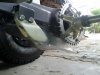
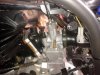
I got some rubber seals to cover the rod ends so they should last a bit longer now. I do not have much left to do before I can start jetting the quad. The jets are on there way from the USA so by the time they get here the quad will be done. I still need to get a longer chain because of the extend swingarm, check that brake line and hand brake cable make it, fit rear calliper, fit sprocket and disc guard, complete air-box mods,bleed brakes, setup front suspension. The only thing that is still giving me problems is the carb, I cant get it to fit on the air-box side. It fits when its not on the quad but when its on the quad I just cant get it on. So tomorrow I will try heat the rubber with hot water and see if stretches and makes things better. I have tried a heat gun but will try hot water because they say that works.
I also have to mod the bumper because the nose cone does not want to fit with the new bumper.

Super Noober, thanks for the advise!

I am starting to see light at the end of the tunnel :)
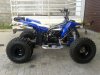
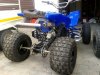
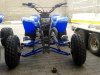
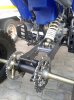
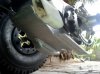
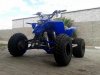
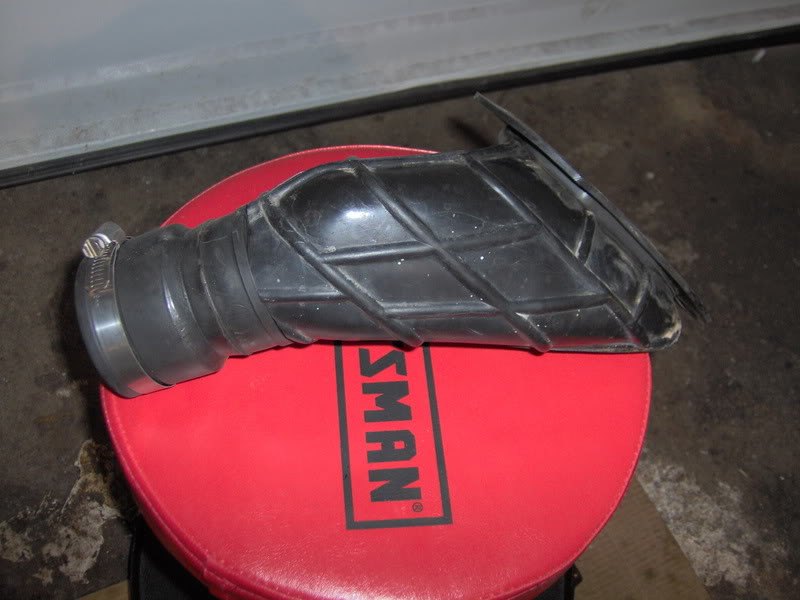
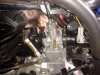
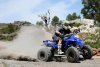
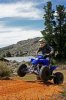
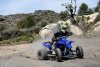
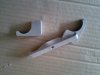
 

Attachments

  • Pic5.jpg
    Pic5.jpg
    95.3 KB · Views: 226
  • Pic8.jpg
    Pic8.jpg
    94.7 KB · Views: 211
  • Pic6.jpg
    Pic6.jpg
    94.9 KB · Views: 239
  • Pic1.jpg
    Pic1.jpg
    93.6 KB · Views: 213
  • Pic4.jpg
    Pic4.jpg
    97.6 KB · Views: 212
Hey

Here are some more photo's of the quad. I got the carb in so I am stoked with that. I also got my jets today so will be jetting the bike this weekend. Just have to get a longer chain because of the swingarm and bleed the brakes. Also I am finished with my belly plate will post photo's of that when its on the bike. The only thing left is to get the bumper to fit but that's next months problem.
 

Attachments

  • pic1.jpg
    pic1.jpg
    89.7 KB · Views: 196
  • pic2.jpg
    pic2.jpg
    91.7 KB · Views: 210
  • pic3.jpg
    pic3.jpg
    93.7 KB · Views: 203
  • pic4.jpg
    pic4.jpg
    86.4 KB · Views: 229
  • pic5.jpg
    pic5.jpg
    91.5 KB · Views: 212
Great build so far! Loving how the swingarm turned out! As you get more money, I'd recommend upgrading your shocks (Works brand shocks are a good bet), but it looks really good as-is. The better shocks will help your handling quite a bit and jumping will be fun again. Lol
 
Thanks Guys! Glad you like the build. I am really happy with the swingarm :)
Got my jets (Thanks to CWP) and chain yesterday so will be riding the bike in this weekend :D
I would love to upgrade the shocks but that's a lot of cash. This really nice guy is giving me he's Banshee front shocks, I should have them next week. Its only a little upgrade but it cheap :)
 
Hey Guys

I need some help please! I have a bought the 30mm OKO carb for my blaster, its also know as the CPW carb. The nice thing about this carb is that it fits really easily onto the intake boot but not so good on the air filter side. When the plastics are off the bike I can get the carb into the boot with some work but when its on the bike I just cant get it on. I have tried a heat gun but the rubber just get soft and does not really stretch. Does anyone have this carb, and can you please help? Do not want to build a new air box but will if I have to. This is one of the last things to do on the build and I really want to get it done! Should I heat the rubber up more? I just dont want it to tear. :(

Try soaking the airbox boot in really hot water for a while then try fitting it to the carb while its still hot.
You can also modify the airbox boot but cutting it back and using a rubber pipe reducer from the plumbing section at a hardware store.
I had to do this to make the stock boot fit my 38mm carb.
IM000017.jpg
 
Hey Paulie

Thanks for the advice! Your reducer job looks really good! I finally found a technique to getting the carb to fit the standard intake boot but it takes some elbow grease :). I have attached a pic of what it looks like.

The quad is now final running after this weekend. I got the chain on and bled the brakes and then took it for a spin and it goes like a bomb. I had some trouble in the begging to get it to idle but I realised that it was the TORS giving me problems and not the carb. When I was at home setting the bike up for the test ride I had the airbox lid off. I modified the airbox lid by cutting a 2"x3" sq hole in it and covered it with a type of outerwear but when I went for the test ride the bike did not want to run right so I took the lid of again and it when like a bomb. Any comments on that? I can’t believe the outerwear restricts flow that much I don’t know. I will post photos of the mod when I get a chance.

I still need to jet the bike right. When I have ridden the motor in right then I will do the plug test. Running 160 main and 50 idle jet right now. Also can any tell me in the pic that I attached the object circled in red is that the ideal screw because it does not seem to so anything?
 

Attachments

  • carb.jpg
    carb.jpg
    92 KB · Views: 199
Hey Blasterboy

Ya I think you are right it is the idle screw just does not seem to do anything when I uses it but its probably because my jetting is not right yet.

Here is a clip of me test driving the quad this past weekend. Will be doing the plug test and jetting in about 2 weeks when I get time. :)

Blaster Test Drive - YouTube
 

Attachments

  • js1.jpg
    js1.jpg
    101 KB · Views: 187
  • js4.jpg
    js4.jpg
    99.3 KB · Views: 200
  • js3.jpg
    js3.jpg
    100.5 KB · Views: 191
nice build man but where did you get the arm from.......sorry if I miss read it

Hey LT

The A-arms I bought off EBay from a company called American Star. ( American Star, The Official Manufacturers Website! ) The actually sent me the wrong a-arms. I asked for the MX Pro model and they sent me the Pro X model. The main problem with that was that the Pro X did not come with your everyday sealed ball joint, it instead came with what I know as a Rod end or Heim joint. The rod end is not sealed and I think it is not going to last because its going to get covered in dust, sand and mud. I found this company online called SealsIt that makes rubber boots for the rod ends. (Check the photos) So I order some but they where not cheap since they had to come from the USA. Seals-It
 

Attachments

  • A-arm.jpg
    A-arm.jpg
    83.7 KB · Views: 169
  • Rodend&boot.jpg
    Rodend&boot.jpg
    86.9 KB · Views: 175
if you are still battling with the intake boot, wedge a fish paste bottle in the boot and boil it on the stove in a pot of water. stretches it permenantly
 
if you are still battling with the intake boot, wedge a fish paste bottle in the boot and boil it on the stove in a pot of water. stretches it permenantly

Hey Blaner

Ya the fish paste bottle is a great idea, I have got the intake boot on but might still do that to make it easier to get on.

I attached my belly plate this past weekend and attached some pics. I also removed the gear inside the 2T pump so that's not doing anything any more. Have always premixed but did not remove the gear now the pump is dead. Should have taken some pics but forgot, its easy to remove anyway.
 

Attachments

  • plate clamps.jpg
    plate clamps.jpg
    83.1 KB · Views: 189
  • b-plate.jpg
    b-plate.jpg
    90.8 KB · Views: 155