did this mod man free power awsome worked great and yes i could def feel the difference......wahoooooo
DIY 4 Degree Timing Advance (Pics)
- Thread starter jwalk1818
- Start date
You are using an out of date browser. It may not display this or other websites correctly.
You should upgrade or use an alternative browser.
You should upgrade or use an alternative browser.
i'm gonna do it when i rebuild, becausei can't risk screwing up my motor before i race and go to the badlands
has anyone had a problem getting the flywheel off?? and whats it mean if theres white stuff all around the inside of that area??
Like the other guy said its probably oxidized or it may be some type of white sealant if its around the thread and the nut. Use a impact to get the flywheel bolt off, after that you need a flywheel puller, i threaded the holes in the flywheel and screwed bolts into the flywheel then just used a regular gear puller i had.
i'm doin this after i rebuild, because i have a veerrrrryyy special engine set up for it and i'm not tellin anybody
i'm doin this after i rebuild, because i have a veerrrrryyy special engine set up for it and i'm not tellin anybody
are you putting on one of those 250 kits???
This is an interesting topic, and a mod like this is fairly common on older motorcycles as well(before they had digital advance curves and such).
Problem is, there's no such thing as "free power" from a motor....everything is a trade off. Yamaha set the timing the way it is because it's the best balance between power and engine life. Advancing your timing will give a bit more power at the expense of greatly increased strain on the motor. Timing is set slightly before TDC to account for the time it takes the fuel to ignite, and ideally is set so the rapid expansion of the fuel happens just after TDC. With the stock timing, it happens later after TDC than it could. On the older Kawi bikes timing advance was a big hit until everybody's motor started going south a year later.
Though I suppose it's in the same category as any hop-up, the OEM made the engine as "tame" as they did in the interest of long life. Kawasaki made this mistake in the 70's with the 750 two-stroke street bikes. They were crazy hopped up right out of the box and were killer fast for their day, but there's none left. There were hardly any left in the 80's, and the only ones left now are by die-hard owners who are content to completely re-do the motor every 10-15k miles. It was a total flop for Kawi, and marked the end of the 2 stroke street bike.
Advancing it too far can destroy the motor. To grasp this you have to think in literally an instantaneous timeframe. Ideally the gas blows up just as the piston is already on it's way back down, with the conrod angled ever so sligtly past vertical. Advance the timing too much and get it just exactly wrong, and the gas will blow exactly as the piston is at TDC with the conrod absolutely vertical. The near instant force load can't be transmitted to the crank with a vertical rod. That's when things break.
So just like any other hop-up that nets you more power, it comes at the expense of reliability and longevity.
I totally disagree with you about the demise of 2 stroke street bikes. It was the tree huggers and EPA , same reason you can't get Banshees and Blasters anymore. The RZ 350 was sold in the US until 1986. As far as "free" power I think they're talking out of pocket. Power does come at a price tho. How many mile do you think a Hybusa would go at 14,000+ rpm before it needs rebuilt? For that matter a YFZ 450 or craptor? Of course this is assumeing 100% perfect maintenance. AA Top Fuel dragster only goes 4 seconds at full power then rebuilt.
Last edited:
i want to do this, but as i got ready to take off the stator plastic cover, the screws are on so tight, its like they are threadlocked on. any suggestions to help getting them off? i dont want to strip them either.
I use a hammer through phillips (p3 size) screwdriver, hit it quite hard with the hammer as your trying to unscrew it. After two or three whacks they usually unscrew. A handheld impactdriver that you hit with a hammer also works great.
I just did this mod, and all I have to say is holy crap!!!!! I have a F7 pipe, reed spacer, and everything else is stock. It made a huge difference in mid range, very, very noticeable difference. Well worth the 20 minutes it toool me to do this.
This is an interesting topic, and a mod like this is fairly common on older motorcycles as well....
Thanks for finally bringing to the surface the bad things that happen with this. I was wondering what bad things it would do but no one said it. And the later comment about tree huggers being the demise of 2 strokes I believe is wrong. I believe that the demise of 2 strokes began because they are so easy and cheap to work on. With that being a fact, the companies weren't making as much money on parts and shops didnt get as much business. A 2 stroke with fuel injection (it's possible) is 25% more "Eco-Friendly" than a 4 stroke.
This is from another website just thought it would be a good DIY here before the other website disappears.
#1 Unplug the connections for the stator wires behind the frame tube next to the CARB.
#2 Remove the stator cover
#3 Remove the flywheel and keyway.
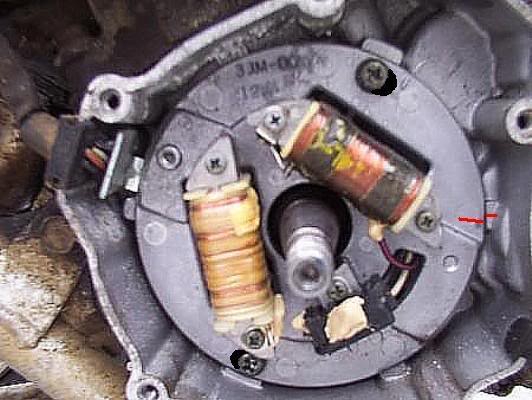
#4 Mark the original stator position with a scribe as in the pic (the red line marks the stock timing location)
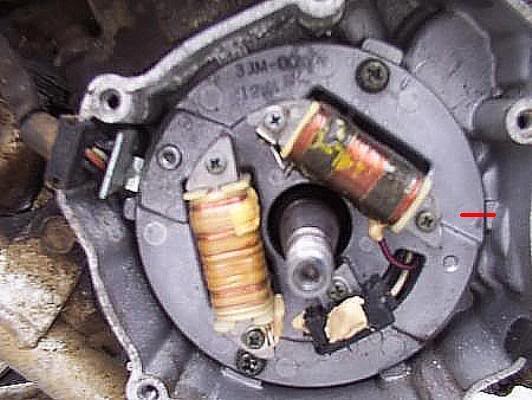
#5 Next remove the stator plate by removing the two mounting bolts
#6 using a scribe measure and scribe a line 3mm to the left of the mounting hole location. This will give you a 4 degree timing advance
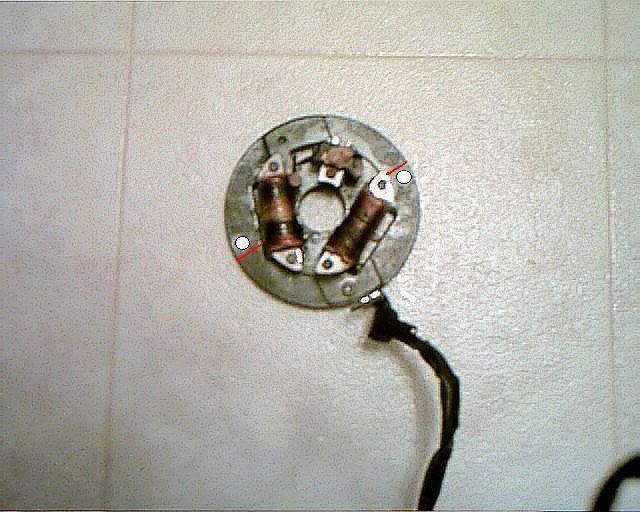
#7 Using a round file or a grinding bit in a dremal tool widen the mounting holes 3mm to the line you just made.
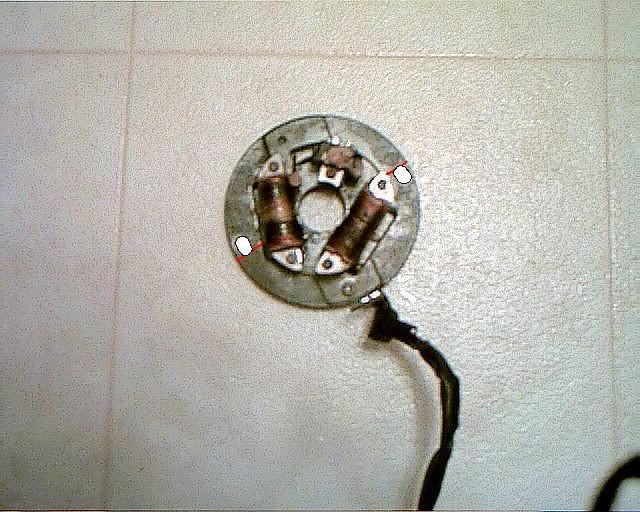
#8 reinstall the stator plate and measure the marks you made in step #4 and make sure the plate can now be turned 3mm.
If you wish you can slot the stator both to the left and right so it's possible to retard the timing for custom applications!
cool,
glad to see my pics are still out there for people to use.
cool,
glad to see my pics are still out there for people to use.
Isn't this from Bluetraxx?
 I remember you posting it there one time. Your legacy is eternal. I:I
This is from another website just thought it would be a good DIY here before the other website disappears.
#1 Unplug the connections for the stator wires behind the frame tube next to the CARB.
#2 Remove the stator cover
#3 Remove the flywheel and keyway.
#4 Mark the original stator position with a scribe as in the pic (the red line marks the stock timing location)
#5 Next remove the stator plate by removing the two mounting bolts
#6 using a scribe measure and scribe a line 3mm to the left of the mounting hole location. This will give you a 4 degree timing advance
#7 Using a round file or a grinding bit in a dremal tool widen the mounting holes 3mm to the line you just made.
#8 reinstall the stator plate and measure the marks you made in step #4 and make sure the plate can now be turned 3mm.
If you wish you can slot the stator both to the left and right so it's possible to retard the timing for custom applications!
I got a question YFS. How do you know going 3mm counterclockwise is a +4 degree advance? I mean if I bust out a 360* protractor and just measure 4 degrees counterclockwise is that approximately 3mm or what? Just curious as I will probably just print out a 360* protractor and scribe a mark at 4 degrees advanced.
I have the adjustable stator plate and I still don't know why I should turn it up.. I don't want to put any more stress on the engine... what if I do +2
If you don't want to put any more stress on the engine, then take the aftermarket pipe off the quad.
+2 will be fine. I was going to do +2-3, but I might just go +4. The nice thing is you can ALWAYS go back. Since you have the adjustable plate, just play with it and get it to where you feel it is running best. If it starts running erratic or pinging, simply change it back.
Similar threads
- Replies
- 14
- Views
- 2K
- Replies
- 0
- Views
- 427
- Replies
- 3
- Views
- 2K