case repair
- Thread starter sicivicdude
- Start date
You are using an out of date browser. It may not display this or other websites correctly.
You should upgrade or use an alternative browser.
You should upgrade or use an alternative browser.
- Status
- Not open for further replies.
do u have any pics of the cases after you soothed em back out?
..... there really isn't a whole lot to see afterwards. I use a carbide burr to remove the fresh material until the new material is at the proper height. The only thing you'd see in the "after" pictures would be burr marks and what looks like a stock case...
i did a repair on the shift tube via tig'ing it back together with round stock (which came out really well). from there i took it to a local machine shop and had a new hole drilled via lathe for the shift shaft. afterward a had them machine a new sealing surface for the shift shaft seal.
when it was all said and done, it cost me around 200beans and quite a bit of time. i would recommend finding a complete bottom end and rebuilding it.
on a side note, the case halves are line bored so replacing one half wont work unfortunatly :/
i can post before and after pics if anyone wants to see.
i did a repair on the shift tube via tig'ing it back together with round stock (which came out really well). from there i took it to a local machine shop and had a new hole drilled via lathe for the shift shaft. afterward a had them machine a new sealing surface for the shift shaft seal.
when it was all said and done, it cost me around 200beans and quite a bit of time. i would recommend finding a complete bottom end and rebuilding it.
on a side note, the case halves are line bored so replacing one half wont work unfortunatly :/
i can post before and after pics if anyone wants to see.
I've had decent luck putting the stock together as long as there is something left to weld back together.
Case halves on certain four wheelers are line bored, the blaster is not one of them (suzuki LT250's are so beware!). I've had luck swapping out case halves if damage is too severe to repair.
..... there really isn't a whole lot to see afterwards. I use a carbide burr to remove the fresh material until the new material is at the proper height. The only thing you'd see in the "after" pictures would be burr marks and what looks like a stock case...
Ah I see. I was just curious how smooth the edges where the case halves meet turned out.
Ah I see. I was just curious how smooth the edges where the case halves meet turned out.
That's where most of the hard work comes into play. Tig welders (and the brazing rod to a lesser extent) generally bead whatever they're working on. The trick to it is to build the "bead" up past where the material is needed to square it off and then grind it back down. You always have to add more material than you needed and then remove the excess. That's why I said, "there's not much to see" when I get done.
Ah I see. I was just curious how smooth the edges where the case halves meet turned out.
They have to be flat, if not, it won't seal.
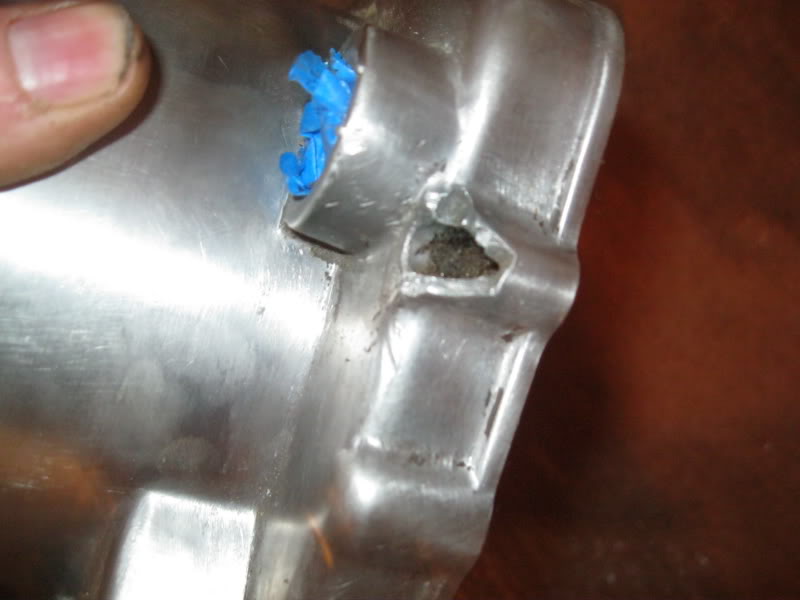
A DT200 clutch cover that had been beat up on in its previous go-round. I cleaned up the "rash" and welded a new mounting bracket tube. Obviously this repair is pre-finish. The finished product SHOULD look like it never happened.


So much filler rod has to be used to fill the undercut that the molten puddle creates, there should be a law against it.
So much filler rod has to be used to fill the undercut that the molten puddle creates, there should be a law against it.
:-/ wha?
Is there any other way to build up the required amount of material to repair a break like this without throwing the filler rod at it?
No way, one has to build up above the puddle for obvious reasons, my comment was tongue in cheek, that one has to use so much rod to get the buildup. It seems so much of a waste to grind off so much hard work.
I should have started my comment more clearly " It is a shame that so much filler has to be used ect: , would have made more sense then..")
I should have started my comment more clearly " It is a shame that so much filler has to be used ect: , would have made more sense then..
No way, one has to build up above the puddle for obvious reasons, my comment was tongue in cheek, that one has to use so much rod to get the buildup. It seems so much of a waste to grind off so much hard work.
I should have started my comment more clearly " It is a shame that so much filler has to be used ect: , would have made more sense then..
Oh ok, yeah would have made a little more sense to me if you'd started it off a little different but I understand now.
I didn't have to add TOO much material which will have to ground back off. I really kept my heat to a minimum to "crisp" up the edges and kept moving the work to keep the undercut to a minimum as well.
I have worked in a Technical Education welding Dept for many years and that buildup you made on the bolt flange is second to none I have seen.
Do you use pure Argon or a mix.
Do you use pure Argon or a mix.
I have worked in a Technical Education welding Dept for many years and that buildup you made on the bolt flange is second to none I have seen.
Do you use pure Argon or a mix.
It's pure argon.
I have a Miller Econotig 150 with a 3/32" pure tungsten (green) and 1/16" 4043 filler rod. The cast does NOT like to weld until some filler is added to "limber it up" some. I make the first pass on "low" (0-85 amps I believe) at about 70% (so about 55 amps or so) and dope the cast a bit very slowly.
Once a little 4043 is mixed in, I can switch to "hi" at about 70% with the pedal depressed about 3/4 of the way and continue to add filler to build up where I need. The final bit of the edges is done with the pedal just blow 1/2 way to bring the plasma down to a very fine point (as fine as AC can get) just before the plasma destabilizes and VERY carefully add the filler to make a nice edge on it.
You sure have the art mastered, its a shame there are so many miles between us because it is almost impossible to get alum cast welded out here in the sticks in Aussie.
You sure have the art mastered, its a shame there are so many miles between us because it is almost impossible to get alum cast welded out here in the sticks in Aussie.
The art mastered? HA, I've had my tig welder for ~4 months now....
The difference is, I didn't go to school to learn how to "do it right" which means I have no preconceived notions about how it's "supposed to work" which means I've tried EVERYTHING. I've ironed out what doesn't work now... I'm just working on tons of practice to perfect what I've learned about the process using my machine.
Cast aluminum is SUCH a horrible material to work with. The original caster isn't worried about impurities which means they throw basically anything they want to in there and still call it aluminum. It seems each piece of cast is a little different compound but basically all of it welds poorly....
My favorite term for Cast aluminum is " muck metal ".
I have seen so many fellas wincing from the casting collapsing and falling into their boots.
As you said there seems to be no standard mix, and when you feel you have the settings and procedure right, the next cast presents a new challenge.
I no longer am able to weld Cast aluminum as I am a little too shaky, and I don't look too good anymore.
My favorite term for Cast aluminum is " muck metal ".
I have seen so many fellas wincing from the casting collapsing and falling into their boots.
As you said there seems to be no standard mix, and when you feel you have the settings and procedure right, the next cast presents a new challenge.
I no longer am able to weld Cast aluminum as I am a little too shaky, and I don't look too good anymore.
Oh, fighting that oxide layer is a TERRIBLE game. I stop and let it cool occasionally on the first layer when I'm working some filler into the cast so it won't collapse because that oxide layer floats to the top the whole time and cruds up. That's part of the reason and need to "dope it" with the clean filler to "cut" some of that crap with good aluminum....
I know what you're saying. My dad was an "instrument maker" in a one-off custom tool room machine shop. He's 61 years old now and has Parksinson's Disease on his right side. He had to give up welding because he wasn't able to hold it stable enough to keep the arc tight. It's a real shame because way back when he'd have welded circles around what I can do.
- Status
- Not open for further replies.
Similar threads
- Replies
- 5
- Views
- 210
- Replies
- 0
- Views
- 98
- Replies
- 4
- Views
- 538