I have a stock cylinder i ported myself with a dremel. I smoothed out the transfers,matched the cases, raised the exhaust port 1mm and widened 1mm on each side. Also cleaned intake out, took as little as could off. Do i have to do anythimg else to make these mods work? I already have a rechambered head for it. Do i have to raise any other ports to balance what i have done or am i good to bolt on?
Porting question!
- Thread starter DrywallDoc
- Start date
You are using an out of date browser. It may not display this or other websites correctly.
You should upgrade or use an alternative browser.
You should upgrade or use an alternative browser.
 You may need to be a little more agressive with the intake.
Last edited:

Whats the difference in gains? Do you fill in the top and bottom of the intake or just the "windows"I kinda like filling them in myself...

Steve
3 packs of JB Weld, 1/8" aluminum plates on both sides. The steel reed stops are removed and the box surface is used as a stop. The point is to maintain constant port cross-section from carb to port window.
Credit to JoeAK47 for this original cross section picture:

This is where the epoxy goes:

The bridge is left same width as the piston bridge, but both windows opened on the sides.
Surface was sand blasted for better grip before applying the epoxy.
What it does is broaden the powerband and simplifies the jetting.
Steve
Credit to JoeAK47 for this original cross section picture:
This is where the epoxy goes:
The bridge is left same width as the piston bridge, but both windows opened on the sides.
Surface was sand blasted for better grip before applying the epoxy.
What it does is broaden the powerband and simplifies the jetting.
Steve
Will this work with vforce4 reed cage or only stock?3 packs of JB Weld, 1/8" aluminum plates on both sides. The steel reed stops are removed and the box surface is used as a stop. The point is to maintain constant port cross-section from carb to port window.
Credit to JoeAK47 for this original cross section picture:
This is where the epoxy goes:
The bridge is left same width as the piston bridge, but both windows opened on the sides.
Surface was sand blasted for better grip before applying the epoxy.
What it does is broaden the powerband and simplifies the jetting.
Steve
It will work with any reeds. The aim is constant cross section.
Picture a mist of air and water shooting in through a porch window.
What happens to the water?
It drops to the floor. You gotta keep the air moving to keep the water suspended.
You have to keep the cross section constant to keep the fuel from dropping out of suspension.
KTM does it even on the intake side of the reeds:

Steve
Picture a mist of air and water shooting in through a porch window.
What happens to the water?
It drops to the floor. You gotta keep the air moving to keep the water suspended.
You have to keep the cross section constant to keep the fuel from dropping out of suspension.
KTM does it even on the intake side of the reeds:
Steve
Interesting. I have an extra cylinder im going to try that. What about transfers? Do you fill these in to narrow them out a bit? Does this increase flow? Or do you only fill the intake?It will work with any reeds. The aim is constant cross section.
Picture a mist of air and water shooting in through a porch window.
What happens to the water?
It drops to the floor. You gotta keep the air moving to keep the water suspended.
You have to keep the cross section constant to keep the fuel from dropping out of suspension.
KTM does it even on the intake side of the reeds:
Steve
Only the intake side.
Match the center of the port to the piston size and angles.
Widen the port to what you feel is safe with the rings. I angle it to the piston too.
The only metal I remove from the piston is at the top of its ports, never the bottom or side.
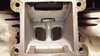
I was originally going to fill in both sides with 1/8" aluminum fillers like this:


But I found it shrouded the reeds and this offered more power:

It turned out the detail there at the reed opening is very important.
This picture shows some of the "fill, cut, file, fill" sort of work getting it to work.

A lot of conventional guys don't like this approach. Definitely swimming up stream on this one.
If you don't like it easy enough to cut it out. This cylinder is still working for my son years later.
Planning on doing a similar job on his Banshee.
Steve
Match the center of the port to the piston size and angles.
Widen the port to what you feel is safe with the rings. I angle it to the piston too.
The only metal I remove from the piston is at the top of its ports, never the bottom or side.
I was originally going to fill in both sides with 1/8" aluminum fillers like this:
But I found it shrouded the reeds and this offered more power:
It turned out the detail there at the reed opening is very important.
This picture shows some of the "fill, cut, file, fill" sort of work getting it to work.
A lot of conventional guys don't like this approach. Definitely swimming up stream on this one.
If you don't like it easy enough to cut it out. This cylinder is still working for my son years later.
Planning on doing a similar job on his Banshee.
Steve
Im not big on the whole "my work is neater therefore better bullshit" all i care about is the final result. I also like to experiment so keep the suggestions coming bud. As long as it runs im happy. Have you ever run a vitos cylinder?Only the intake side.
Match the center of the port to the piston size and angles.
Widen the port to what you feel is safe with the rings. I angle it to the piston too.
The only metal I remove from the piston is at the top of its ports, never the bottom or side.
I was originally going to fill in both sides with 1/8" aluminum fillers like this:
But I found it shrouded the reeds and this offered more power:
It turned out the detail there at the reed opening is very important.
This picture shows some of the "fill, cut, file, fill" sort of work getting it to work.
A lot of conventional guys don't like this approach. Definitely swimming up stream on this one.
If you don't like it easy enough to cut it out. This cylinder is still working for my son years later.
Planning on doing a similar job on his Banshee.
Steve
Yes, this Blaster has a Vitos BBK cylinder and a +3mm crank:

It has no modifications other than those 2.
It is intended to be a step by step test of ideas to make more power.
I got busy with Search and Rescue and a business I work for and no time for the past years.
As is, the torque is considerably better than a stock Blaster, but not in comparison to a port and head mod.
Why do you ask?
Steve
Similar threads
- Replies
- 12
- Views
- 814