88 Build

Russell45

Member
Aug 19, 2012
32
2
34
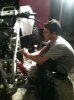
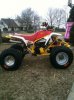
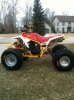
So my son and I have been working on our rebuild all winter, and finally got her done and started heat cycles. Original bike was bone stock. Plan was to do a top end, pipe, rubber, and whatever it needed, Got a little out of control, go figure. Been taking lots of photos and figured we'd just post when we were done, now that she's running, here they are, hope you enjoy.

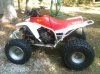
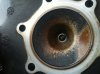
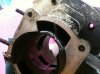
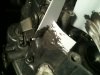
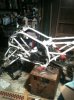
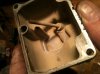
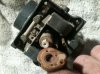
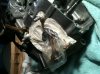
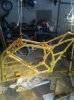
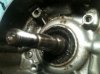
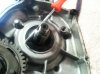
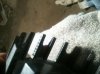
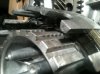
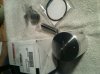
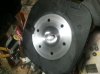
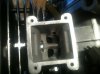
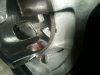
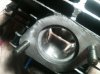
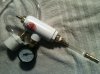
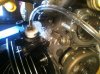
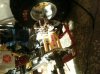
Here's the original bike, and original top end. Head showed very uneven combustion, bore and piston were in good shape, original after 25 years of PO beating on it. Found out the frame was bent on the right side behind the A-arm mount, so the job became all out rebuild.
 

Attachments

  • original bike.jpg
    original bike.jpg
    59.3 KB · Views: 155
  • head original.jpg
    head original.jpg
    39.8 KB · Views: 154
  • transfer original.jpg
    transfer original.jpg
    42.3 KB · Views: 153
Here's the boy helping tear down, and doing some JB weld on a small hole in the case on the stator side. Despite a virgin bore and original piston, somebody had been in to both sides, looked like they used a homemade tool to hold the flywheel, slopped a lot of yamabond around.
 

Attachments

  • Keaton tear down 1.jpg
    Keaton tear down 1.jpg
    36.5 KB · Views: 141
  • jb weld.JPG
    jb weld.JPG
    94.8 KB · Views: 158
  • tear down1.jpg
    tear down1.jpg
    45.4 KB · Views: 140
Carb was completely lacquered up, pretty amazing it ran as good as it did. After all the mods, the stock main 220 jet was replaced with a 320, we'll see how that works. Photo of the motor with the top end off, I used masking tape and a sandwich bag over the connecting rod to keep it all clean, and that worked pretty well.
 

Attachments

  • carb bowl junk.jpg
    carb bowl junk.jpg
    32.1 KB · Views: 138
  • carb junk1.jpg
    carb junk1.jpg
    41.6 KB · Views: 148
  • clean bottom end.jpg
    clean bottom end.jpg
    43.8 KB · Views: 143
We finally found a frame local enough to drive up to Michigan to get it. Turned out the fellow is a well known swingarm builder, and we would up coming home with a new +4 swinger and the frame. We stripped that frame like 3 times, finally gave trying to get all the tight spots and took it to a sandblaster, best $50 of the build. Painting in the garage nearly caused a divorce. Couple coats of bare metal primer, two coats of hideous yellow, and three clear. Brought it inside to dry for a week before the paint completely hardened

Replaced all the bottom end seals, the flywheel side looked like it was leaking a bit, oil and carbon behind the stator. That little bent pick is the bomb for pulling seals and a bunch of other little jobs that would have been harder without it.
 

Attachments

  • frame paint1.jpg
    frame paint1.jpg
    39.7 KB · Views: 141
  • leaky stator side.jpg
    leaky stator side.jpg
    36.6 KB · Views: 137
  • new seal.jpg
    new seal.jpg
    38 KB · Views: 136
Yeah I noticed the hacking on the transfers, and thought somebody had taken a stab at something, not sure what exactly. It might be somebody did, but this is a very early 1988 machine, serial number puts it at like 1900th build, which is crazy early, and maybe they were still doing some hand work on them then, who knows.
 
Replaced the plates with a Tusk clutch kit, and used 3 of the 5 heavy duty springs, per Ken Oconnor's suggestion. Lever pressure is manageable. The baskets showed some wear, but were'nt notched deeply enough to weaken the fingers. I glued 400wet/dry on some popsicle sticks and cleaned up all the wear on both outer and inner baskets. Tedious work but it came out great.
 

Attachments

  • clutch outer basket.jpg
    clutch outer basket.jpg
    33.7 KB · Views: 143
  • clutch inner basket.jpg
    clutch inner basket.jpg
    35.2 KB · Views: 136
So then the good stuff comes to the door. Wiseco 66.25 piston kit, with OEM gaskets. Unfortunately the kit did not come with piston pin clips. After a bunch of calls to Ken and Awk, I wound up finding a couple NOS clips at a dealer only a couple hours away, they measure the same and worked fine.

And then here's the blasterporn. Rechambered head and aggressive trail port by Ken Oconnor. The man is an artist, and a great guy to work with. Along with others, I highly recommend his work. I mean, just look at the pictures...
 

Attachments

  • wiseco.jpg
    wiseco.jpg
    44.4 KB · Views: 132
  • Head KOR.jpg
    Head KOR.jpg
    31.4 KB · Views: 133
  • intake KOR.jpg
    intake KOR.jpg
    31.1 KB · Views: 148
  • boost ports transfer.JPG
    boost ports transfer.JPG
    82.9 KB · Views: 174
  • exhaust KOR.jpg
    exhaust KOR.jpg
    36.5 KB · Views: 126
Putting the top end back together, keeping it clean. Motor back in the frame, built my leak tester (nice sticker huh?). Funny as hell buying tubing and plumbing parts at Lowes, and the young kid who was helping find stuff just keeps smiling cause he's dead certain I'm building some sort of bong device. Then I pulled the low pressure gauge out of my pocket and saw his confusion, told him what I was doing and he just looked depressed.

Anyway, it worked well, first pass it wouldn't hold air at all. Intake was leaking bad, fixed that with two gaskets, one on each side of the reed block, both with thin coats of Yamabond on both sides. Airtight.
 

Attachments

  • piston install.jpg
    piston install.jpg
    36.3 KB · Views: 131
  • motor in frame.jpg
    motor in frame.jpg
    44.1 KB · Views: 122
  • leak tester.jpg
    leak tester.jpg
    50.6 KB · Views: 120
  • leaking.jpg
    leaking.jpg
    44.6 KB · Views: 153
So to make a long story shorter, here she is, complete except for chain (bought two new ones that didn't fit, no joy).

We did a set of Awk's rear hydros - work great easy install, Awk was a big help with all this.

We also did: new front wheel bearings and seals, FMF fatty, oil injection block off kit, the Spree Store swinger, new Razrs all around, ebay ITP wheels rear, and some other little stuff. Might still do a seat cover with some yellow and red in it.

Been a great winter job, and a good opportunity to have fun with my son in the garage. Seems like pulling wrenches is becoming a lost art, lost to the virtual world and videogames. We had a lot of fun with this, can't wait to ride the heck out of it when the weather gets warmer.

Hope you enjoyed the 'quick tour' of this build. Thanks to all of you who have shared wisdom here, the forum was always the first place I looked for good info and tips and tricks.
 

Attachments

  • final1.jpg
    final1.jpg
    52.9 KB · Views: 156
  • final2.jpg
    final2.jpg
    53.8 KB · Views: 137
  • Awk Hydro.jpg
    Awk Hydro.jpg
    44.5 KB · Views: 138
Putting the top end back together, keeping it clean. Motor back in the frame, built my leak tester (nice sticker huh?). Funny as hell buying tubing and plumbing parts at Lowes, and the young kid who was helping find stuff just keeps smiling cause he's dead certain I'm building some sort of bong device. Then I pulled the low pressure gauge out of my pocket and saw his confusion, told him what I was doing and he just looked depressed.

Anyway, it worked well, first pass it wouldn't hold air at all. Intake was leaking bad, fixed that with two gaskets, one on each side of the reed block, both with thin coats of Yamabond on both sides. Airtight.

This is common if the bolts have been overtightened and have warped the boot.

They should be tightened gradually and diagonally in increments up to 5.8 ft lbs.
 
Also did A-arm bushings, a KOR case saver, and a TM designworks chain guide. New red handlebars, and replaced the twist throttle with a proper thumb throttle. Going to vent the airbox and cover the vents with the Outerwears material they sent that will not fit over the whole airbox.
 
  • Like
Reactions: Awk08
cause he's dead certain I'm building some sort of bong device. Then I pulled the low pressure gauge out of my pocket and saw his confusion, told him what I was doing and he just looked depressed.

nice lookin work russell and way to involve the boy...lessons and memories he'll carry with him forever I:I

if that wasn't enuf, the lowes bong story certainly garnered you more reps, my 'ol lady is asking me whats so funny :D

if that clutch pull proves to be to much for the boy on long rides, try one of these...........

Outlaw EZ Pull 3 Position Clutch Lever Kawasaki KX125 KX250 KX250F KX450F KX500 | eBay

they work great !
 
Last edited by a moderator:
The swingarm is a +4. I was told I'd need a 100 link chain, and had just bought a new 92 link. 100 is too short, need 106-110. Paint is all Rust-oleum, bare metal primer, gloss protective enamel, and clear gloss. It's still not clear if my son gets this one or the 06 stocker to ride, but dad is definitely gonna break it in anyway. I got a couple younger kids, my 4year old son rides a little Eton Viper 50 and its his favorite thing in his whole kid world. I bought that for my 13 yo when he was 4, brought it in under the Christmas tree. Wife is on a Recon, with 5yo daughter. Fun stuff.
 
Nice job on the build, thats a sweet looking ride. Way to get the family involved. I love riding with my kids. And on occasion the wife will come out to play.
 
Russell,

What a positively awesome project!!! Also, I can attest that Russ is probably the best Father in the world!

Can't wait to see it this summer!