Mysterious seized motor *HELP PLEASE!*

ManiacalBlaster

New Member
May 21, 2012
19
0
0
Chicagoland
I've the new owner of a 96 Blaster that I've only been out a few times on and love it. Already gotten a few tips off this forum so I appreciate the input and definitely would like some input on the problem I have now.

So It's a 96 Blaster that had a top end kit put on before I bought it of this guy. told me it was a 240 kit.

I've had it out three four times, twice to just a little trail loop, and two times to big offroad parks where I was runnin it real good.

My buddy told me that Blaster takes a 32:1 mix for the oil in the gas. So what I did, was take 2-stroke motor oil, Penzoil, and added 16 oz's to 4 gallons of gas and have been adding that to the old fuel dude had in there already. So - is that the wrong mixture?

Just this weekend at the Badlands in Attica, IN, the motor seized on me. The plug had metal flecks on it, and a guy I was riding with, a motorcycle mechanic, said that looks like no oil man. Before it seized on me - In 1st, second, and 3rd, on small hills, it was revving up like it should, then just dying...dropping rpms. We adjusted the idle mix and the air screw a bit, and it seemed to improve. It was rippin pretty good - then the thing seized up on me. Kick start wouldnt budge....

It was so dusty on Saturday, and theres a k&n filter in it, without the air box cover. That thing got pretty dirty.

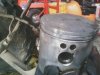
So I've got the head off, and can see scoring on the head and cylinder wall, with little metal flecks on top of the piston. Bottom ring in tact and moves a bit... The top ring appears in tact, but seems froze up in the piston real good.

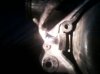
The connecting rod bearing appears to be seized as well, as the rod moves only a little bit with much resistance.

HERES WHERE I NEED HELP:

I did the oil mix in the gas - how did the motor seize up like that? Would a dirty air filter contribute to this failure? Why did the plug look like it was running lean with a super dirty air filter?

Dude I bought it from (who was riding with me) said I didnt break it in enough after that rebuild and the rings didnt get a chance to seat. Anyone offer any suggestions or assistance? I'm going to tear it down all the way to see whats up with the connecting rod bearing....
 
It is called detonation , caused by running a fuel lean mixture,which overheats the piston crown and expands it, causing it to sieze in the bore.

The metal flecks are fried piston top.

A dirty air filter would not cause this to happen, because a dirty filter would ten to make it run cooler.

If the previous owner did not re jet for the 240 bore this could have possibly causedit.

If the motor was assembled incorrectly and not given a leak down test to see if it was air tight, a lean mixture could have been caused.

I am not sure about US gallons but,16oz to four gallons seem to be the correct ratio, 32:1 so you did the math OK.
 
I would also try to find out if any work as been done to the head. It may have been milled to the point that you need to run race fuel.
 
Agreed alot of variables here,

Yes it could be becuase it was not properly broken in.

Yes it could of been lean, due to improper jetting, or an air leak.

Yes 16oz of oil to 4 gallon is perfect! Should use oil specifically for premix.

Yes, you may have leaned it out enough by adding more oil in the old gas/oil mix.
I hope the oil injection is removed!

Yes you will need a top end rebuild and the bottom end cleaned, if there is metal flakes or specs you can bet it down below too!

Then after you get it rebuilt do this VVV
14mqc1y.jpg


Then this
blaster-engine-break-44174


Then this VVV
http://www.blasterforum.com/do-yourself-20/how-plug-chop-38674/

Then enjoy it!
 
Yes 16oz of oil to 4 gallon is perfect! Should use oil specifically for premix.

Yes, you may have leaned it out enough by adding more oil in the old gas/oil mix.
I hope the oil injection is removed!

i was thinking the same thing about the oil injection being removed too, and if its removed i hope you blocked all the necessary lines/holes (one on the carb and two from the injector pump)
 
Maybe post some pics. I would suspet the crank caused the problem.

This is the only pic I have so far. Focusing on the chunks taken out of the piston head there. There was a tiny chunk of metal wedged between the piston and clyinder wall at that shiny spot... The top ring is stuck pretty solid, while the bottom ring has movement. The crank or rod bearing does seem to be seized - I have very little movement from the connecting rod...

I can get more photos as I tear it down further tonight and over the next couple of days...

Thank you for the suggestions so far! This thing was tearin it up before that happened...so I'm ready to get it back in action!
 

Attachments

  • seized motor.jpg
    seized motor.jpg
    82.2 KB · Views: 221
The piston seems to have suffered mild detonation, maybe caused by improper jetting.

Maybe the previous owner tuned it by feel, without doing a plug chop.

A slighty lean mix, will make the motor seem to run extremy well, but slowly, but surely cook the piston.

The mild detonation can also be caused by adding more oil to the fuel, which subtracts the amount of fuel, causing a leaner mix which burns hotter.

Use of low octane fuel, with a high compression , can too be the culprit.

Any air leaks in the exhaust or intake will affect the breathing and will change the jetting requirements.

It would be a good idea to leak test the motor after re build.

As to the crank bearing, seems like some of the glitter you found on the plug has found its way into the bearing.

Alright cool, thanks for the feedback.

My buddy is saying between me and him we can get it rebuilt - but I'll tell you right now I don't know a thing aout re jetting...and I know he sends his out to have that done. Same thing with the cylinder wall scoring, I have to find out if it can be honed or bored or whatever.

I was running 93 octane in there with the 32:1 oil mix. He suggested 110, but it was running well so I didnt go that high. Definitely will work on leak testing it thoroughly once we do get it rebuilt. That post above concerning the leak testing ought to assist in getting that checked out. I got my work cut out for me...
 
I know this isn't the greatest photo, I'll try and get a better one after work today with more light...

I have the motor detatched and the only thing left is this electrical connection going into the left side of the case. I wanted to be sure how to detach it without breaking the contacts I can see inside.

Any suggestions?

Also, after reading the link for common engine seizures, it appears my blaster motor fell victim to me not breaking it in after the top end rebuild it was given. I was told by the guy I bought it from it had ten minutes on the rebuild, but certainly had no idea I was to take it easy on it and go through a break in process. I was gunning that thing like crazy.

I'll get better pics of the piston and rings later today, but there are chunks taken out of the piston head on two ends, and the top ring is froze in there solid. The crank does not appear to be moving as it should like I mentioned before, so I am suspect of the bottom end now.

I am planning on doing the actual rebuild, but the damage to the cylinder wall, tiny scoring on the head, and the leak down test once completed....I'm pretty sure I'll need to take it in for that stuff - hone the cylinder wall, check the head, and perform that leak down test. I'd want to be positive it is done properly.
 

Attachments

  • blaster connector.jpg
    blaster connector.jpg
    61.2 KB · Views: 181
Just follow the wires, connections should be on left frame tube just behind carb

Okay cool thanks man.

I'm doing this with my arm in a sling, so it's a bit slow going...All I saw was the wires going up into the frame the other day...but if there's a connector up there - that's what I'm lookin for.
 
It appears as though the bearing came apart/got mis positioned in the race for the connecting rod. There is a thin opening at the base of the connecting rod where I can see the obviously crooked bearing inside.

I can also see scoring on the bottom ends of the connecting rod. Also I can see the case is scored in the lowest spot in the crank rotation.

Slowly but surely getting it taken apart...but as it is - that scoring on the case - that need to be addressed in a rebuild?

Just follow the wires, connections should be on left frame tube just behind carb

Yeah so those wires are just run into a long sleeve of wires and there's no connector to easily detach them. I'll have to figure that one out....

That last lead is what's preventing me from putting the motor on a bench and having room to start opening it up.
 

Attachments

  • comboActionDemoinsanitywoods 221.jpg
    comboActionDemoinsanitywoods 221.jpg
    31 KB · Views: 163
It appears as though the bearing came apart/got mis positioned in the race for the connecting rod. There is a thin opening at the base of the connecting rod where I can see the obviously crooked bearing inside.

I can also see scoring on the bottom ends of the connecting rod. Also I can see the case is scored in the lowest spot in the crank rotation.

That bearing does look very sad.

I am in no way having a poke at you, and I do not know the history of the motor, but this is a typical example of not splitting the cases and cleaning and/or replacing the bearings after a piston skirt failure.

This can also be caused by overheating or lack of lubrication, and in your case possibly may have been caused by a lean mixture causing mild detonation.

I've the new owner of a 96 Blaster

Dude I bought it from (who was riding with me) said I didnt break it in enough after that rebuild and the rings didnt get a chance to seat. Anyone offer any suggestions or assistance? I'm going to tear it down all the way to see whats up with the connecting rod bearing....

Just re-read your first post, and it seems to me that the dude you bought it from is trying to pass the buck on to you, as poorly seated rings, should not cause a bearing failure.
 
Last edited:
That bearing does look very sad.

I am in no way having a poke at you, and I do not know the history of the motor, but this is a typical example of not splitting the cases and cleaning and/or replacing the bearings after a piston skirt failure.

This can also be caused by overheating or lack of lubrication, and in your case possibly may have been caused by a lean mixture causing mild detonation.

Agree but i remember an old kx 125 i had that simply trashed a crankshaft bearing for no aparant reason the thing started sounding like a hammer was hitting someting inside ! Got me home like that, wher i opened the motor the bearing was missing a ballbearing (never found it) and the cage was destroid
I did get away without any case work , just cleaning

Nuno
 
That bearing does look very sad.

I am in no way having a poke at you, and I do not know the history of the motor, but this is a typical example of not splitting the cases and cleaning and/or replacing the bearings after a piston skirt failure.

This can also be caused by overheating or lack of lubrication, and in your case possibly may have been caused by a lean mixture causing mild detonation.


Just re-read your first post, and it seems to me that the dude you bought it from is trying to pass the buck on to you, as poorly seated rings, should not cause a bearing failure.

From the information I've been given from this guy I bought it off of, I feel as though he had a top end rebuild and perhaps didn't do anything with the bottom end. I'm a bit perplexed as to how it ran as well as it did the first few times out, only problems not really idling as well, with the connecting rod bearing already in that condition - or close to it. So still not totally sure on exactly what happened - other than inspecting the aftermath.

Either way, I know that I have to get a case splitter, and a flywheel puller (purchased or makeshift) to get that case apart and clean it up down there as well as get that bearing replaced.

I want to get a good eye on the extent of the damage to the case.

I can see the three wires leading into that last contact I have to detach before I can totally get the motor off the quad has been spliced before, and I'll have to just do that again as I see no connector for those three by themselves in sight.
 
From the information I've been given from this guy I bought it off of, I feel as though he had a top end rebuild and perhaps didn't do anything with the bottom end. I'm a bit perplexed as to how it ran as well as it did the first few times out, only problems not really idling as well, with the connecting rod bearing already in that condition - or close to it. So still not totally sure on exactly what happened - other than inspecting the aftermath.

My fear in a nutshell, top end meltdown, debris getting into crankcase, just waiting for the time to strike.

It takes only a bit of schrapnel as small as the point of a pin, to wreak havoc!:(
 
At least completely removed the motor from the quad now. There were four connections, (I thought were sleeves over splices), right there by the motor.

So a guy my friend knows who rebuilds these things tells me that it is a three piece crank on my Blaster ('96). That will need a bearing driven out as well as pressed on. I'm trying to find info in the forum on this fact unsuccessfully. I see the really well done vids on bottom end assembly/disassembly, but nothing on separating a three piece crank.

Now from a couple of those vids, I am unclear, do I have to (or is it a good idea while apart) to fully disassemble transmission for cleaning - or can I leave it generally assembled while I get to the problem area - the crank shaft, connecting rod, and connecting rod bearing?


Also - this guy tells me he'll do the full rebuild $250 plus parts - and $60 extra to hone the cylinder wall. Maybe he'll knock it down a bit since I've got the motor out with the cylinder and clutch cover off - but I doubt by much.

I'm in the process of seeing how much parts are going to be to get an exact figure. I am interested in rebuilding the motor right so it runs and stays running. I did however pay only $400 for the quad, so whatever I can do on my own I'd like to go that route - moneys tight. $310 plus parts for full rebuild, machining and all - sound like a good offer to you guys?