Monster Boyesons

best

Active Member
Dec 17, 2010
1,656
266
130
Nova Scotia
www.glinx.com
Just thought I'd share these pictures with you guys.
I believe the engine is a Gasgas EC250 and the article is on case to transfer port matching

Note the intake port in the cylinder much the same as the Blaster, only not split:

1overlap.jpg


Now, as the camera backs up, look at the massive Boyesen ports on either side of the cylinder barrel, feeding down into the transfer ports:

2overlap.jpg
 
AND...This can be done when the engine is assembled regarless of what "other" people will tell you!

If you have your engine apart for that "full rebuild",then this is the time to do it the "easy" way, but...

If its assembled,you can still do it...YOURSELF!
You will need some ...
#1 Paper towels
#2 masking tape
#3 A base gasket that has been matched to your cylinder (stock or ported)
#4 A Shop vac with a small tip
#5 A friend to help with the shop vac
#6 A scribe and marking compond to "match" the base gasket to the case
#7 A dremel,assortment of hand files,rotory files,sand paper,or pocket knife
#8 Common sense


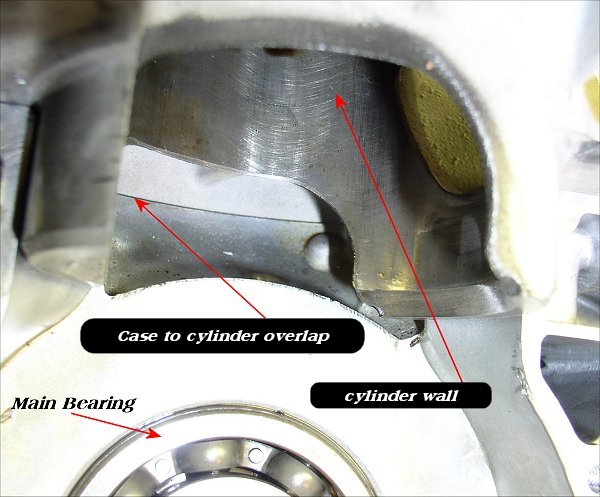
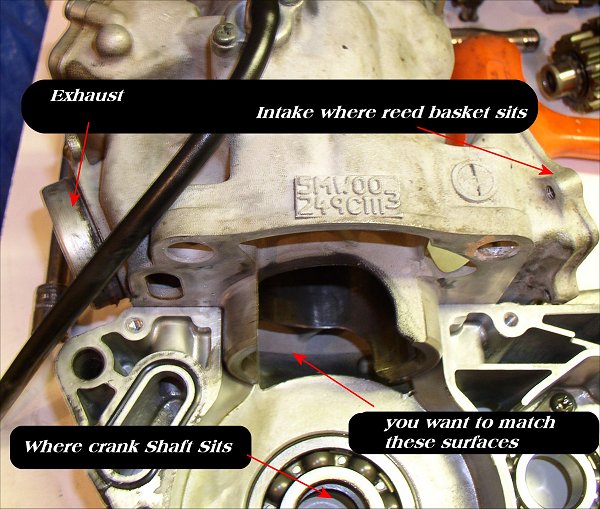
Port matching the engine case to the transfer ports on the cylinder. This can be done while the engine is assembled....if done with caution. This can make a HUGE difference!

This engine had its tranfer ports of the "Aggresive trail ported" cylinder matched to the engine case while the engine is assembled,and while it is still installed in the frame.
This can be done! It also works VERY well! Why cheat yourself out of power that the cylinder can produce? It took longer to prepareand tape than to actually cut and blend. The cutting and blending took about 7 minutes. Some cases require alot of material to be removed. Some very little.
7325-engine-had-its-tranfer-ports-aggresive-trail-ported-cylinder-matched-engine-case-while-engine-assembled-while-still-installed-frame-can-done-also-works-very-well-why-cheat-yourself-out-power-cylinder-can-produce-took-longer-prepareand-tape-than-actually-cut-blend-cutting-blending-took-about-7-minutes-some-cases-require-alot-material-removed-some-very-little.jpg


This picture shows how you must properly tape the opening of the case to prevent aluminum chips from entering the case. The job is already completed in this photo

7324-picture-shows-how-you-must-properly-tape-opening-case-prevent-aluminum-chips-entering-case-job-already-completed-photo.jpg


Here is another shot of the tape job. While I was using the carbide double cut bit (6" long) I also had the hose of a small shop vacuume within an inch or two of the bit to evacuate the chips. The blue dykem is just a die I use to see my scribed lines. Other things work just as well...paint,marks-A lot pen,etc,etc.

7323-here-another-shot-tape-job-while-i-using-carbide-double-cut-bit-6-long-i-also-had-hose-small-shop-vacuume-within-inch-two-bit-evacuate-chips-blue-dykem-just-die-i-use-see-my-scribed-lines-other-things-work-just-well-paint-marks-lot-pen-etc-etc.jpg


Here is a picture after the tape was removed,paper towels pulled out of the case,and dykem (blue dye) was removed.

7322-here-picture-after-tape-removed-paper-towels-pulled-out-case-dykem-blue-dye-removed.jpg


What you're going to use the shop vac for,is to suck up any metal particles and debris why your "cutting and blending" to the scribed line. This is where the "friend" comes in handy. Get the shop vac tip very close to the work,and you will notice that when your done that there will be NO debris what so ever.

the tape will be enough to prevent any debri from entering the engine. It works very well. The trick is to have everything oil free,so the tape will stick.. Before you lay down the tape,use some carb cleaner to de-grease the surfaces. Don't be lazy! Do it once and then do it again! Then stuff paper towels down into the spaces in the crank case to fill the voids. This gives support to to tape above,and creates another barrier to prevent anything entering the crank case.

Every case/cylinder match is different. Some times you will only need to take off just a "wisp" of aluminum,and this is where the "pocket knife",or "X-acto knife" comes in handy. YES a pocket knife or X-acto knife will cut aluminum!
Other times will require more material to be removed. Thats where the dremel,hand files,rotory files,etc come in handy.

REMEMBER THIS...
Don't just match to your scribed line,but "Cut & Blend" down a ways from the top of the case to create a nice SMOOTHtransition. It will do no good to just take the sharp edge off but still leave a "Bump" for the air/fuel mixture to "Bounce off of" like a speed bump. NO BUMPS!

Heres a good analogy >>>
You have an edge of a concrete pad sticking up on the side walk in front of your house that you constantly keep tripping on when you go check the mail. Its that edge where two pads of concrete don't match,because one is high that the other (mis-matched ports),so you decide to round off "just the corner" of the raised one with a grinder,so your shoe won't catch anymore,but your lazy and do a half ass job and literally just "round the edge",then discover that it still keeps tripping you every time you go get the mail. So..... you decide to "Cut & Blend" the edge into the top of the concrete pad to match the other concrete pad next to it (Matched port),and cure the problem once and for all.

Do it right...Do it once! This is FREE POWER! It only takes a few moments to do when you have your cylinder off. This is especially important with a ported cylinder.

It will take you longer to tape everything off and prep than it will to actually "Cut & Blend"

AND...You can do it all by yourself! >>> At home in your own garage!

Imagine that...Nothing like doing something right the first time.
 
Last edited:
Joe, can you please limit the number of font and colors changes? I know you mean for that to be important but a caps or italicised line is actually easier to read and can get the point across too.

best, monster boyesens are doable on a blaster.

DSC00305-1.jpg


DSC00292.jpg


HOWEVER, they are NOT necessary on a "regular" blaster. The size of the boyesen ports was NOT the reason for the modifications I undertook on that cylinder (only a happy side effect) and is NOT simple/easy/recommended to do that to a cylinder you have any affinity at all for. That was a "frankenstein" type experiment.

If you want to do boyesens, a 12mm drill bit will support a REALLY well worked blaster engine just fine while minimizing the risk of "blowing through" while maximizing the gains seen.
 
Is the term monster boyesens referring to the auxiliary intake ports that go from the intake window directly to the transfers? Why is it called monster boyesens, is this something that boyesen racing that makes reed and crap came up with?
 
"Boyesen ports" are ports that pass directly from the intake window (reed box) to the lower transfer port. They circumvent the normal procedure of passing into the lower crankcase and then up the entire transfer port into the combustion chamber. Too small (or non existant) and most of the charge has to pass into the crankcase to wait its turn. Too large and the pressure differential created in the intake tract is upset and fresh charge may not pass as vigorously into the crankcase POTENTIALLY causing a problem with lubrication. All modern 2 stroke engine utilize a fine balance of boyesen port and crankcase port.
 
very cool pictures SCD!!! I think the old man and i are going to try this one out. i have a couple nasty cylinders......

If you are building a normal blaster engine (gasoline powered no matter the tune level basically) you need two things for decent boyesen ports.

The first is a 1/4" aviation length drill bit (6" minimum). You need to line that drill bit up at the "top" inside corner of the transfer port with the cylinder flipped over (upside down) and attached well. You need to put the shank of the drill bit at the very outside corner of that transfer port for the right angle and elevation. Try not to actually touch the transfer at all with the drill bit but get it as low and tight into that opposite corner as you can. Once the small hole is drilled you can step up to a 12mm (7/16" or so) give or take. Getting the larger drill bit to "bite" into that predrill hole is difficult but can be done with patience. Once your drill bit has passed into the intake window, clean up the flashing and try to balance the size, shape, and length of the ports from both sides. Be VERY careful taking the ports "outwards" or "upwards" though. The mounting tab needs some strength retained out there....

This requires welding on the blaster jug doesn't it?? Shouldn't that be done first to add material before drilling the hole?

"Boyesen ports" are ports that pass directly from the intake window (reed box) to the lower transfer port. They circumvent the normal procedure of passing into the lower crankcase and then up the entire transfer port into the combustion chamber. Too small (or non existant) and most of the charge has to pass into the crankcase to wait its turn. Too large and the pressure differential created in the intake tract is upset and fresh charge may not pass as vigorously into the crankcase POTENTIALLY causing a problem with lubrication. All modern 2 stroke engine utilize a fine balance of boyesen port and crankcase port.

Too small and too big im guessing refers to the diameter of the port?

How are you going to "learn" how to do it yourself if you send them to me? :-/
I would do it myslef but Im not comfortable on what to do yet. I would like to see someone elso do it before I give it a try. But seriously I would love to see and vid of this and would love for you to demonstrate on one of my many pairs of cases.I:I
 
This requires welding on the blaster jug doesn't it?? Shouldn't that be done first to add material before drilling the hole?


Too small and too big im guessing refers to the diameter of the port?

Boyesen ports can be added (provided you've got big enough "equipment" to) to a stock blaster cylinder. The material around the sleeve inside of the mounting ears on both sides provides enough "meat" to add modest sized boyesen ports. You CANNOT add boyesen ports the size that I did without quite a bit of work including welding on a cylinder (big no no if the bore is still good)

It refers to a combination of port size, length, direction, and ending location. I simply by saying "too large" and "too small" but I really mean, being capable of too much flow and too little flow.