Time to bump this long forgotten thread. I am back at this build once more! After lots of shopping, thinking, planning, and even a little soul searching for what I really want, more parts have been ordered. I have a solo Sportster seat in the mail, as well as some 7/8 DOM tubing for building a set of apes like none I've ever seen. I got the cut stock seat done and sewed up, but it doesn't look right and I decided to ditch it for now. Hopefully I'll have more updates sooner rather than later this go 'round.
KZ Bobber Build
- Thread starter Braaaptor
- Start date
You are using an out of date browser. It may not display this or other websites correctly.
You should upgrade or use an alternative browser.
You should upgrade or use an alternative browser.
I'm glad to be back. I lost most of my riding buddies this year, so I've just been relaxing and saving $$ for building equipment instead. Pics will definitely be posted as soon as I get something fresh to share! I:I
Update time, complete with pics! The next part of the build consists of picking out an appropriate set of handlebars.
I've been dreaming up some very unique hi-rise ("ape hanger") handlebars for awhile now, and I finally got the chance to take them from vision to reality. I love to weld, and have been getting better and better at building. So, here we go!
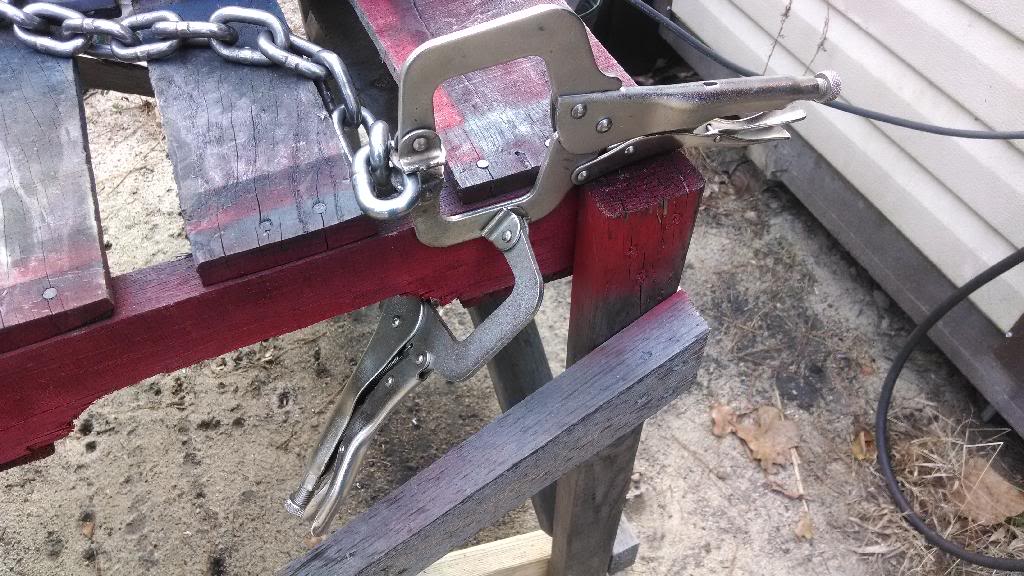
I started out with a 4' section of .156 wall DOM tubing, sized 7/8" OD to match the original 'bars. This way, it will clamp right into the factory handlebar mounts, and stock-sized controls will still clamp on. I have no plans of bending the tubing; you'll soon see why I chose tubing with such thick walls

Now, to get cutting! I indexed the tubing with a traditional plumber's tubing cutter, although it is too thick to cut all the way through with this tool alone.

Instead, time to break out the chop saw. Yes, my outside work table is made out of an old pallet. It was free to build (except for the cost of screws), strong enough to stand on (yes, I tested it), and when it finally rots I'll just put together another one.

First section cut and mocked-up:

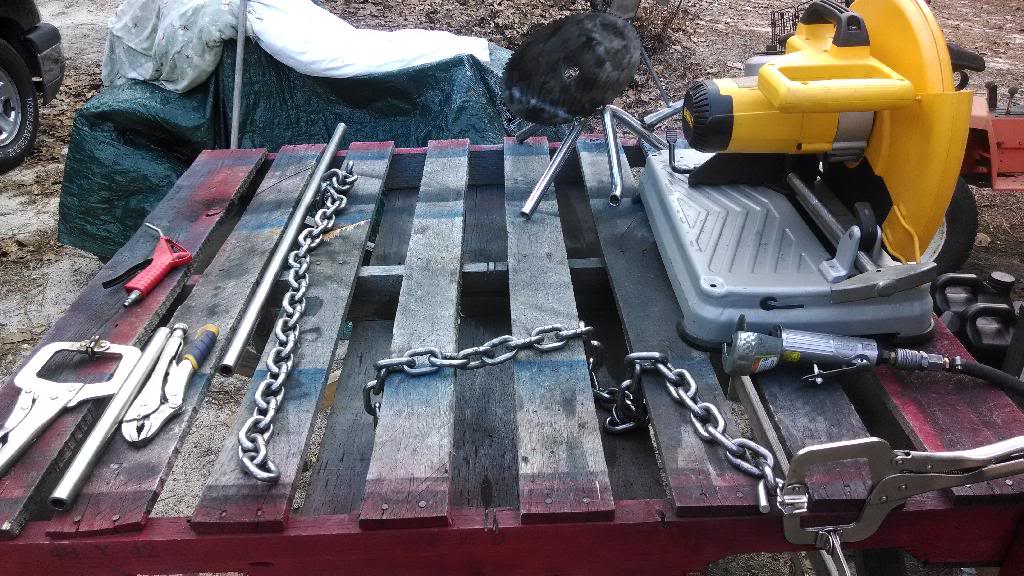
The second half of these bars is made out of chain. I've seen a few other sets of apes made out of chain, but none like what I'm about to do. I didn't have a vise for this build, so I got creative.
And, cut!:

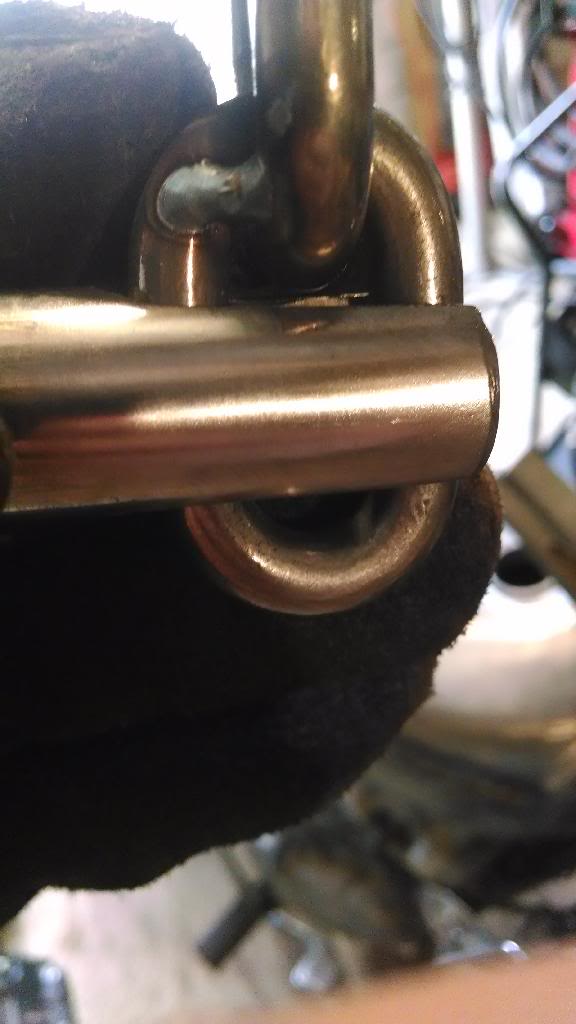
Now, to join chain and lower tubing together. Notched with the cutoff saw:

And, mocked-up!


Stay tuned for more pics, coming in just a sec!
I've been dreaming up some very unique hi-rise ("ape hanger") handlebars for awhile now, and I finally got the chance to take them from vision to reality. I love to weld, and have been getting better and better at building. So, here we go!
I started out with a 4' section of .156 wall DOM tubing, sized 7/8" OD to match the original 'bars. This way, it will clamp right into the factory handlebar mounts, and stock-sized controls will still clamp on. I have no plans of bending the tubing; you'll soon see why I chose tubing with such thick walls

Now, to get cutting! I indexed the tubing with a traditional plumber's tubing cutter, although it is too thick to cut all the way through with this tool alone.

Instead, time to break out the chop saw. Yes, my outside work table is made out of an old pallet. It was free to build (except for the cost of screws), strong enough to stand on (yes, I tested it), and when it finally rots I'll just put together another one.

First section cut and mocked-up:

The second half of these bars is made out of chain. I've seen a few other sets of apes made out of chain, but none like what I'm about to do. I didn't have a vise for this build, so I got creative.

And, cut!:


Now, to join chain and lower tubing together. Notched with the cutoff saw:

And, mocked-up!


Stay tuned for more pics, coming in just a sec!
Continued! Once I got the lower tubing notched to accommodate the cut chain, I repeated the procedure for the other side of the tubing and other section of chain.
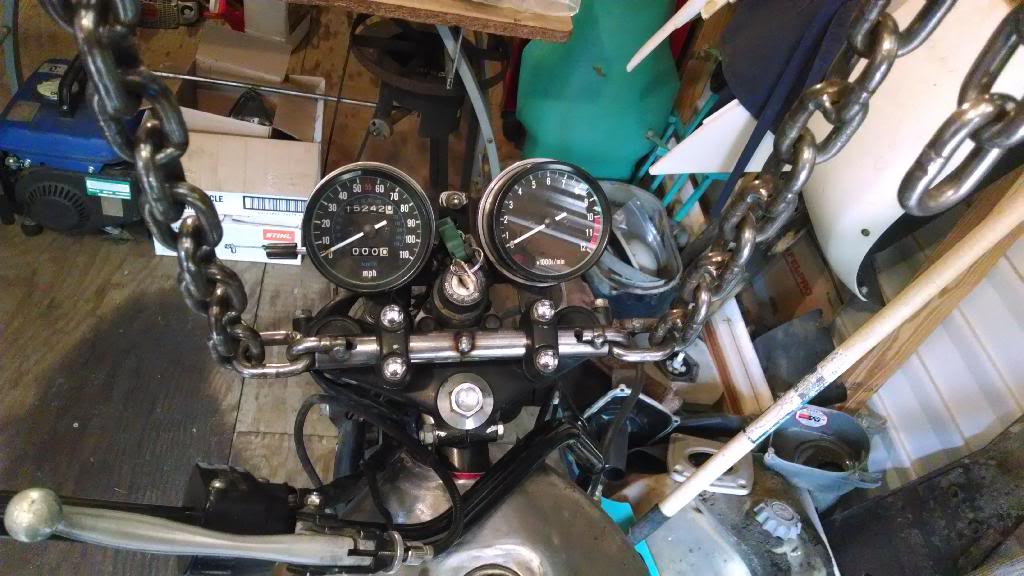
A couple tack welds later, and it was time to stick the limp chain and tubing into the clamps to see how it looks on the bike. I got a good used Harley Sportster seat to replace the failed cut-up stock seat, which didn't look right on this build. At this point, its not bolted down yet, but I'll get it done up soon. Also, I originally got a set of cruiser style handlebars to try on the bike, but I soon decided to build something considerably more radical. The cruiser bars are now back on the shelf for a future project.


With the bars looking pretty good sitting in their clamps, time for the next step. Back to the work table we go...

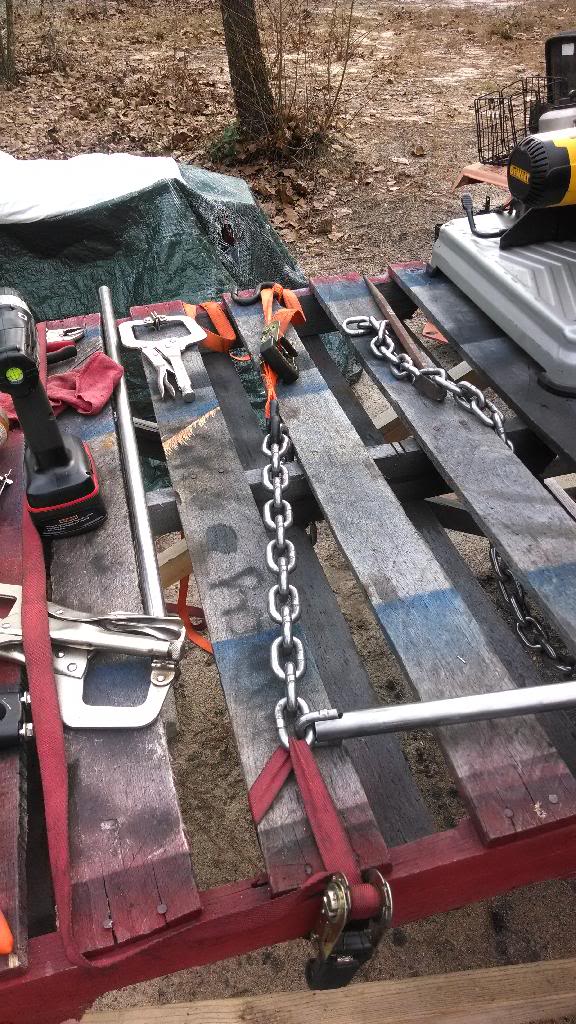
In order to get the chain tight and even before tack welding the individual links together, I pulled out a couple ratchet straps and cranked them down. This keeps the chain snug and immobile while welding.

Done with this section, for the moment! On a build like this, you don't want to weld ANYTHING solid until you are 100% through and are satisfied with the results.

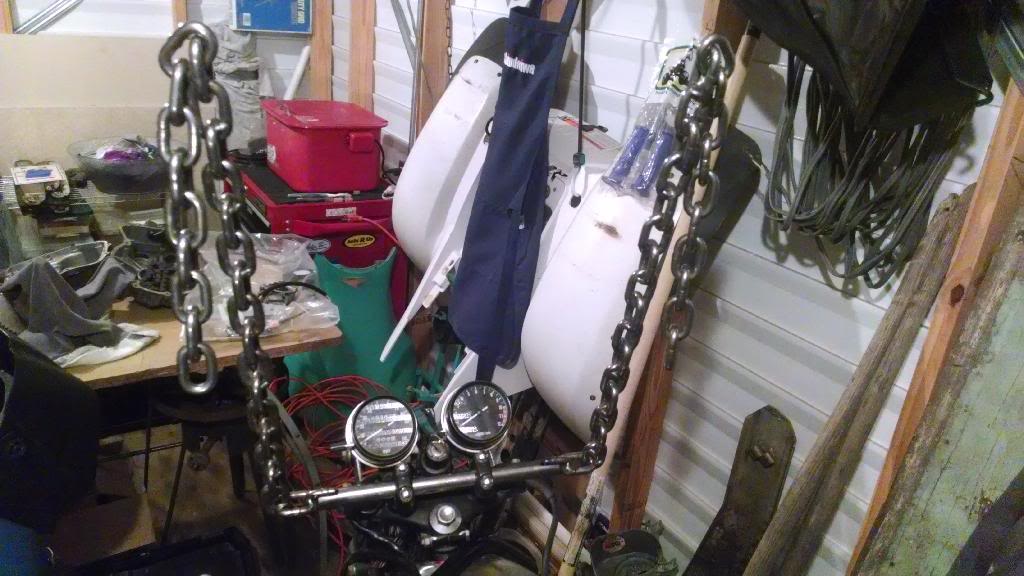
Back to the bike we go! Notice the straps hanging from the roof of the building. They are holding the chains up while I do another mock-up.

Happy with the initial mock-up, its back to the bench again. I made a jig out of scrap lumber and a spare set of handlebar clamps to hold the 'bars solid while I do more welding.

They're up! Starting to come together!
Starting to look like actual handlebars at this point!

More pics to come! Stay tuned...
A couple tack welds later, and it was time to stick the limp chain and tubing into the clamps to see how it looks on the bike. I got a good used Harley Sportster seat to replace the failed cut-up stock seat, which didn't look right on this build. At this point, its not bolted down yet, but I'll get it done up soon. Also, I originally got a set of cruiser style handlebars to try on the bike, but I soon decided to build something considerably more radical. The cruiser bars are now back on the shelf for a future project.


With the bars looking pretty good sitting in their clamps, time for the next step. Back to the work table we go...

In order to get the chain tight and even before tack welding the individual links together, I pulled out a couple ratchet straps and cranked them down. This keeps the chain snug and immobile while welding.


Done with this section, for the moment! On a build like this, you don't want to weld ANYTHING solid until you are 100% through and are satisfied with the results.

Back to the bike we go! Notice the straps hanging from the roof of the building. They are holding the chains up while I do another mock-up.

Happy with the initial mock-up, its back to the bench again. I made a jig out of scrap lumber and a spare set of handlebar clamps to hold the 'bars solid while I do more welding.

They're up! Starting to come together!

Starting to look like actual handlebars at this point!

More pics to come! Stay tuned...
Thanks, Awk! More pics, here we go:
I got to looking at the base of the handlebars, and the more I looked at it, the more it began to look "off". I decided the base was too wide, so I cut out 4 inches of tubing and tacked it back together.
Before:
After. Ahh, much better I do believe. This is a small and narrow bike, and the original wide apes looked out-of-place.
Now, to finish the job by building the top half of the handlebars.
To begin, I notched the left and right side tubes which will accommodate the hand controls to fit on the chain. These notches are cut deeper and wider so that they can slip all the way over a chain link, without the link itself having to be cut or modified.
Notched:

And set in place:
Now for the fun part! Finishing the project. Most tubular apehangers simply rise a certain number of inches, and are then bent downwards and rearwards a certain number of degrees. I wanted to buck tradition and do these handlebars differently. After much tweaking and a little re-welding (remember, I only tacked the bars together during the build), here's the finished product:


Definitely unique. Why this style? Well, I got my inspiration from a set of controls I work with as a small engine mechanic from time to time: Exmark Manufacturing Co.'s ECS, or Enhanced Control System. These controls are used on a variety of walk-behind and riding lawnmowers built by Exmark, and they work very well.
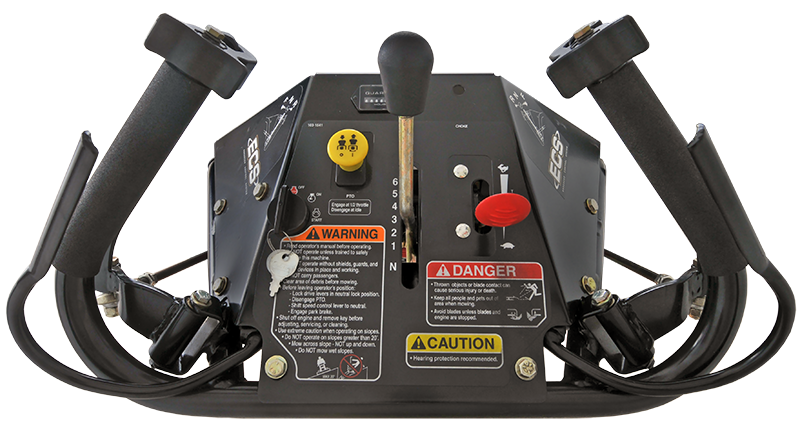
These controls are less fatiguing to use and accommodate the user's (or rider's, in this case) hands in a more natural position. Time will tell how well these bars work, but as of now I'm very happy with the end result. Since my little 140 amp Lincoln welder doesn't have enough power to safely weld these handlebars up 100% solid, I will be taking them to work to finish in a few days. We have a 220 volt Miller machine at the shop that will do the trick to ensure nothing breaks while I'm out riding.
More updates to come as I get more done!
I got to looking at the base of the handlebars, and the more I looked at it, the more it began to look "off". I decided the base was too wide, so I cut out 4 inches of tubing and tacked it back together.
Before:
After. Ahh, much better I do believe. This is a small and narrow bike, and the original wide apes looked out-of-place.

Now, to finish the job by building the top half of the handlebars.
To begin, I notched the left and right side tubes which will accommodate the hand controls to fit on the chain. These notches are cut deeper and wider so that they can slip all the way over a chain link, without the link itself having to be cut or modified.
Notched:

And set in place:

Now for the fun part! Finishing the project. Most tubular apehangers simply rise a certain number of inches, and are then bent downwards and rearwards a certain number of degrees. I wanted to buck tradition and do these handlebars differently. After much tweaking and a little re-welding (remember, I only tacked the bars together during the build), here's the finished product:


Definitely unique. Why this style? Well, I got my inspiration from a set of controls I work with as a small engine mechanic from time to time: Exmark Manufacturing Co.'s ECS, or Enhanced Control System. These controls are used on a variety of walk-behind and riding lawnmowers built by Exmark, and they work very well.

These controls are less fatiguing to use and accommodate the user's (or rider's, in this case) hands in a more natural position. Time will tell how well these bars work, but as of now I'm very happy with the end result. Since my little 140 amp Lincoln welder doesn't have enough power to safely weld these handlebars up 100% solid, I will be taking them to work to finish in a few days. We have a 220 volt Miller machine at the shop that will do the trick to ensure nothing breaks while I'm out riding.
More updates to come as I get more done!
")
I love the build I am embarking on a mild custom 1980 Suzuki gs850 build for a friend
Thanks! I'd like to do a bigger 750/850 build myself one of these years. Those bikes look good with some mild custom work done to them.
You and I both. Although I'd take it a step farther and build an RD 350 chopper. Maybe have a set of custom pipes made to match. People certainly wouldn't mistake it for the average Harley or S&S-powered machine
Last edited:
I had 4 rd350s at once 1 was free and trashed 3 of them I bought for$200 for the set 2 where running the next day wish I still had em
Similar threads
- Replies
- 11
- Views
- 644
- Replies
- 1
- Views
- 94