improving Velocity!!?!!!

Oct 8, 2011
623
6
60
33
nova scotia
porting is one of the best things for these little 2 smokers but most dont venture off into port stuffing. this is adding in the engines ports that have extra volume that isn't needed.
Companys like vitos use stuffer cranks to reducing case volume to improve performance.
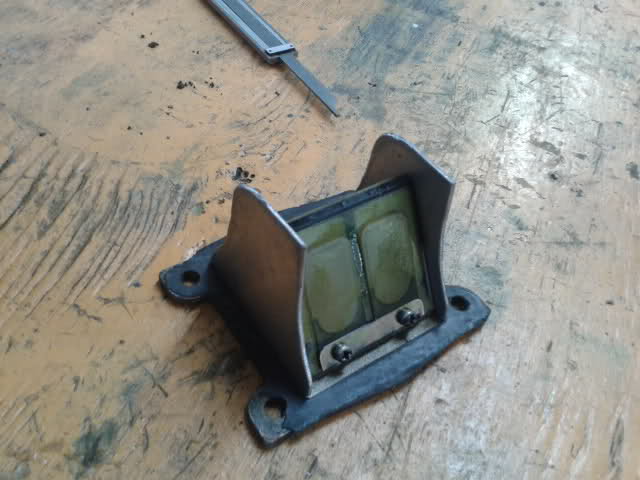
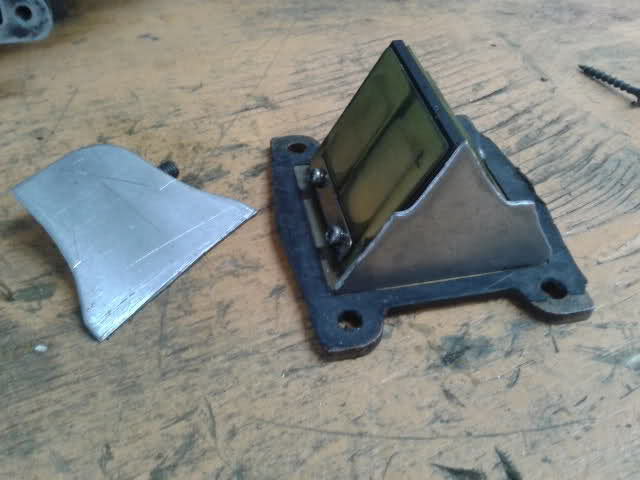
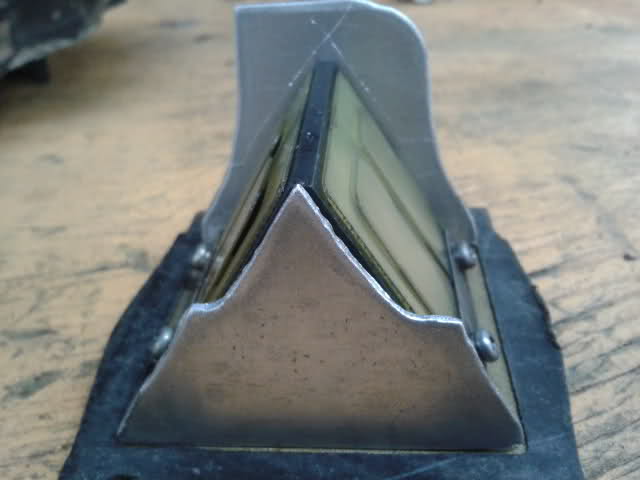
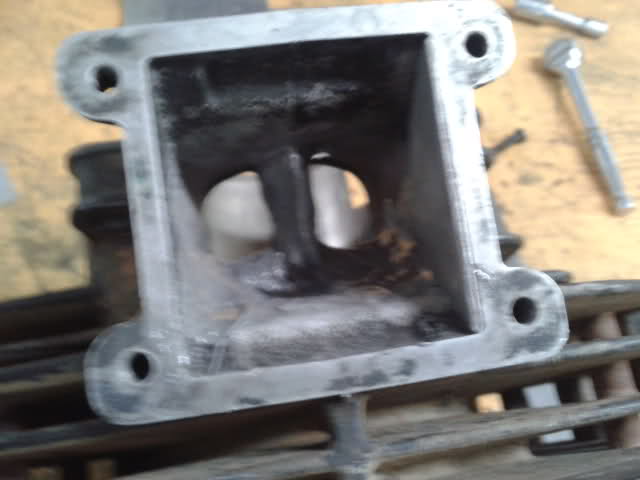
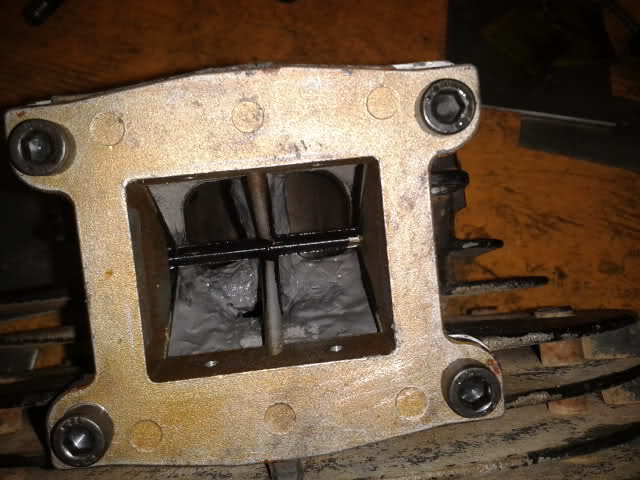
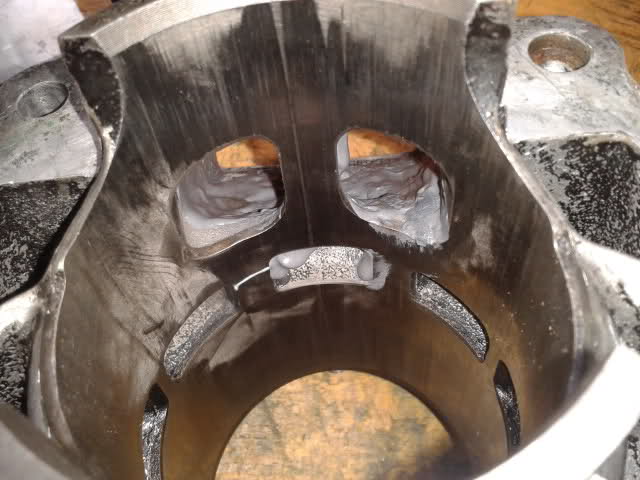
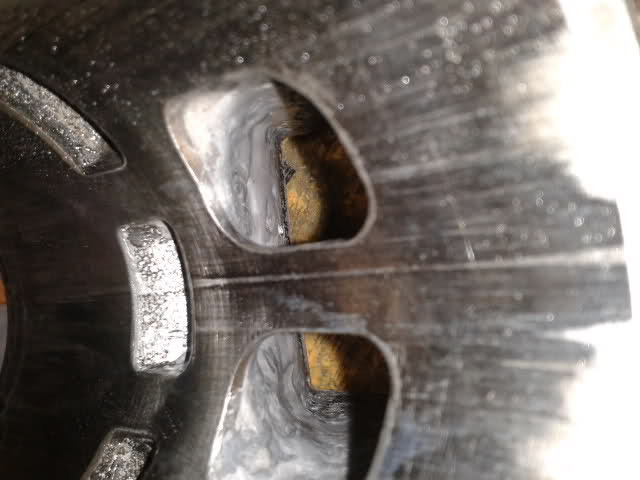
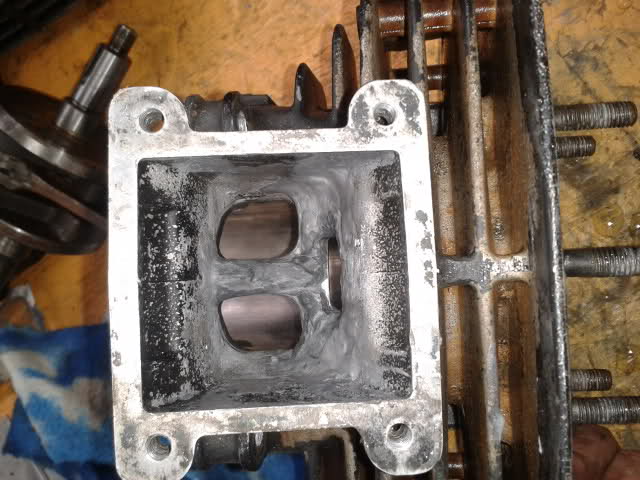
raising exhaust port, transfor ports and just cleaning up everywhere is a must to start making better performance. we noticed areas that have way more empty space then the rest. looking at the intake ports is where we noticed there was alot more vol then the rest of flow.
2i9oxvt.jpg


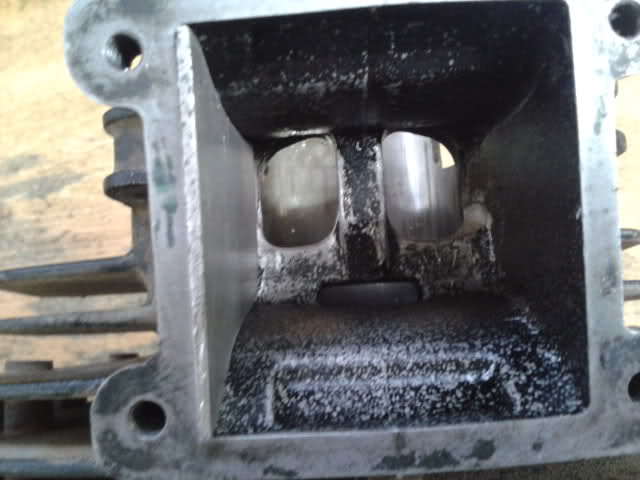
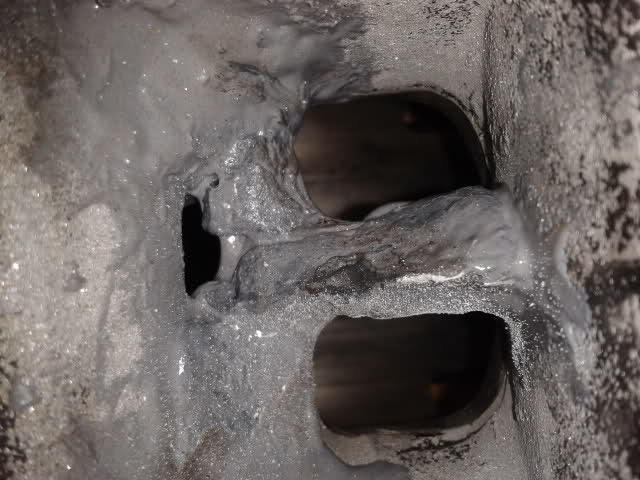
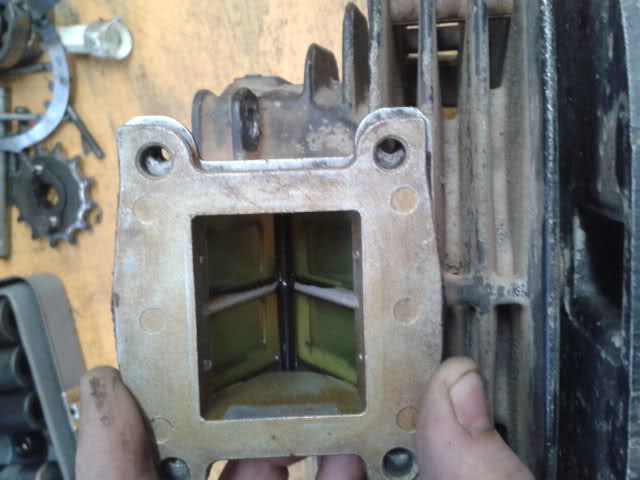
notice the wiggle space the reeds have sitting inside the intake
33agtnt.jpg


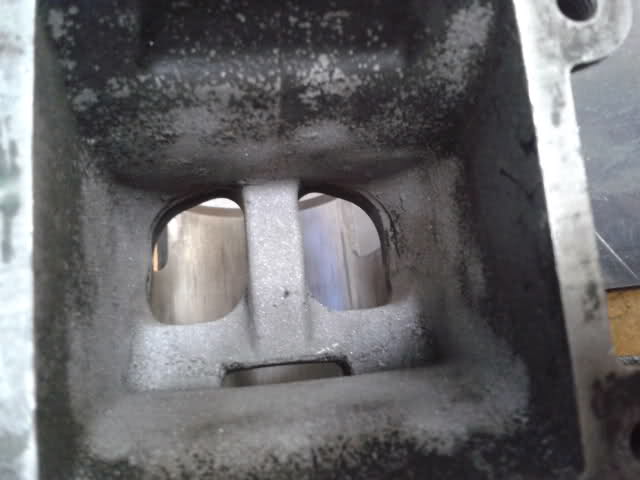
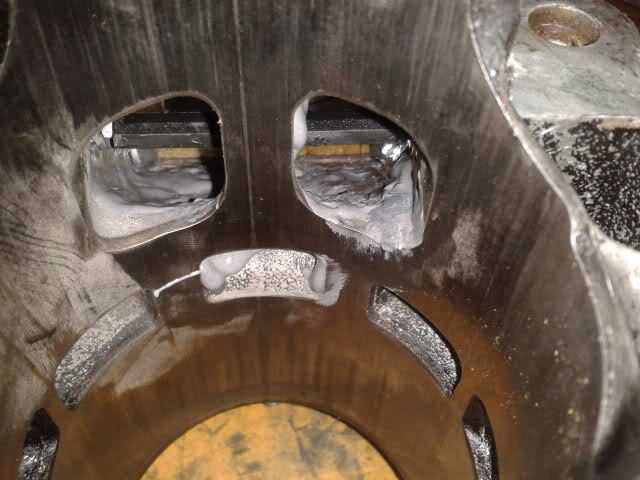
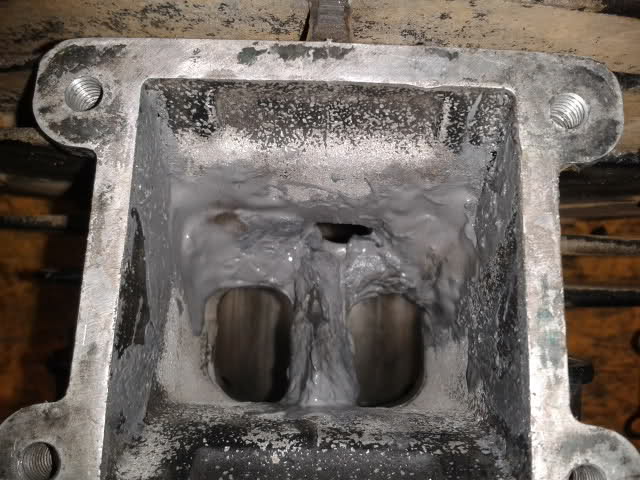
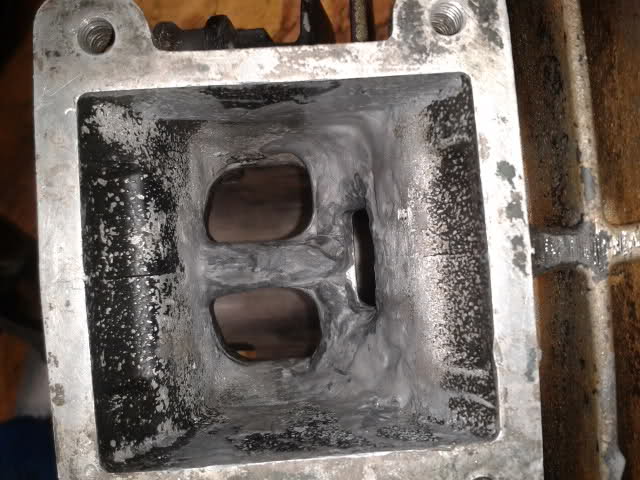
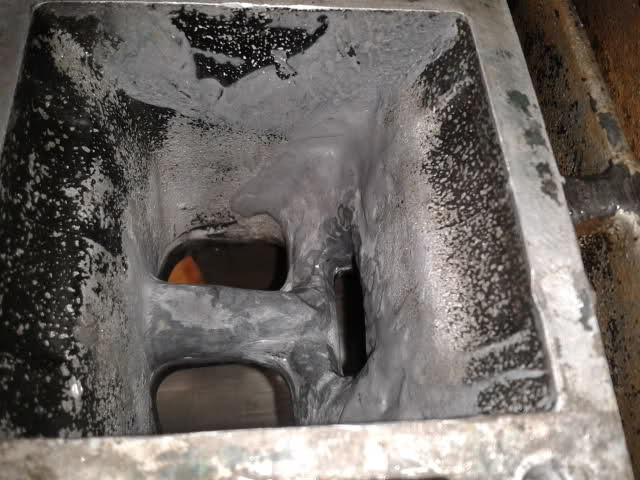
filling these areas with JB Weld and aluminum can possibly improve the flow
now i know these are some crazzy ideas and most of your first thoughts are " i wouldnt be doing that to my blaster" but the idea here is this is a test it should do something. the art of us doing it is to help us understand what may happen and best part is you all might learn from us "experimenting in the garage" :p i mean crazy stuff.
this should improve performance but no way of finding out onless we try.
 
Last edited:
Do you have one of those mad scientist sinister laughs??? I like the outside the box thinking on filling up the reed chamber slop. I thought that was pretty odd when I sealed my down for my leakdown test, why wouldn't it be a tighter fit? Depending on how much past the reed chamber you fill in, it is definitely going to affect the centrifugal spin of the air flow.
 
Do you have one of those mad scientist sinister laughs??? I like the outside the box thinking on filling up the reed chamber slop. I thought that was pretty odd when I sealed my down for my leakdown test, why wouldn't it be a tighter fit? Depending on how much past the reed chamber you fill in, it is definitely going to affect the centrifugal spin of the air flow.

lol muaahahaha as i stir my mixtures of jb weld adhesive :D
 
my fix for the back and forth play in the power reeds
tz1vs.jpg


shaved to fit right
8y8cr5.jpg


e709xc.jpg


sand blasted to help Jb stick
5dp7wk.jpg


were trying to raise the intake bridge aswell as fill in the upper pockets of the intake.
2l940ea.jpg


this pic sucks but you can kinda see what were doin
29koqpz.jpg
 
ill be watching to see the outcome. we had toyed around with this idea as well, we figured the best way to go would be lead or pewter. but jb should hold up just as good.

my question is the "ass dyno" isnt exactly conclusive, do you have a way of testing it such as a dyno or a way to measure the volumetric rate?

if not then all the work is meaningless because you cant come up with concrete numbers for flow and cfm's. im not hating, keep up the good work. id just like to see a company with some testing equipment do this to give solid results. something other than "it feels faster"
 
Used Permatex steel putty and JB Weld, the slow stuff.
The orange stuff you see in the picture is Plasticine, kids play putty.
The idea was to block the ports with that and pour the JB Weld in, but I found the Steel Putty in the cabinet.
More solid and easier to work with, we gave a coat with JB Weld to wet the sand blasted aluminum and moulded the Steel putty with our fingers.
Don't tell Neil, but I have never used the Steel Putty in engine ports before. Better to experiment on his engine!

2l940ea.jpg
 
ill be watching to see the outcome. we had toyed around with this idea as well, we figured the best way to go would be lead or pewter. but jb should hold up just as good.

my question is the "ass dyno" isnt exactly conclusive, do you have a way of testing it such as a dyno or a way to measure the volumetric rate?

if not then all the work is meaningless because you cant come up with concrete numbers for flow and cfm's. im not hating, keep up the good work. id just like to see a company with some testing equipment do this to give solid results. something other than "it feels faster"

I have used JB Weld for intake ports on both iron and aluminum heads and cylinders. Lead or pewter don't flow and stick well enough, especially to aluminum. I also cast lead/tin/antimony bullets in cast iron and aluminum moulds so I know how they work. Would not work for porting. Many years ago I stuffed engines using JB Weld and/or Devcon Epoxy and lead shot as a filler. The lead shot was cheap and soft if it came loose. I would not use it now because I now know that its weight would make it prone to coming loose, even if it didn't in those old engines.

Incidentally one of Triplecrown's motors has a 1" diameter hole in its bottom plugged with JB Weld for the past couple years now.
Complete with a part line through its center!

I built a flow tester for doing port work many years ago. It consisted of a shop vac sucking through a plumbing pipe mimicking a cylinder under a head for testing, as I did port work. Also got rid of the shavings! I had a clear gas with coloured water draped up on the wall to tell me my pressure drop. While I didn't figure out the CFM (I could, I am a pretty sophisticated backwoods garage redneck), I just wanted to be assured I was increasing flow, not ruining it, and I wanted it balanced between all cylinders. This stuff can be done if you know the science.

Well, long story short, I was building great high rpm motors with no low rpm guts. Flow is not the whole story I found. Use the flow bench, but see where you can fill in without ruining the flow. Keep velocity up. When I stuck with smaller ports or filled in ports I got better power, and over a broader range. You will have to ask another night if you want my ideas why.

No dyno, sorry. We just run it up the sand hill. Stock Blaster will do it in 2nd at max revs. Torker Blaster did it in 3rd and 4th, low revs, DT200 Blaster does it in 3rd max revs. If it feels like the DT200 Blaster, it is probably close to 30hp. If it feels like the KTM Blaster, it is probably closer to 40hp. It is all subjective, but we have some yardsticks to measure it against, and we are critical. It is all a comparison. Is it better now than before?
One step at a time.
 
heres some pictures of the crazy stuff
20729uw.jpg


its drying now ill get some pictures before i use the dremal and clean them back up again.

2vtyuco.jpg

cylinder looks rough, in this pic you can really see how much we built up

like best mentioned we have lots to compair too. i have a good launch video of the bike aswell before this mod was done.


if the changes are noticeable enough then a new vid may be help??
 
Last edited by a moderator:
I have used JB Weld for intake ports on both iron and aluminum heads and cylinders. Lead or pewter don't flow and stick well enough, especially to aluminum. I also cast lead/tin/antimony bullets in cast iron and aluminum moulds so I know how they work. Would not work for porting. Many years ago I stuffed engines using JB Weld and/or Devcon Epoxy and lead shot as a filler. The lead shot was cheap and soft if it came loose. I would not use it now because I now know that its weight would make it prone to coming loose, even if it didn't in those old engines.

Incidentally one of Triplecrown's motors has a 1" diameter hole in its bottom plugged with JB Weld for the past couple years now.
Complete with a part line through its center!

I built a flow tester for doing port work many years ago. It consisted of a shop vac sucking through a plumbing pipe mimicking a cylinder under a head for testing, as I did port work. Also got rid of the shavings! I had a clear gas with coloured water draped up on the wall to tell me my pressure drop. While I didn't figure out the CFM (I could, I am a pretty sophisticated backwoods garage redneck), I just wanted to be assured I was increasing flow, not ruining it, and I wanted it balanced between all cylinders. This stuff can be done if you know the science.

Well, long story short, I was building great high rpm motors with no low rpm guts. Flow is not the whole story I found. Use the flow bench, but see where you can fill in without ruining the flow. Keep velocity up. When I stuck with smaller ports or filled in ports I got better power, and over a broader range. You will have to ask another night if you want my ideas why.

No dyno, sorry. We just run it up the sand hill. Stock Blaster will do it in 2nd at max revs. Torker Blaster did it in 3rd and 4th, low revs, DT200 Blaster does it in 3rd max revs. If it feels like the DT200 Blaster, it is probably close to 30hp. If it feels like the KTM Blaster, it is probably closer to 40hp. It is all subjective, but we have some yardsticks to measure it against, and we are critical. It is all a comparison. Is it better now than before?
One step at a time.

nice work, thats what i like to hear. at least you guys can flow test it. for some solid results. i cant wait to see the results. throttle response should get a little better also with out all that turbulance created inside the reed chamber. once again kepp up the good work. tuned in
 
Last edited:
So maybe that is how the RAD valve get's it response/power from?

If I understand this right, bear with me, you are attempting to fill all voids as to have a straight shot of intake charge "blasted" into the cylinder right?

And my next "best" question is, have you accounted for the movement of the reed petals or am I not understanding this?

yes i never thought about it but your probly right about the rad valve, we did leave room for the reeds to open, just enough tho. notice how i cut the side shims to a V at the reeds this is to let every bit of flow.

the cylinder is finished now and on the bike but due to an airleak i wasnt able to take it for a test spin yet. i think we have 2 of your testers on the way I:I
 
Alright i got the my first attempt at this done, heres how it looks.
24nl508.jpg

s2qsfm.jpg

ok it looks really rough, but with some cleaning up it should work fine

starting to clean it up
23mu7mo.jpg

2zhp943.jpg

2gxqt4w.jpg

14kz28.jpg

3464ak7.jpg


there is still lots of extra vol but i wanted to try what i have here so i re-installed the cylinder. i Must wait for a good leak tester as to the one i made dosnt do it for me:-[:p
If this dosnt do anything its off to the next but if it seems good for more then you can bet ill be haulin it apart and doing a finer job of it.
 
Looking forward to hearing about the results ! , I have 3 Cyl here I've been porting and polishing on myself by going off KOR videos on you tube , I'm Confident in my work , I've also been polishing up the Clutch side cover and will be doing allot more once I start buying more stuff !
 
yes i never thought about it but your probly right about the rad valve, we did leave room for the reeds to open, just enough tho. notice how i cut the side shims to a V at the reeds this is to let every bit of flow.

the cylinder is finished now and on the bike but due to an airleak i wasnt able to take it for a test spin yet. i think we have 2 of your testers on the way I:I

Yes sir! Only bad part about international deliveries , no tracking. I would think they should be there sometime this week this is the second week.
 
Looks terrible! :)
The sandblasted aluminum was wetted with tan coloured JB Weld and then dark coloured Steel Putty put over it, and then more JB Weld filled in any cracks and voids.
Makes it look very mottled. Sorry I couldn't be there to help. It is hard cutting a square hole with a round peg, isn't it?

Is the last a "finished" photo?
I think the roof (with boost port) should be flatter and more squared at the corner, but I like what you did with the boost port.
I am worried if there is enough room for the reeds to move.

About the cylinder. This is Triplecrown's worst run-able cylinder and piston.
The scratches and wear marks you see are actually there, although more superficial than they look.
If you are going to make any mistakes, better to do it on your worst cylinder and save your best for when you've learned your tricks.

If this cylinder doesn't get damaged or destroyed in this process, it will get a hone oversize and a new piston.
If it does get destroyed, we start on 2nd best run-able cylinder...
 
Is the last a "finished" photo?
I think the roof (with boost port) should be flatter and more squared at the corner, but I like what you did with the boost port.
I am worried if there is enough room for the reeds to move.
.

yes i think i used some sand paper after this pic to clean it up alittle but that last pic is pretty much the finished. i see what you mean about the boost port i think it could of cleaned that up some a bit better. im not completely happy with how it turned there is enough room for the reeds but i could of filled it in abit better all around. oh well 3 bolts 4 nuts to haul it apart again
 
Dunno if it is my eyes, but the bridge looks like a bit of a wall to me, there could be some detremental eddys off of that.
 
Yes sir! Only bad part about international deliveries , no tracking. I would think they should be there sometime this week this is the second week.

sweeeettt!!! looking forward to it :D

Blaaster said:
Dunno if it is my eyes, but the bridge looks like a bit of a wall to me, there could be some detremental eddys off of that.

we wanted it as high as we could get it till it would hit the reeds. after molding it i had to cut abit off to clear the boyesens. im thinking shes going to have another attempt at it before finishing.