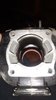
Cylinder port polish
- Thread starter Tommyz125
- Start date
You are using an out of date browser. It may not display this or other websites correctly.
You should upgrade or use an alternative browser.
You should upgrade or use an alternative browser.
A clean-up like that is noticeable. Good job! The head will do nothing. Get that re-chambered.
Have you raised or modified the ex port at all? If not than you can/should raise it just a tad and widen just a tad also. Whats the intake tract look like, any work in there yet?
Great start btw, what tools you using?
Ohh and what pipeare you curently running?
Great start btw, what tools you using?
Ohh and what pipeare you curently running?
My pipe is full fmf fatty and my tools i dont know how to name it in english so il post a pictureHave you raised or modified the ex port at all? If not than you can/should raise it just a tad and widen just a tad also. Whats the intake tract look like, any work in there yet?
Great start btw, what tools you using?
Ohh and what pipeare you curently running?
Have you raised or modified the ex port at all? If not than you can/should raise it just a tad and widen just a tad also. Whats the intake tract look like, any work in there yet?
Great start btw, what tools you using?
Ohh and what pipeare you curently running?
I have sandblasted the transfertMy pipe is full fmf fatty and my tools i dont know how to name it in english so il post a pictureView attachment 29209 View attachment 29210
Attachments
I dont have touch the sleeve at all i havnt raised the exhaust port cause i dont want to lose low rpm power to fit the middle rpm expansion chamber (fmf)My pipe is full fmf fatty and my tools i dont know how to name it in english so il post a pictureView attachment 29209 View attachment 29210
If the exhaust port has not been raised any and the intake Windows not enlarged, what you have done will gain very little.
Yeah , its what i think to, did raising exhaust port 1mm will kill to many low rev power? Or it be just benefical for hi revIf the exhaust port has not been raised any and the intake Windows not enlarged, what you have done will gain very little.
Tommy, You are on the right track. Raising the exhaust port 1mm to 1.5 mm is extremely beneficial across the whole power band. From the bottom ...all the way to the top! You won't lose any low end. You will actually gain some. It is just MOSTLY NOTICEABLE in the mid range to the top end. No harm will be done. Its only beneficial.
Yamaha de-tuned the blaster engine for many reasons. It was sold as an entry level quad, so they had to real in some power for the newbee that was learning to ride. They did this in many (inexpensive ways) by reducing the size of all the transfer, intake, and exhaust port on the cylinder, and designing a weak combustion chamber.
This is however, beneficial to "Tuners" like yourself, because it gives you material to play with.
With a re-chambered head and a ported cylinder and a GOOD pipe, you will be doubling the power output RELIABLY.
You will want to widen the exhaust port also. Not a bunch, but a millimeter or two on each side. REMEMBER... The exhaust port in a two stroke engine is where most of the power is produced. You will also want to use the stock exhaust gasket as a template to show where you need to remove material where the pipe bolts up. There is a ton of material (aluminum) that will need to be removed here. After you get both the exhaust port window inside the cylinder roughed out, and the exhaust port outlet (where the pipe connects) roughed out, you blend the space in between both points. Its hard to mess this up because there is so much material to play with.
The transfers are looking good, however you need to get rid of the step where the iron liner meets the aluminum transfer ports. The high velocity air/fuel mix will stumble and stall out (lack of a better term) trying to transition between the two surfaces you have so far created. Bring that nice flowing curve you have produced ALL THE WAY OVER to the iron liner. Do not make the iron liner a razor edge where it meets the piston. Space that about half a millimeter (.020 thousands of an inch) to the edge of the bore.
We're going to need photos of the intake side to get you started there too. There will be a few things to look out for, so you don't make a mistake. Did you use a cylinder base gasket as a template to scribe the lines where you did the transfer port blending? If not, now is the time. You'll want to do this, because when your finished with the cylinder you will match the cylinder transfer ports to the engine case where the two meet. Its another one of those "steps or speed bumps" that the high speed air/fuel mixture will stumble and stall out.
This is fun and you should be very proud of yourself for taking the initiative to give it a go. You will learn a lot in the process. Ken OConnor Racing has porting templates. They're awesome! I would suggest getting a set when you get a chance, because you and I both know that you will want to be doing more than one cylinder...t Well made, well designed, and reusable.
The rotary file your using needs to be longer. If you try using that short one you have, you could make a mistake. Please be careful.
I know this sounds ridiculous, but you could also use a round rat tail file to help with the intake and exhaust porting. Just use the file for "roughing it out". Be sure to stick some thick cardboard, or card stock (layers of recipe cards) inside the cylinder to prevent the tip of the file from nicking the cylinder's back wall when using the file. Common sense. You could also put a gob of hot melt glue all over the end too + some tape.
TAKE YOUR TIME! This is going to be fun and REWARDING.
I've ported quite a few two strokes so far, and the blaster is probably the most fun and rewarding, because you receive the most gains from the labor/love you put into it.
Your FMF Fatty is a GREAT pipe to use with porting. I use a DMC Alien with great results.
DMC Alien, Toomey B1, Pro Circuit, etc work great with porting.
Last but not least, don't forget to post LOTS of photos of your progress!
Hope this info helps you out...Take care, Joe
Last edited:
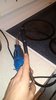
^^^ What he said. I will add just one thing. Since using a dremel or alike. Get yourself one of these. They are cheap and come in handy and allow you more control.
http://m.ebay.com/itm/Flexible-Dril...704c9386fbc2f92257d966&pid=100463&rk=1&rkt=1&
http://m.ebay.com/itm/Flexible-Dril...704c9386fbc2f92257d966&pid=100463&rk=1&rkt=1&
Man its a real pleasure to work on engine and learn with it , i have put my engine together ,do leak test, and ride a couple of time to set my " but dyno" before doing real porting to compare the power , since i have buy the quad 3 month ago.Tommy, You are on the right track. Raising the exhaust port 1mm to 1.5 mm is extremely beneficial across the whole power band. From the bottom ...all the way to the top! You won't lose any low end. You will actually gain some. It is just MOSTLY NOTICEABLE in the mid range to the top end. No harm will be done. Its only beneficial.
Yamaha de-tuned the blaster engine for many reasons. It was sold as an entry level quad, so they had to real in some power for the newbee that was learning to ride. They did this in many (inexpensive ways) by reducing the size of all the transfer, intake, and exhaust port on the cylinder, and designing a weak combustion chamber.
This is however, beneficial to "Tuners" like yourself, because it gives you material to play with.
With a re-chambered head and a ported cylinder and a GOOD pipe, you will be doubling the power output RELIABLY.
You will want to widen the exhaust port also. Not a bunch, but a millimeter or two on each side. REMEMBER... The exhaust port in a two stroke engine is where most of the power is produced. You will also want to use the stock exhaust gasket as a template to show where you need to remove material where the pipe bolts up. There is a ton of material (aluminum) that will need to be removed here. After you get both the exhaust port window inside the cylinder roughed out, and the exhaust port outlet (where the pipe connects) roughed out, you blend the space in between both points. Its hard to mess this up because there is so much material to play with.
The transfers are looking good, however you need to get rid of the step where the iron liner meets the aluminum transfer ports. The high velocity air/fuel mix will stumble and stall out (lack of a better term) trying to transition between the two surfaces you have so far created. Bring that nice flowing curve you have produced ALL THE WAY OVER to the iron liner. Do not make the iron liner a razor edge where it meets the piston. Space that about half a millimeter (.020 thousands of an inch) to the edge of the bore.
We're going to need photos of the intake side to get you started there too. There will be a few things to look out for, so you don't make a mistake. Did you use a cylinder base gasket as a template to scribe the lines where you did the transfer port blending? If not, now is the time. You'll want to do this, because when your finished with the cylinder you will match the cylinder transfer ports to the engine case where the two meet. Its another one of those "steps or speed bumps" that the high speed air/fuel mixture will stumble and stall out.
This is fun and you should be very proud of yourself for taking the initiative to give it a go. You will learn a lot in the process. Ken OConnor Racing has porting templates. They're awesome! I would suggest getting a set when you get a chance, because you and I both know that you will want to be doing more than one cylinder...t Well made, well designed, and reusable.
The rotary file your using needs to be longer. If you try using that short one you have, you could make a mistake. Please be careful.
I know this sounds ridiculous, but you could also use a round rat tail file to help with the intake and exhaust porting. Just use the file for "roughing it out". Be sure to stick some thick cardboard, or card stock (layers of recipe cards) inside the cylinder to prevent the tip of the file from nicking the cylinder's back wall when using the file. Common sense. You could also put a gob of hot melt glue all over the end too + some tape.
TAKE YOUR TIME! This is going to be fun and REWARDING.
I've ported quite a few two strokes so far, and the blaster is probably the most fun and rewarding, because you receive the most gains from the labor/love you put into it.
Your FMF Fatty is a GREAT pipe to use with porting. I use a DMC Alien with great results.
DMC Alien, Toomey B1, Pro Circuit, etc work great with porting.
Last but not least, don't forget to post LOTS of photos of your progress!
Hope this info helps you out...Take care, Joe
My son is riding a cylinder ported by JoeAK47, Joe knows his stuff, wonderful work.
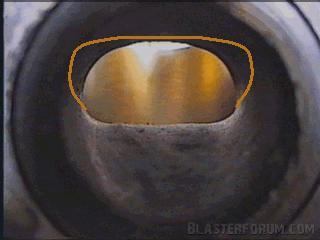
I'd mention mention too, when you widen the exhaust port, widen it more at the top than the bottom. Take as little material as possible from the bottom.
I'd suggest this is the shape you are looking for when looking into the exhaust port:
I'd mention mention too, when you widen the exhaust port, widen it more at the top than the bottom. Take as little material as possible from the bottom.
I'd suggest this is the shape you are looking for when looking into the exhaust port:
^^^ What he said. I will add just one thing. Since using a dremel or alike. Get yourself one of these. They are cheap and come in handy and allow you more control.
http://m.ebay.com/itm/Flexible-Drill-Shaft-Extension-Keyless-Chuck-Dremel-Compatible-Tool-Accessory/112059976713?_trksid=p2053742.c100463.m3226&_trkparms=aid=555014&algo=PL.DEFAULT&ao=1&asc=20150527183144&meid=5b694480e9704c9386fbc2f92257d966&pid=100463&rk=1&rkt=1&
From ebay china for 5$ CAD, i was surprised by the material quality, work well , jug porting to come!!^^^ What he said. I will add just one thing. Since using a dremel or alike. Get yourself one of these. They are cheap and come in handy and allow you more control.
http://m.ebay.com/itm/Flexible-Drill-Shaft-Extension-Keyless-Chuck-Dremel-Compatible-Tool-Accessory/112059976713?_trksid=p2053742.c100463.m3226&_trkparms=aid=555014&algo=PL.DEFAULT&ao=1&asc=20150527183144&meid=5b694480e9704c9386fbc2f92257d966&pid=100463&rk=1&rkt=1&
Attachments
Ive remove the cylinder from the quad. I'll start working on exhaust port tomorrowTommy, You are on the right track. Raising the exhaust port 1mm to 1.5 mm is extremely beneficial across the whole power band. From the bottom ...all the way to the top! You won't lose any low end. You will actually gain some. It is just MOSTLY NOTICEABLE in the mid range to the top end. No harm will be done. Its only beneficial.
Yamaha de-tuned the blaster engine for many reasons. It was sold as an entry level quad, so they had to real in some power for the newbee that was learning to ride. They did this in many (inexpensive ways) by reducing the size of all the transfer, intake, and exhaust port on the cylinder, and designing a weak combustion chamber.
This is however, beneficial to "Tuners" like yourself, because it gives you material to play with.
With a re-chambered head and a ported cylinder and a GOOD pipe, you will be doubling the power output RELIABLY.
You will want to widen the exhaust port also. Not a bunch, but a millimeter or two on each side. REMEMBER... The exhaust port in a two stroke engine is where most of the power is produced. You will also want to use the stock exhaust gasket as a template to show where you need to remove material where the pipe bolts up. There is a ton of material (aluminum) that will need to be removed here. After you get both the exhaust port window inside the cylinder roughed out, and the exhaust port outlet (where the pipe connects) roughed out, you blend the space in between both points. Its hard to mess this up because there is so much material to play with.
The transfers are looking good, however you need to get rid of the step where the iron liner meets the aluminum transfer ports. The high velocity air/fuel mix will stumble and stall out (lack of a better term) trying to transition between the two surfaces you have so far created. Bring that nice flowing curve you have produced ALL THE WAY OVER to the iron liner. Do not make the iron liner a razor edge where it meets the piston. Space that about half a millimeter (.020 thousands of an inch) to the edge of the bore.
We're going to need photos of the intake side to get you started there too. There will be a few things to look out for, so you don't make a mistake. Did you use a cylinder base gasket as a template to scribe the lines where you did the transfer port blending? If not, now is the time. You'll want to do this, because when your finished with the cylinder you will match the cylinder transfer ports to the engine case where the two meet. Its another one of those "steps or speed bumps" that the high speed air/fuel mixture will stumble and stall out.
This is fun and you should be very proud of yourself for taking the initiative to give it a go. You will learn a lot in the process. Ken OConnor Racing has porting templates. They're awesome! I would suggest getting a set when you get a chance, because you and I both know that you will want to be doing more than one cylinder...t Well made, well designed, and reusable.
The rotary file your using needs to be longer. If you try using that short one you have, you could make a mistake. Please be careful.
I know this sounds ridiculous, but you could also use a round rat tail file to help with the intake and exhaust porting. Just use the file for "roughing it out". Be sure to stick some thick cardboard, or card stock (layers of recipe cards) inside the cylinder to prevent the tip of the file from nicking the cylinder's back wall when using the file. Common sense. You could also put a gob of hot melt glue all over the end too + some tape.
TAKE YOUR TIME! This is going to be fun and REWARDING.
I've ported quite a few two strokes so far, and the blaster is probably the most fun and rewarding, because you receive the most gains from the labor/love you put into it.
Your FMF Fatty is a GREAT pipe to use with porting. I use a DMC Alien with great results.
DMC Alien, Toomey B1, Pro Circuit, etc work great with porting.
Last but not least, don't forget to post LOTS of photos of your progress!
Hope this info helps you out...Take care, Joe
Attachments
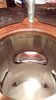
Ok Tommy, Your head is finished... See it below...
Click on "Full Screen" to see detail.
Click on "Full Screen" to see detail.
Man, THIS IS LOOKING A-M-A-Z-I-N-G , IM REAAALY HAPPY, YOUR WORK : A1Ok Tommy, Your head is finished... See it below...
Click on "Full Screen" to see detail.
How many cc's ?Man, THIS IS LOOKING A-M-A-Z-I-N-G , IM REAAALY HAPPY, YOUR WORK : A1

Ok Tommy, Your head is finished... See it below...
Click on "Full Screen" to see detail.
JoeAK47, can i not order a head in USA, have you do the work and send it to South Africa? all of the people on this forum are almost from USA so they have it easy....we guys abroad miss out!! This is not my original language so sorry for any mistakes!!
Similar threads
- Replies
- 1
- Views
- 126
- Replies
- 1
- Views
- 94