465IT Blaster rebuilt and ready to run
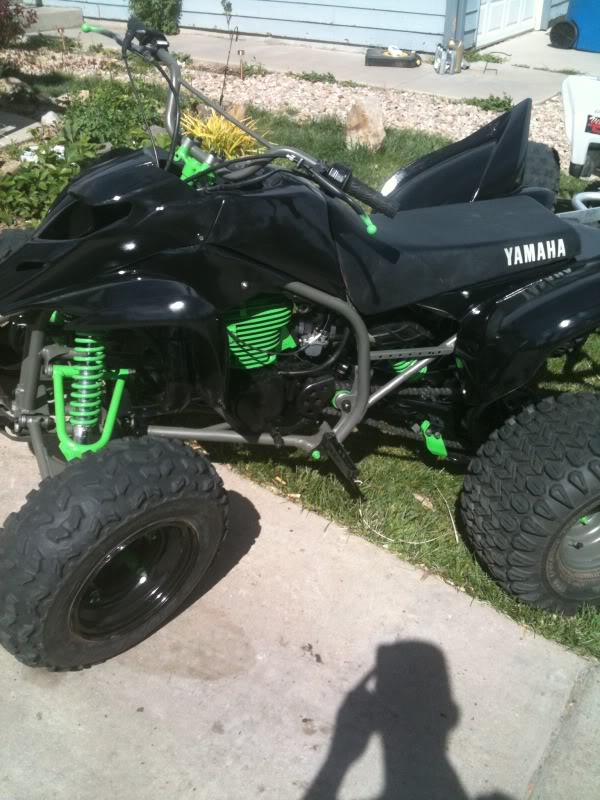
So for everyone who doesnt know the story of my Yamaha 465IT Blaster... Here is it after my first quick rebuild after i rebuilt my engine mounts.
http://www.blasterforum.com/engine-mods-swaps-129/yamaha-465it-blaster-beaster-19768/
Here is a pic of what the Beast looked like when i first purchased it.

But after some riding last season and some major thinking, I decided the Beast needed a full rebuild. So with a little assistance from the impact gun and some good beers, I started to tear her back down. Within a few hours every part on my bike was in a pile waiting for the sand and prep for paint.
After some (ok a ton) of elbow grease, I finally got to throw some paint. using a nice enamel paint I did my frame and most of the major rolling chasis components, and started the process of rebuilding.......


I even went through the effort to customize it as much as i could.... even the spots you'd never really see.... such as the steering stem but it looks good anyway.


Went ahead and painted the Head green to show just how much larger it is than the normal 200cc blaster from a quick glance because i get asked that alot.. "well its not that much bigger is it?"


Finally after about a year of working on and off on my plastics they are finished. I had originally purchased them from the local craigslist for $50 but the only issue was the guy rhino lined them. They looked good in all but i couldn't handle the rough texture(they were rhino lined in the previous build with the horse). So Back at it with the heat gun this time and a ton more elbow grease i managed to get them back to good looking order. A fresh coat of this magic plastic paint and were off and rollin. I was worried the paint was going to act like painting any other plastic products, chip and crack instantly with any bend. But surprisingly enough you can almost fold the plastic in half with out any paint damage. However they are done and they look fantastic with the blaster +03 hood.((Big thanks to the guys who suggested the hood back when i made the first post, it swayed my position to getting on and i'm so happy i did))

And i will be getting video soon enough..
I also rebuild another blaster from the ground up just a few weeks prior to starting mine (It kinda gave me the motivation to tear into mine) I'll post that build here soon..
So for everyone who doesnt know the story of my Yamaha 465IT Blaster... Here is it after my first quick rebuild after i rebuilt my engine mounts.
http://www.blasterforum.com/engine-mods-swaps-129/yamaha-465it-blaster-beaster-19768/
Here is a pic of what the Beast looked like when i first purchased it.
But after some riding last season and some major thinking, I decided the Beast needed a full rebuild. So with a little assistance from the impact gun and some good beers, I started to tear her back down. Within a few hours every part on my bike was in a pile waiting for the sand and prep for paint.
After some (ok a ton) of elbow grease, I finally got to throw some paint. using a nice enamel paint I did my frame and most of the major rolling chasis components, and started the process of rebuilding.......
I even went through the effort to customize it as much as i could.... even the spots you'd never really see.... such as the steering stem but it looks good anyway.
Went ahead and painted the Head green to show just how much larger it is than the normal 200cc blaster from a quick glance because i get asked that alot.. "well its not that much bigger is it?"
Finally after about a year of working on and off on my plastics they are finished. I had originally purchased them from the local craigslist for $50 but the only issue was the guy rhino lined them. They looked good in all but i couldn't handle the rough texture(they were rhino lined in the previous build with the horse). So Back at it with the heat gun this time and a ton more elbow grease i managed to get them back to good looking order. A fresh coat of this magic plastic paint and were off and rollin. I was worried the paint was going to act like painting any other plastic products, chip and crack instantly with any bend. But surprisingly enough you can almost fold the plastic in half with out any paint damage. However they are done and they look fantastic with the blaster +03 hood.((Big thanks to the guys who suggested the hood back when i made the first post, it swayed my position to getting on and i'm so happy i did))
And i will be getting video soon enough..
I also rebuild another blaster from the ground up just a few weeks prior to starting mine (It kinda gave me the motivation to tear into mine) I'll post that build here soon..
Last edited:


