Short story. My stock pipe has something rattling around inside of it. I'm not sure if there is a baffle inside that came loose or is jammed sideways inside. I ordered an FMF fatty pipe. My question is will I be able to use the stock silencer? I used the search function but couldn't find anything. There was a small note with the pipe that said it won't work with any other silencer. I looked all over before ordering to try to find a pipe to use with the stock silencer. Eventually I will get an FMF silencer. Any help would be appreciated.
New FMF fatty pipe to stock silencer
- Thread starter Blaster72
- Start date
You are using an out of date browser. It may not display this or other websites correctly.
You should upgrade or use an alternative browser.
You should upgrade or use an alternative browser.
cool, only reason i would is to let it breath better, the stock silencer restricts flow a little bit
cool, only reason i would is to let it breath better, the stock silencer restricts flow a little bit
Small understatement, the stock silencer restricts the breathing a lot, it is not a straight through design and the FMF will not like it very much.
Bite the bullet, sell the wife and kids, buy and fit a straight through type.
Small understatement, the stock silencer restricts the breathing a lot, it is not a straight through design and the FMF will not like it very much.
Bite the bullet, sell the wife and kids, buy and fit a straight through type.
you could fab up a custom silencer, would be pretty dang easy and no welding required
Re: Re: New FMF fatty pipe to stock silencer
I have a 260 and a 270 on order. I will try the plug chop trick after it's all done. What is a good setting for the needle clip? The stock main jet is in now. I'm running about 3300 feet elevation with considerable humidity. Thanks for the info.
cool jetting should be arround 260-280 a full pipe and no lid help a good amount
I have a 260 and a 270 on order. I will try the plug chop trick after it's all done. What is a good setting for the needle clip? The stock main jet is in now. I'm running about 3300 feet elevation with considerable humidity. Thanks for the info.
I got the exhaust fully installed today. Everything fit nice and tight. My needle clip was on the 3rd setting already. I didn't know that until today. I put in a 270 main jet. Per FMF I removed the snorkel from the air box but not the lid. I had to adjust the mixture screw out to 1 3/4. It was set at 2 1/2 before I started messing with it. I have a little more tweeking to do with the carb for later. The power band hits really hard too. When I went for my first test run I couldn't get into the power band. It ran crappy on the high end. When I set the mix screw to 1 3/4 that seemed to do the trick. Any other info would be appreciated.
My needle clip was on the 3rd setting already. I didn't know that until today. I put in a 270 main jet. Per FMF I removed the snorkel from the air box but not the lid. I had to adjust the mixture screw out to 1 3/4. It was set at 2 1/2 before I started messing with it. I have a little more tweeking to do with the carb for later. The power band hits really hard too. When I went for my first test run I couldn't get into the power band. It ran crappy on the high end. When I set the mix screw to 1 3/4 that seemed to do the trick. Any other info would be appreciated.Adjust the float, adjust the idle and then plug chop to ascertain if you have the correct main jet.
Float level should 20 to 21.5mm on a stock carby.


you want to turn the carb and hold it on a slight angle to measure the float height, like shown here......

it should just barely be touching the inner needle, not depressing it,
holding it pefrectly horizontal like your pic shows may allow the needle to be depressed giving false measurements.
It is possible to check the fuel level by attaching a length of clear plastic tubing to the drain nipple , lifting it up the side of the carby, and cracking the drain screw.
The fuel should show in the pipe to the level of the carb body above the float bowl gasket.
Idle adjusting.
Start with air screw 1.5 turns out.
Set idle screw so that it has some sort of idle. With TORS it is the big screw under seat on top of unit. With no TORS is is the brass screw midway down carb body.
Warm up motor and then set idle screw for a faster idle, 2000rpm+
Adjust air screw either way to get the fastest idle.
Adjust air screw a little at a time leaving 10 secs or until the motor to responds.
Re adjust idle screw for desired idle .
Before you make the plug chop run it is important that the float level is correct, the idle is set correctly and there are no air leaks in the system, otherwise the smoke ring may lie about the AFR.
WHEN ALL OF THE ABOVE ARE CORRECT PROCEED WITH THE FOLLOWING.
Warm up motor to operating temp.
Fit new B8ES plug, ride through the gears and hold WOT in 5th or 6th gear for 10 seconds, or as long as you can safely.
Switch off the motor and pull in the clutch, apply brakes to come to a stop quickly.
Take the plug out and replace the old one for the ride home.
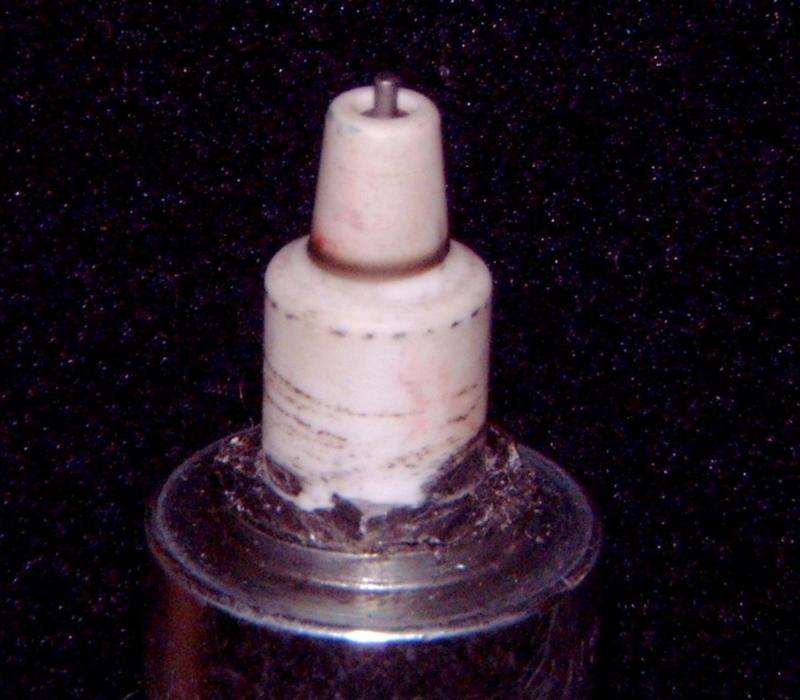
Carefully cut the threaded end off the plug to expose the insulator.
There should be a smoke ring of a cardboard or biscuit colour around the insulator.
If it is non existant or a very light colour, you are lean and require a larger main jet.
If it is a lot darker you are rich and may go down a size in main.
I prefer to run a little on the darker side, I may loose a little power but it is worth it for the peace of mind that I won't need a rebuild so soon.
http://www.blasterforum.com/do-yourself-20/how-plug-chop-38674/
http://www.blasterforum.com/engine-13/plug-chop-how-vid-48226/
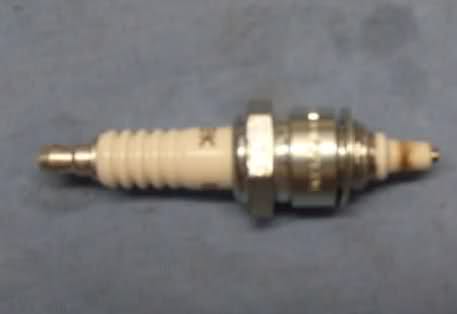
This is a good to go plug.
This one is a little rich, but I would run it, I like to be on the safe side.
You have to get up a reasonable speed so that you can get the motor to pull strongly.
Then hold it Wide Open Throttle (WOT) for 10 secs or as long as you can.
The idea is not to get speed but to make it pull strong at full throttle to get onto the main jet curcuit.
I find I can safely do it on a short run by applying the brakes some.
If you have not enough room you can use 4th or 5th gear with good results.
Float level should 20 to 21.5mm on a stock carby.
you want to turn the carb and hold it on a slight angle to measure the float height, like shown here......
it should just barely be touching the inner needle, not depressing it,
holding it pefrectly horizontal like your pic shows may allow the needle to be depressed giving false measurements.
It is possible to check the fuel level by attaching a length of clear plastic tubing to the drain nipple , lifting it up the side of the carby, and cracking the drain screw.
The fuel should show in the pipe to the level of the carb body above the float bowl gasket.
Idle adjusting.
Start with air screw 1.5 turns out.
Set idle screw so that it has some sort of idle. With TORS it is the big screw under seat on top of unit. With no TORS is is the brass screw midway down carb body.
Warm up motor and then set idle screw for a faster idle, 2000rpm+
Adjust air screw either way to get the fastest idle.
Adjust air screw a little at a time leaving 10 secs or until the motor to responds.
Re adjust idle screw for desired idle .
Before you make the plug chop run it is important that the float level is correct, the idle is set correctly and there are no air leaks in the system, otherwise the smoke ring may lie about the AFR.
WHEN ALL OF THE ABOVE ARE CORRECT PROCEED WITH THE FOLLOWING.
Warm up motor to operating temp.
Fit new B8ES plug, ride through the gears and hold WOT in 5th or 6th gear for 10 seconds, or as long as you can safely.
Switch off the motor and pull in the clutch, apply brakes to come to a stop quickly.
Take the plug out and replace the old one for the ride home.
Carefully cut the threaded end off the plug to expose the insulator.
There should be a smoke ring of a cardboard or biscuit colour around the insulator.
If it is non existant or a very light colour, you are lean and require a larger main jet.
If it is a lot darker you are rich and may go down a size in main.
I prefer to run a little on the darker side, I may loose a little power but it is worth it for the peace of mind that I won't need a rebuild so soon.
http://www.blasterforum.com/do-yourself-20/how-plug-chop-38674/
http://www.blasterforum.com/engine-13/plug-chop-how-vid-48226/
This is a good to go plug.
This one is a little rich, but I would run it, I like to be on the safe side.
You have to get up a reasonable speed so that you can get the motor to pull strongly.
Then hold it Wide Open Throttle (WOT) for 10 secs or as long as you can.
The idea is not to get speed but to make it pull strong at full throttle to get onto the main jet curcuit.
I find I can safely do it on a short run by applying the brakes some.
If you have not enough room you can use 4th or 5th gear with good results.
I wanted to check compression while I was at it. I got 129 and no higher. My manual says less than 140 is a problem. When I pulled the plug it was soaking wet. I still have to do the adjustments from the above post yet. Just though I would share.
129 is pretty good compression for a stock engine,
no worries there.
Thanks. Just got to get the other issues worked out.
Similar threads
- Replies
- 1
- Views
- 340
- Replies
- 5
- Views
- 485