TWal Complete Blaster Rebuild
- Thread starter TWal
- Start date
You are using an out of date browser. It may not display this or other websites correctly.
You should upgrade or use an alternative browser.
You should upgrade or use an alternative browser.
I feel you! Thankfully the weather has been a bit more reasonable here in MA over the past few days. I imagine its been a lot worse up in Michigan!That's why I'm trying to get all my fab work and welding done so I can get it out to the guy and get it coated. Between work and extreme bitter cold, its been tough.
Haha, good for you man. That's a great way to get things done.twai I try to do bartering on as much as I can I trade my labor[repairing bikes/atvs/atcs]stuff I may have etc.I have been blessed with the gift of the hustle
Thanks! I plan on buying plastics in the exact color I want (white) when it becomes necessary. I'll absolutely have a professional paint them if I manage to score some cheap.Nice quad. Just make your you have really good pro when you paint the plastics. My quad had painted plastics. Even wifesblasters black blaster is painted. Its all in the prep.
Hi again everyone!
I would love to hear all of your opinions regarding brakes. Not only do I have no clue how the front drum brakes work, but I hear they're horrible. What should I do to fix that? What are the most reasonably priced replacements for the front brakes?
Thanks!
I would love to hear all of your opinions regarding brakes. Not only do I have no clue how the front drum brakes work, but I hear they're horrible. What should I do to fix that? What are the most reasonably priced replacements for the front brakes?
Thanks!
Hi again everyone!
I would love to hear all of your opinions regarding brakes. Not only do I have no clue how the front drum brakes work, but I hear they're horrible. What should I do to fix that? What are the most reasonably priced replacements for the front brakes?
Thanks!
Adjusted correctly, the front drum brakes work very well. It's the cable operated rear brake that is horrible.
Interesting... I've been looking to find a diagram or picture of the front brakes broken down so I can better understand them. I took apart the whole front hubs and brakes when I was home and could not understand how they operated. Do you have any idea where I could find an explanation or diagram?Adjusted correctly, the front drum brakes work very well. It's the cable operated rear brake that is horrible.
Interesting... I've been looking to find a diagram or picture of the front brakes broken down so I can better understand them. I took apart the whole front hubs and brakes when I was home and could not understand how they operated. Do you have any idea where I could find an explanation or diagram?
Purchase a service manual.
Thank you both! The manual seems very easy to understand. When I'm back home I'll take a look at what I have and will hopefully be able to fix it. That being said, can anyone recommend a good set of disc brakes? I've done a lot of reading and seen plenty of options but I'd like to hear from someone who either has a set or has experience with them.
Front or rear? I took everything from a yzf450 and made them work. Awk sells everything you need to convert without any mods. I am welding my brackets onto the frame and made my caliper bracket. As for the front, eBay is a good bet for 03 and newer parts off stock blasters. I will be running trx250r front brake parts, hubs, spindles and aftermarket arms. So until I get the arms, I can't say how it works...lol
I am looking into changing my front brake setup and will need an entirely new rear brake setup regardless. I'll definitely contact Awk to get a quote on a brake setup. Sounds like quite the project you have decided to take on! Good luck with everything.Front or rear? I took everything from a yzf450 and made them work. Awk sells everything you need to convert without any mods. I am welding my brackets onto the frame and made my caliper bracket. As for the front, eBay is a good bet for 03 and newer parts off stock blasters. I will be running trx250r front brake parts, hubs, spindles and aftermarket arms. So until I get the arms, I can't say how it works...lol
Will do! Thanks!awk08 sells a great rear brake kit pm him
Hey again everyone!
Long time no see! School and work have picked up again and I have been very busy with both. I have had time, however, to take pictures and highlight a potential problem with having my Blaster frame painted. I need your help.
I was looking over my frame today and noticed a small tab attached to the left side pointing inward just above where the swing arm connects. It is very rusted to the point where there is an actual gash in the side. It looks so worn down that I fear sand blasting and powder coating it will actually wear it away to nothing.
I AM SORRY FOR THE BLURRY PICTURES BUT IT WAS VERY HARD TO FOCUS ON.
Both of those pictures were taken looking at this tab from the front of the frame. I am wondering what this tab is for, i.e. what it mounts, and how I can fix it before having the frame coated.
ANOTHER ISSUE is a bolting point just above this. When using an impact wrench to try to take the bolt out, I sheared off the head and am now in a sticky situation. The nut is still attached to the end of the bolt but there is no head on it to take it out with. Any ideas on an easy way to fix this? Here are some pictures (again, sorry for the blur).
If I need to clarify any descriptions of either of my issues or provide clearer pictures please let me know!
Thanks everyone! I am looking forward to reading your responses!
Hey again everyone!
Long time no see! School and work have picked up again and I have been very busy with both. I have had time, however, to take pictures and highlight a potential problem with having my Blaster frame painted. I need your help.
I was looking over my frame today and noticed a small tab attached to the left side pointing inward just above where the swing arm connects. It is very rusted to the point where there is an actual gash in the side. It looks so worn down that I fear sand blasting and powder coating it will actually wear it away to nothing.
I AM SORRY FOR THE BLURRY PICTURES BUT IT WAS VERY HARD TO FOCUS ON.
Both of those pictures were taken looking at this tab from the front of the frame. I am wondering what this tab is for, i.e. what it mounts, and how I can fix it before having the frame coated.
ANOTHER ISSUE is a bolting point just above this. When using an impact wrench to try to take the bolt out, I sheared off the head and am now in a sticky situation. The nut is still attached to the end of the bolt but there is no head on it to take it out with. Any ideas on an easy way to fix this? Here are some pictures (again, sorry for the blur).
If I need to clarify any descriptions of either of my issues or provide clearer pictures please let me know!
Thanks everyone! I am looking forward to reading your responses!
that is where your chain rollers should be i believe. cant really tell because of the picture but i believe so. As for taking the bolt out i would do a trip to harbor freight and get bolt extractor thing works like magic.
that is where your chain rollers should be i believe. cant really tell because of the picture but i believe so. As for taking the bolt out i would do a trip to harbor freight and get bolt extractor thing works like magic.
2nd That. It looks like where a chain roller was, and that gash is from the chain slapping on it.
Easy outs, drill bits, some light heat, and patience is the best way to extract a broken off bolt. Patience being the most important part!
Yup, its the roller bolts.
I suggest this I:I
http://www.blasterforum.com/do-yourself-20/converting-dual-bearing-chain-roller-55355/
I suggest this I:I
http://www.blasterforum.com/do-yourself-20/converting-dual-bearing-chain-roller-55355/
These are definitely the chain rollers, thank you! I will definitely look into that for getting the bolt out. My one concern with using something like that is the rust that has built up all around it. When I'm home again I'll see how bad it is and decide what to do from there.that is where your chain rollers should be i believe. cant really tell because of the picture but i believe so. As for taking the bolt out i would do a trip to harbor freight and get bolt extractor thing works like magic.
Thanks! Patience is not something I excel in but I definitely hear you!2nd That. It looks like where a chain roller was, and that gash is from the chain slapping on it.
Easy outs, drill bits, some light heat, and patience is the best way to extract a broken off bolt. Patience being the most important part!
THIS IS AWESOME! THANK YOU!Yup, its the roller bolts.
I suggest this
Yamaha Blaster Forum - The #1 Community For Yamaha Blaster Owners!
It's great to hear from all of you again. As always I appreciate the help! I will ACTUALLY be posting pics and a description of the engine I bought weeks ago VERY SOON!
Yup, its the roller bolts.
I suggest this I:I
http://www.blasterforum.com/do-yourself-20/converting-dual-bearing-chain-roller-55355/
I wouldn't even go that far. The tube is threaded all the way threw. I cut mine off and left about a mm of material as a spacer and bolted my rollers on. A metric bolt long enough to just stick threw the other end is all you need. I can't remember the thread pitch off hand but I can find out this weekend when I go and work on mine.
i agree with dave,
the bolt snapped because it is threaded at the tab, the tab actaully has it's own flat nut welded on the outside
and the extra nut had it double locked, if the nut had been taken off first, it may have come out ?
but the tube itself has chain damage too and needs removed.
take the nut off first, then try to cut/ peel away some of the tube so you can grab the remaining bolt with vise grips to remove it. PB blaster and some heat will help.
after getting the bolt out, cut the tube off flush with the tab, file/sand smooth
(do both upper and lower)
and move on to real chain rollers............
All Balls Lower Chain Roller for Yamaha YFS200 Blaster 88 06 YZ125 83 85 | eBay
(they come with the bolt/nut needed)
in the ebay adds, all balls are listing an upper, and different lower roller ?
never heard of that before, the same 32mm roller will work for both.
i like to replace both upper and lower at the same time, then i always have that upper one in case the lower one takes a sh*t, or when just worn, i can easily swap the upper to the lower and ride on.
i've also had good luck with the rollers from east coast atv, and they actaully sent me 2 replacement new ones once, when one crapped out after a couple rides.
whatever you get, it should be the 32mm. size
pick/replace the seal and pack the bearings with a good waterproof grease before installation.
they will last much longer")
the bolt snapped because it is threaded at the tab, the tab actaully has it's own flat nut welded on the outside
and the extra nut had it double locked, if the nut had been taken off first, it may have come out ?
but the tube itself has chain damage too and needs removed.
take the nut off first, then try to cut/ peel away some of the tube so you can grab the remaining bolt with vise grips to remove it. PB blaster and some heat will help.
after getting the bolt out, cut the tube off flush with the tab, file/sand smooth
(do both upper and lower)
and move on to real chain rollers............
All Balls Lower Chain Roller for Yamaha YFS200 Blaster 88 06 YZ125 83 85 | eBay
(they come with the bolt/nut needed)
in the ebay adds, all balls are listing an upper, and different lower roller ?
never heard of that before, the same 32mm roller will work for both.
i like to replace both upper and lower at the same time, then i always have that upper one in case the lower one takes a sh*t, or when just worn, i can easily swap the upper to the lower and ride on.
i've also had good luck with the rollers from east coast atv, and they actaully sent me 2 replacement new ones once, when one crapped out after a couple rides.
whatever you get, it should be the 32mm. size
pick/replace the seal and pack the bearings with a good waterproof grease before installation.
they will last much longer
Last edited by a moderator:
I might just go ahead and buy the whole thing because my rollers are long gone anyway. The cutting is exactly what I'm planning on doing though. I figured the whole thing was threaded.I wouldn't even go that far. The tube is threaded all the way threw. I cut mine off and left about a mm of material as a spacer and bolted my rollers on. A metric bolt long enough to just stick threw the other end is all you need. I can't remember the thread pitch off hand but I can find out this weekend when I go and work on mine.
The whole thing definitely would have come off without shearing if I had managed to get the nut off first. I couldn't get my impact wrench around the nut because part of the frame was blocking it so I opted for the lazy option of just trying to blast the damn thing out. Clearly it failed.i agree with dave,
the bolt snapped because it is threaded at the tab, the tab actaully has it's own flat nut welded on the outside
and the extra nut had it double locked, if the nut had been taken off first, it may have come out ?
but the tube itself has chain damage too and needs removed.
take the nut off first, then try to cut/ peel away some of the tube so you can grab the remaining bolt with vise grips to remove it. PB blaster and some heat will help.
after getting the bolt out, cut the tube off flush with the tab, file/sand smooth
(do both upper and lower)
and move on to real chain rollers............
All Balls Lower Chain Roller for Yamaha YFS200 Blaster 88 06 YZ125 83 85 | eBay
(they come with the bolt/nut needed)
in the ebay adds, all balls are listing an upper, and different lower roller ?
never heard of that before, the same 32mm roller will work for both.
i like to replace both upper and lower at the same time, then i always have that upper one in case the lower one takes a sh*t, or when just worn, i can easily swap the upper to the lower and ride on.
i've also had good luck with the rollers from east coast atv, and they actaully sent me 2 replacement new ones once, when one crapped out after a couple rides.
whatever you get, it should be the 32mm. size
pick/replace the seal and pack the bearings with a good waterproof grease before installation.
they will last much longer
Those rollers look great! Thank you for the recommendation. Also, thanks again for the information on brakes via PM, Awk. Your information was very helpful and I am definitely looking into both brake sets as options.
Hey guys,
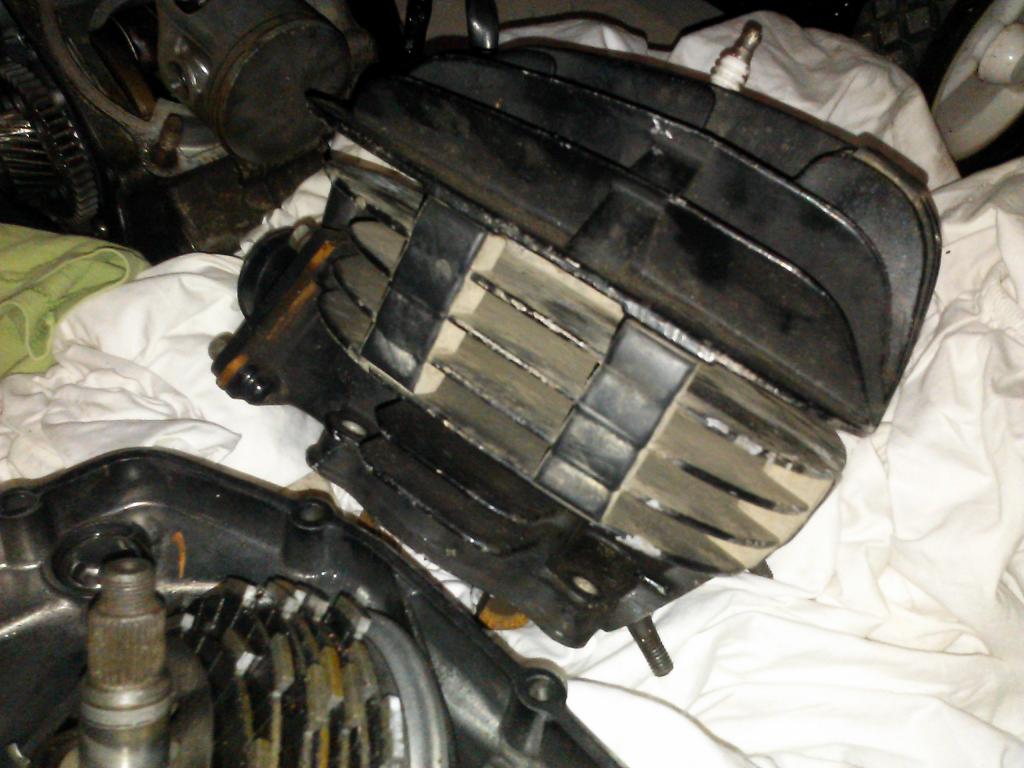
So I have FINALLY found time to post about the engine I recently purchased. I managed to score a ridiculously good deal on this and I'm still shocked the original owner sold it to me for this cheap. For everything you see below, I paid $130.
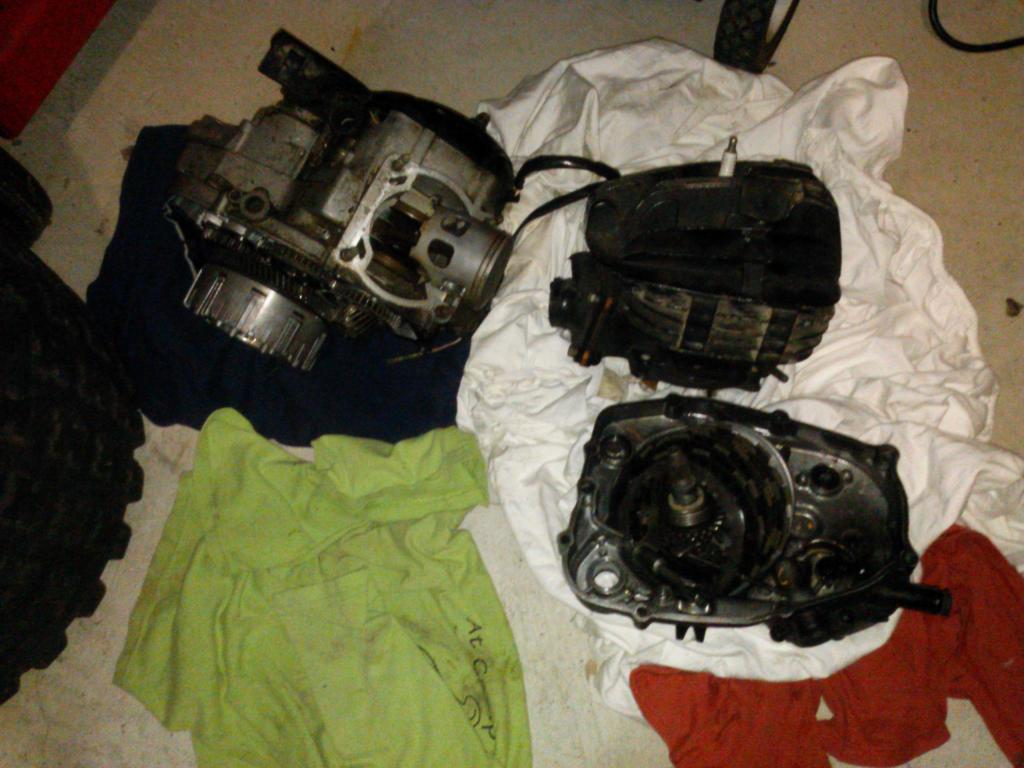
The top end needs work... in fact, it all needs work, but the cylinder is very rusted and will need to be professionally dealt with. It also looks like one of the metal rods that attaches to the bottom end and is then bolted in is missing. I don't know if I'll keep this top end or get a new one. I'll try to get better pictures of the metal rod that is missing when I'm back home.
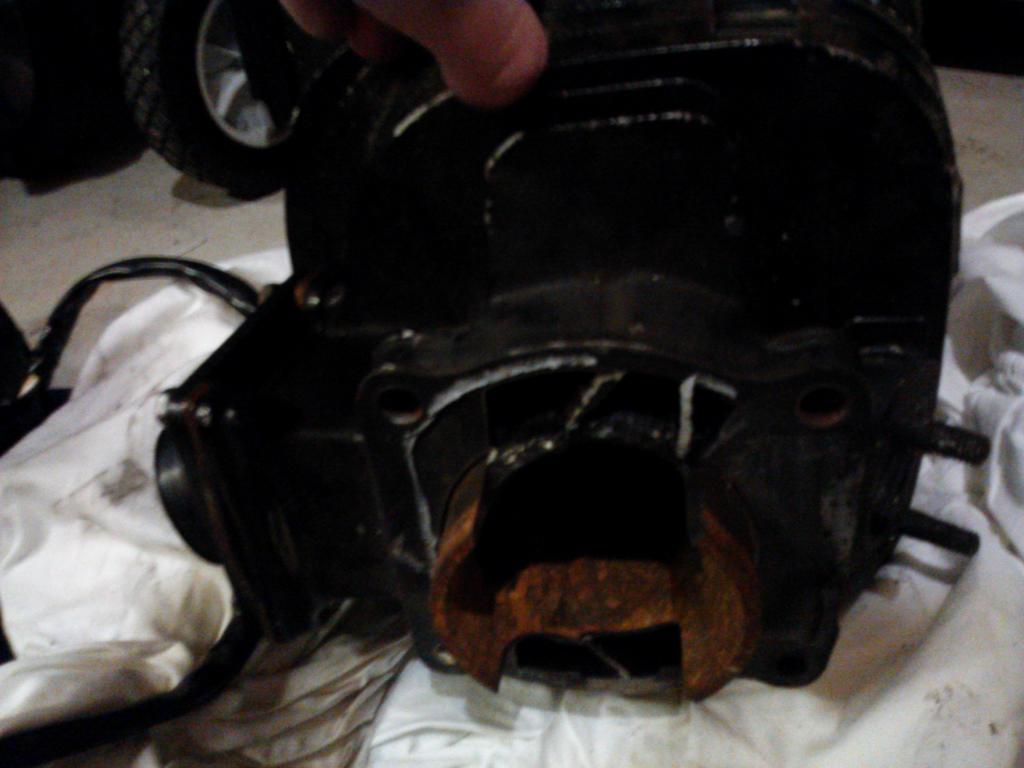
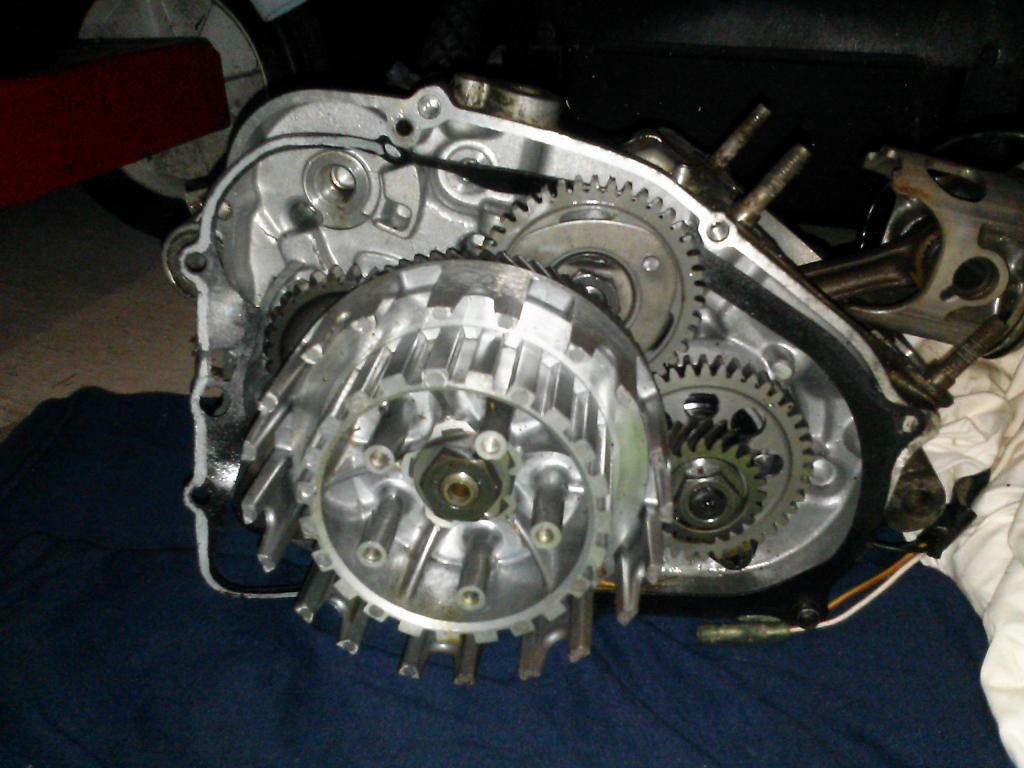
The bottom end seems to be in great shape and I'm told it shifts through all the gears. I will need to get a new piston, and I also plan on sending the entire system away to Ken O'Connor Racing to have it professionally rebuilt and any missing parts added.
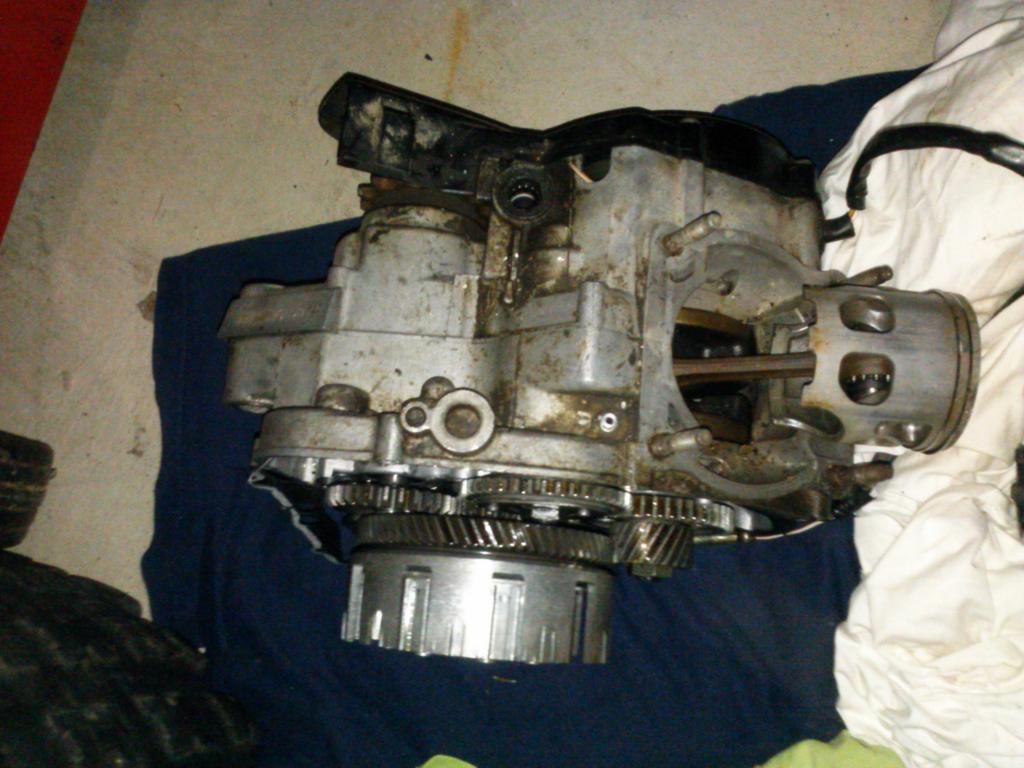
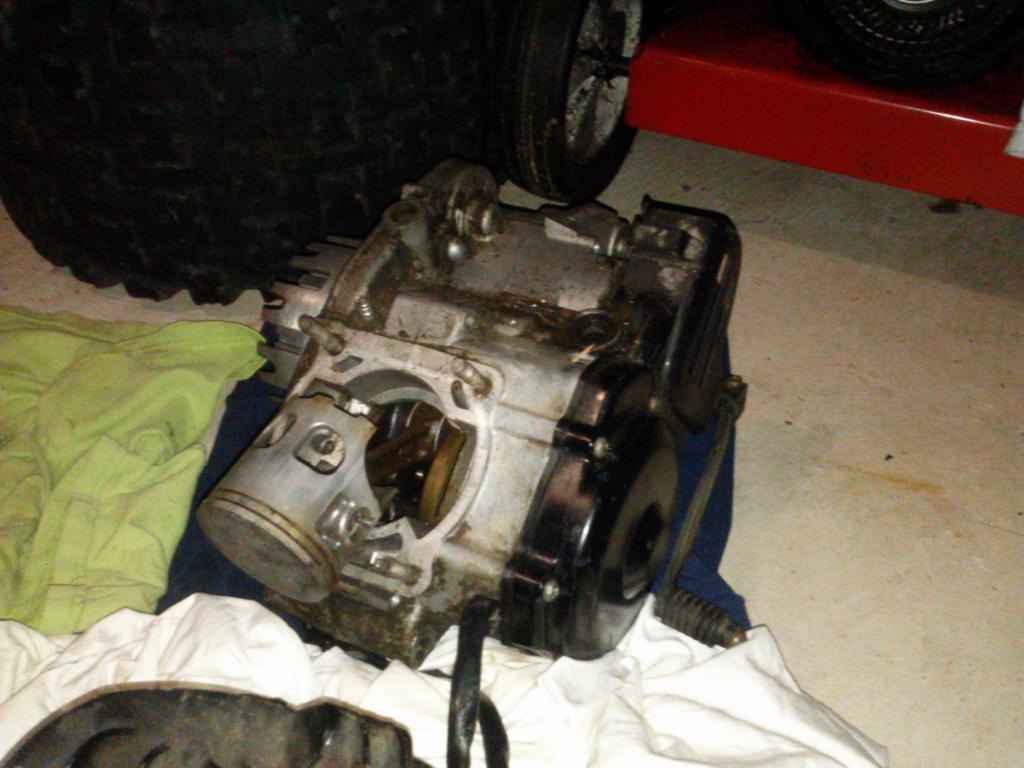
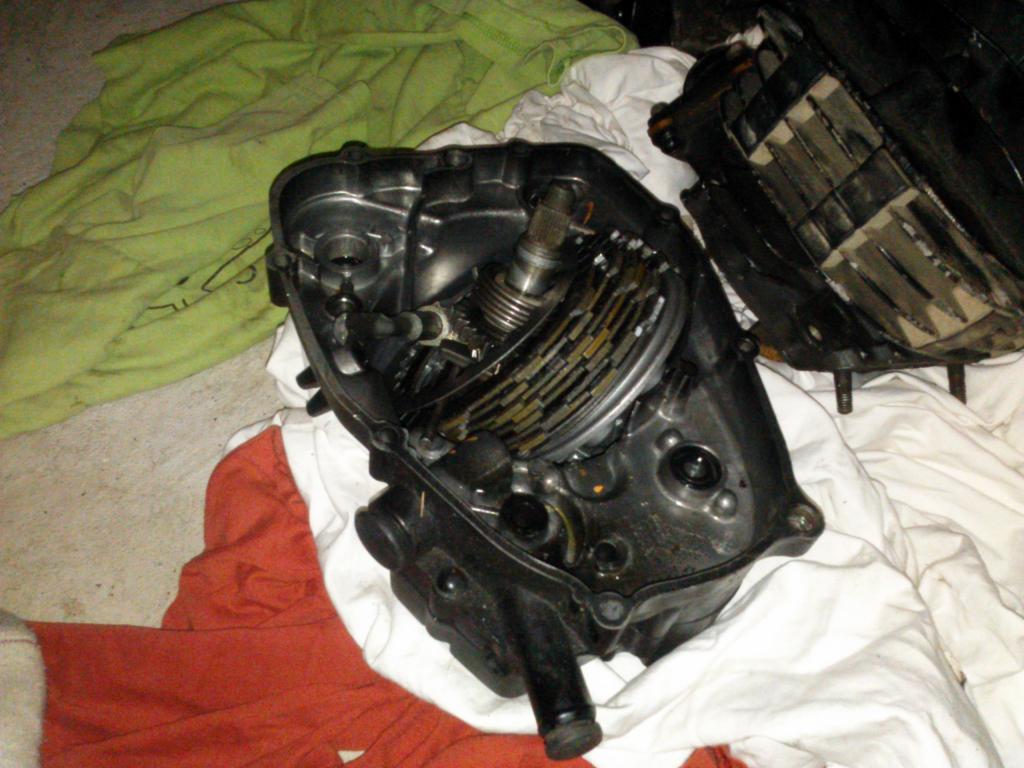
What do you guys think? From what I can see, I scored BIG TIME. The original asking price was $250, which is very fair, but when I offered $130 and to drive up that night with cash, the owner agreed. As I mentioned above, I will be sending this to Ken O'Connor to work his magic. I'm also considering buying a whole new top end as well (since I need a new piston and the cylinder has seen better days) but am not set on anything yet. Give me your thoughts!
So I have FINALLY found time to post about the engine I recently purchased. I managed to score a ridiculously good deal on this and I'm still shocked the original owner sold it to me for this cheap. For everything you see below, I paid $130.
The top end needs work... in fact, it all needs work, but the cylinder is very rusted and will need to be professionally dealt with. It also looks like one of the metal rods that attaches to the bottom end and is then bolted in is missing. I don't know if I'll keep this top end or get a new one. I'll try to get better pictures of the metal rod that is missing when I'm back home.
The bottom end seems to be in great shape and I'm told it shifts through all the gears. I will need to get a new piston, and I also plan on sending the entire system away to Ken O'Connor Racing to have it professionally rebuilt and any missing parts added.
What do you guys think? From what I can see, I scored BIG TIME. The original asking price was $250, which is very fair, but when I offered $130 and to drive up that night with cash, the owner agreed. As I mentioned above, I will be sending this to Ken O'Connor to work his magic. I'm also considering buying a whole new top end as well (since I need a new piston and the cylinder has seen better days) but am not set on anything yet. Give me your thoughts!
Similar threads
- Replies
- 11
- Views
- 682
- Replies
- 3
- Views
- 240
- Replies
- 2
- Views
- 445
- Replies
- 19
- Views
- 379