Hello! Thought i'd share my blaster build with you fine folks! 
History:
We bought the machine brand new off the showroom floor in 1999. Originally it was my father's quad, I ran with an 80cc Badger. I ended up getting into dirt bikes, but thats besides the point. Eventually my father, a tall man at 6' 4" decided he needed a larger quad and passed the Blaster to me. We bought a Pro Circuit full exhaust system, and thats pretty much how we've been running it ever since. If I remember correctly, we had it rebuilt once in it's life by our dealer, but that was a good while ago. So at the end of last summer it took a dump while my buddy was riding it. It completely seized, so we took it home and tore it apart. The piston had completely grenaded, blew into a bunch of pieces. And the connecting rod was twisted like nobodies business.
Parts:
So at that point me and my buddy decided to do a big bore kit. I ordered up a big bore kit from Vitos and had planned on running just the big bore and a stock crank stroke. I ordered both up and a day later received a call from Vito informing me they didn't have any stock cranks in stock, and wouldn't have any for months. He offered me a stroker crank discounted for the mixup. Nice guy Vito! I ordered up all new bearings and seals, OEM, no screwing around. Got the oil pump delete, VForce 4 Reeds, PWK 36mm Carb, uni filter, ProTaper ATV bend bars, Alba Racing nerf bars, Tusk front bumper, modified stock grab handle to securely hold dune flags, Extended swingarm (not sure how long yet), and possibly extended a-arms.
Build:
Since I was pulling the engine fully out of the bike, I decided to do allllllll the bearings and seals, because I'm willing to bet they've never been replaces/greased in their entire life, maybe once.
It begins....

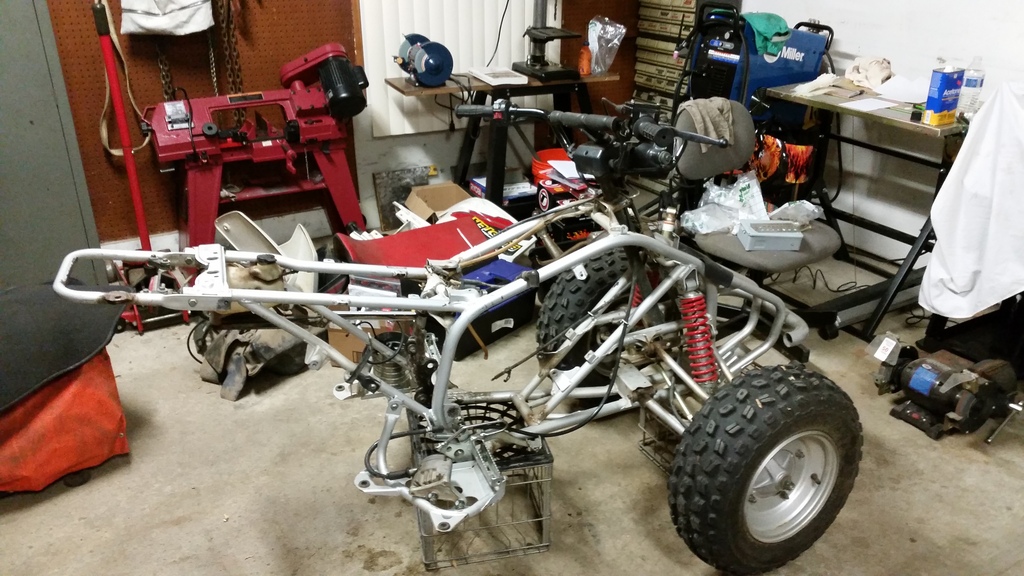
Enigne out, swinger off
Carnage....

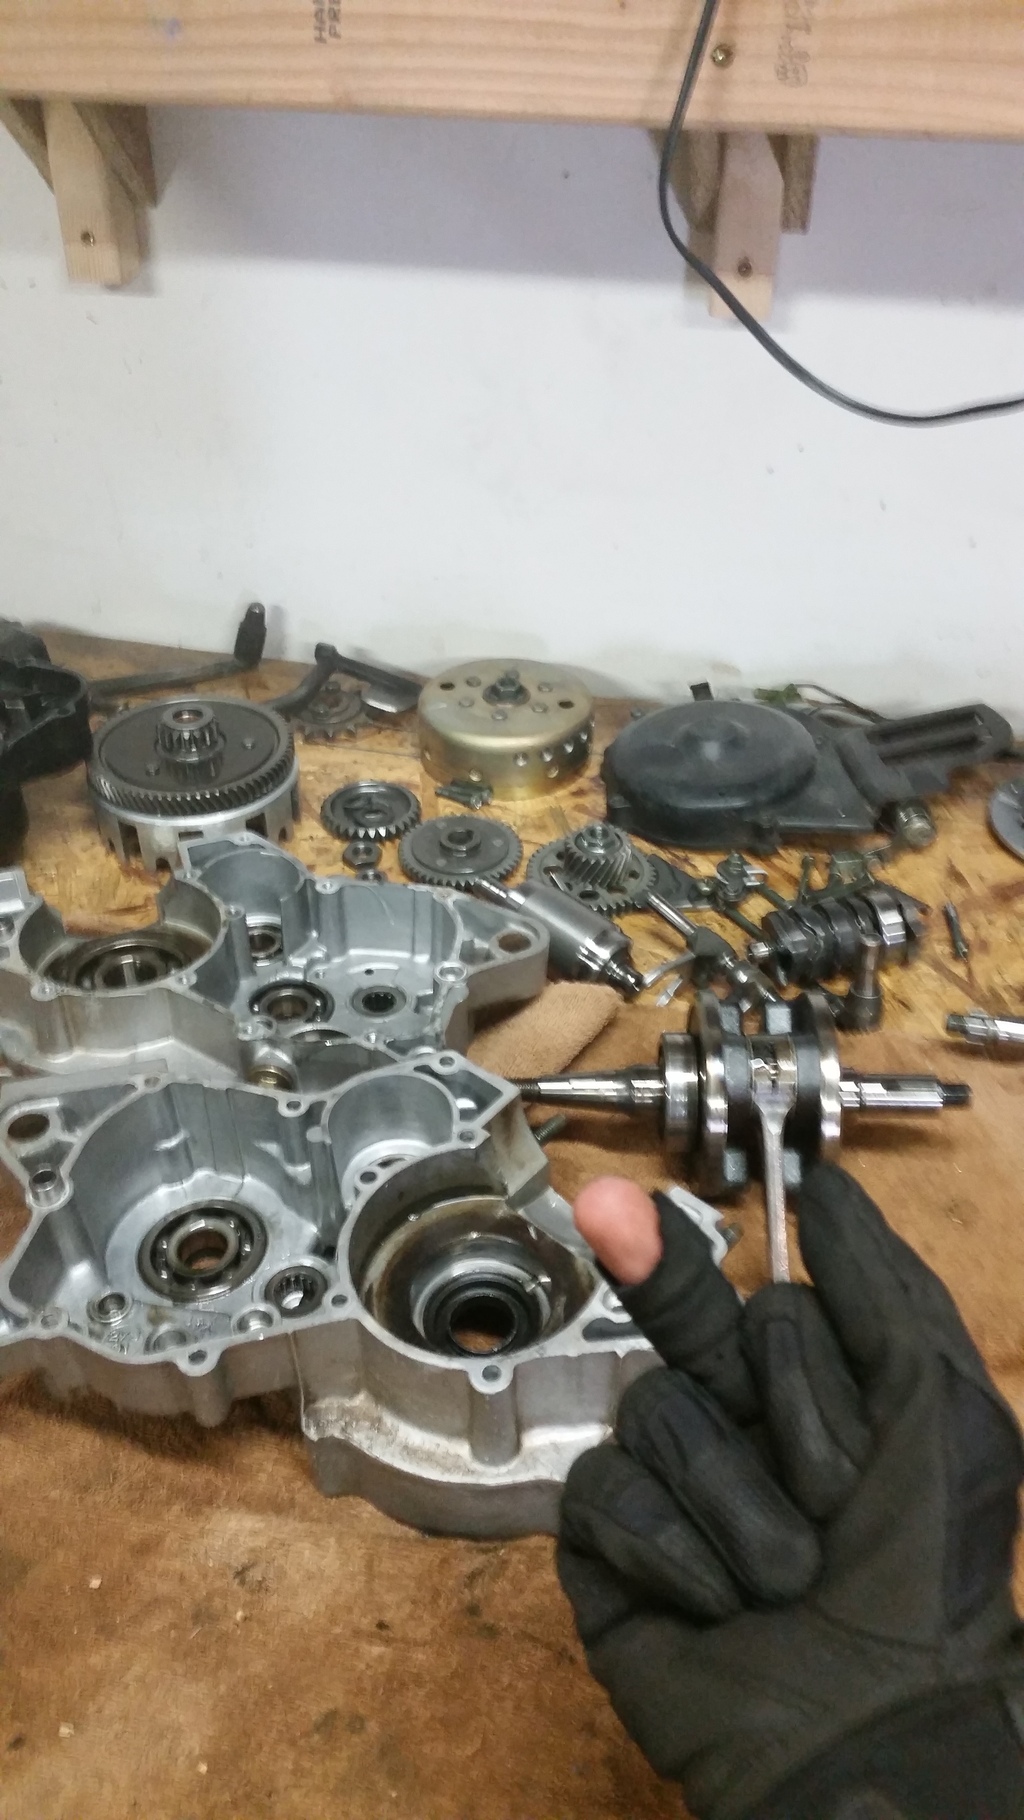
Engine fully disassembled, while I show my displeasure (hopefully im not breaking any rules posting this pic)
New bearings pressed in and oiled, I used my 20 ton shop press from HF

New stroker crank installed, used a tusk crank installer/puller

And thats my last picture I currently have. The build currently stands:
All bearings seated nicely, checked trans and countershaft fitement before installing the crank.
Last night around 1 AM I put the cases together, everything seemed to go together fine, no bunching or pinching.
PROBLEM:
However, when I got the case screws torqued down, my crank is getting bound on something. I can tap the cranks arms slightly and it will free the crank's binding, but when I go to set it on it's side on some wood blocks to continue assembling the right side of the engine, the crank gets bound again. This leads me to believe that the crank isnt fully seated on its bearings, probably the right side.
I should add that before I put the right side on, I installed the piston fully and put it into the cylinder and spun the crank to check for rod clearance as instructed by Vito. There was no clearance issues, and the crank was spinning free and fluidly with just the left side.
So thats where I'm at with this build! Any help with my little issue would be appreciated. Im probably going to split the cases and try to see what is happening.
Thanks for looking
History:
We bought the machine brand new off the showroom floor in 1999. Originally it was my father's quad, I ran with an 80cc Badger. I ended up getting into dirt bikes, but thats besides the point. Eventually my father, a tall man at 6' 4" decided he needed a larger quad and passed the Blaster to me. We bought a Pro Circuit full exhaust system, and thats pretty much how we've been running it ever since. If I remember correctly, we had it rebuilt once in it's life by our dealer, but that was a good while ago. So at the end of last summer it took a dump while my buddy was riding it. It completely seized, so we took it home and tore it apart. The piston had completely grenaded, blew into a bunch of pieces. And the connecting rod was twisted like nobodies business.
Parts:
So at that point me and my buddy decided to do a big bore kit. I ordered up a big bore kit from Vitos and had planned on running just the big bore and a stock crank stroke. I ordered both up and a day later received a call from Vito informing me they didn't have any stock cranks in stock, and wouldn't have any for months. He offered me a stroker crank discounted for the mixup. Nice guy Vito! I ordered up all new bearings and seals, OEM, no screwing around. Got the oil pump delete, VForce 4 Reeds, PWK 36mm Carb, uni filter, ProTaper ATV bend bars, Alba Racing nerf bars, Tusk front bumper, modified stock grab handle to securely hold dune flags, Extended swingarm (not sure how long yet), and possibly extended a-arms.
Build:
Since I was pulling the engine fully out of the bike, I decided to do allllllll the bearings and seals, because I'm willing to bet they've never been replaces/greased in their entire life, maybe once.
It begins....

Enigne out, swinger off

Carnage....

Engine fully disassembled, while I show my displeasure (hopefully im not breaking any rules posting this pic)

New bearings pressed in and oiled, I used my 20 ton shop press from HF

New stroker crank installed, used a tusk crank installer/puller

And thats my last picture I currently have. The build currently stands:
All bearings seated nicely, checked trans and countershaft fitement before installing the crank.
Last night around 1 AM I put the cases together, everything seemed to go together fine, no bunching or pinching.
PROBLEM:
However, when I got the case screws torqued down, my crank is getting bound on something. I can tap the cranks arms slightly and it will free the crank's binding, but when I go to set it on it's side on some wood blocks to continue assembling the right side of the engine, the crank gets bound again. This leads me to believe that the crank isnt fully seated on its bearings, probably the right side.
I should add that before I put the right side on, I installed the piston fully and put it into the cylinder and spun the crank to check for rod clearance as instructed by Vito. There was no clearance issues, and the crank was spinning free and fluidly with just the left side.
So thats where I'm at with this build! Any help with my little issue would be appreciated. Im probably going to split the cases and try to see what is happening.
Thanks for looking

