It all started a year ago! Just a tidy up but then........

Jgp2004

Member
Jun 21, 2017
21
3
39
37
Hello all,

This is really my first proper post on here, Ive been a member for awhile now but in the back ground learning and taking in all the brilliant info on this site..

The names Jonno im from the UK.

And heres my story of my 2004 Blaster which i got as a little project but since then its become a big project as ive got abit carried away!

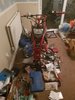
It started when one day i decided to strip it to clean it up.

Im not gonna bore you with essays just quick info and pics!!!
We all love pics..

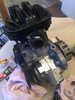
I started by tearing it down to give me an idea of what i needed to do.
20180923_233543.jpg


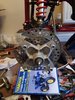
Once Id done that i found lots and lots of issues with it that needed doing. Thats when i decided i was going to fully restore it and improve it.

The first thing i did was take the frame and components to be shot blasted to remove all the poor hand paint work the previous owner had done. After that i had to repair some damaged bolts and broken engine mounts

IMG_3813.JPG
IMG_3826.JPG
20180923_233706.jpg
IMG_3828.JPG


Once id done them few bits it was time to paint all the parts up to get them all looking fresh!

A little primer
IMG_3970.JPG


Then on with the paint
IMG_4184.JPG

IMG_4186.JPG
IMG_4183.JPG
IMG_20180703_103457_355.jpg
20180703_103129.jpg
IMG_4188.JPG
 
  • Like
Reactions: Awk08
Then after id done enough to get me started i decided to clean and rebuild the main part the engine..

New clutch
20180923_233652.jpg


Head removed and cleaned and refitted with new gaskets
20180923_233630.jpg


Once id done all gaskets and piston and oil seals i fitted it all back together and then started to clean all the outside

IMG_4161.JPG

IMG_4164.JPG
IMG_4169.JPG

IMG_3837.JPG
IMG_4161.JPG
IMG_4165.JPG
IMG_4168.JPG
 

Attachments

  • IMG_4153.JPG
    IMG_4153.JPG
    1.1 MB · Views: 221
Last edited:
Next step was to start to fit it up and refurb more parts along the way.

Firstly new bearings and swing arm fitted together and grease nipple added..

IMG_4189.JPG
20180422_211645.jpg
20180422_213400.jpg
IMG_4288.JPG
 

Attachments

  • 20180324_224552.jpg
    20180324_224552.jpg
    1.1 MB · Views: 307
Next step was to start to fit it back up.
Along the way cleaning and refurbing parts and fitting new dust covers and bearings and brake pads. And various other parts.

20171228_133627.jpg
20171228_140527.jpg
20180103_181643.jpg
20180105_092856.jpg
20180303_170132.jpg
IMG_20180419_074206.jpg


Starting to look like a quad again. Still lots more work to be done.
 

Attachments

  • IMG_20180401_192130.jpg
    IMG_20180401_192130.jpg
    842.5 KB · Views: 252
I cleaned all the hubs up and painted the hgs exhaust with vht paint.
I also stripped the whole wiring loom and rewired it to except a battery by floating the earth on the stator and added all road legal lights like indicators and brake lights also a acewell speedo. Also modified a set of new levers to work with the standard parking brake. Ive removed the tors and i also removed the oil pump when rebuilding the engine so now its going to be premix. I did the carb mod and added a air fuel mix screw.
After that i moved the quad to my shed to carry on fitting it up.
I refurbed my wheels and put the tyres on.
20180406_220314.jpg
IMG_20180406_220509_219.jpg
IMG_20180401_192130.jpg
20180919_221654.jpg
IMG_20180323_212858_985.jpg
IMG_20180323_212805_748.jpg
20180714_182926.jpg
Screenshot_20180919-221913_Gallery.jpg
20180714_182916.jpg
IMG_20180714_193803_098.jpg
 
Ive now added a banshee axle and modified a set of raptor heel guards to suit it.

Ive put all fresh brake fluid in and brakes work perfectly
And ive tested all the lighting and it works perfectly (pics to come)

This is currently where ive got to todate
All left to do really is fit the wheels and finish prepping and painting all my fairing up and finally finish fitting it up. Also ive modded a hgs exhaust i had to fit (pics to come).

IMG_20180913_095302.jpg
IMG_20180913_095541_478.jpg
IMG_20180913_103314.jpg
IMG_20180703_143048_243.jpg
 
Thats were i am to date. Ive probably missed lots of bits ive done. But basically ive so far done a full nut and bolt rebuild. It started as a clean up but now its turned into a full restore.

Hope u enjoy the pics.

Ill be posting more as i go along and one day the finished article will be posted!!
 
  • Like
Reactions: Awk08
Nice job!!! I would have loved to restore my 88 Blaster, but have money tied up in an old Goldwing project. Again, Great job!
 
  • Like
Reactions: Jgp2004
Did a little bit more today. Tidyied up the wiring for the battery and tested my speedo it all turns on with the ignition.
Also fitted the rest of my exhaust.
I used a HGS silencer i had lying around in my shed fabricated a pipe from the original tail pipe to suit. Im happy with the result fits well along with my HGS front pipe.

20181005_095936.jpg
20181005_100013.jpg
20181005_142513.jpg
20181005_142524.jpg
 
A little more progress earlier.
Fitted my new skid plate had to open up the mounting holes abit due to larger rear sprocket but no biggie also fitted the speed sensor for the acewell..and just a cheeky shot from the rear.

Im happy with how it looks.
20181009_184949.jpg
20181009_184704.jpg
20181009_184646.jpg
20181009_184757.jpg
 
Well not posted for awhile got it started up recently ran fine then all of a sudden started pouring white smoke. Looks like the crank seal on clutch side has given up. Well gonna tear it down and replace it hopefully that will sort it out