So I thought I’d make this a thread so anyone else having an exhaust leak can hopefully fix theirs! Like I did mine. May not be OEM approved, but it works! (Keep in mind this will require ALOT of cleaning, took me maybe about 2 hours of just cleaning!!)
Let’s start things off with the tools and stuff I used.
1/2” drive ratchet
1/4” drive ratchet
10mm socket and wrench
12mm socket
13MM wrench and socket
Hammer
Screw driver with changeable bits
Awk’s Exhaust plug
Skotch brite
Bräkleen
Copper RTV sealant
Rags
Flash light
*(Most don’t have) Four wheeler lift*
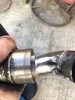
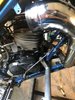
(Image 1)
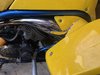
Before starting remember your work gloves and safety glasses! (I’ve gotten brake cleaner in my eyes before and I’m lucky to still have my vision)
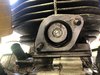
(Image 2)
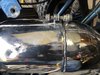
Starting this off I used my screw driver to remove a screw holding on part of my body piece above my wheel (previous owner must’ve lost the bolt because it was a torqes head.) Then the 10mm socket and wrench to remove the other 2 bolts holding onto the body piece
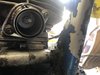
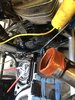
(Image 3 and 4)
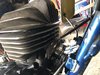
Once my body piece was removed I began taking apart my exhaust into the 2 main pieces and the flange.
Removing the right bend half of my exhaust required me to use my 13MM socket and wrench to take off the nut on the bolt holding my front right arm on, then using my hammer to smack the bolt back just far enough to not remove my right arm, but to just remove the exhaust pipe. (Having the straight piece and silencer already off)
(Image 5)
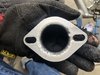
After the flange was removed I fully cleaned the back until it shined with skotch brite and a oil/grease remover (I used brake cleaner)
(Image 6)
I then cleaned the outside and inside of the end of the exhaust pipe that goes into the flange until it shined with the same method as I used for the flange.
(Image 7)
I then raised my fourwheeler up with my lift, but if y’all don’t own one you can life it up on his back wheels and rest it on the wheelie bar, I inserted the exhaust plug which came with the leak down tester I purchased from user: Awk08 (definitely a recommended tool) I tightened the nut on the plug to fully seal my exhaust so no debris would get inside and I began again with brake cleaner and skotch brite to fully clean the area and prepare it for the RTV sealant.
(Image 8 and 9)
I then began to spread the recommended 1/16 of an inch of copper RTV sealant on the backside of the flange and put it back on the machine, I followed the instructions on the back of the tube which states “Hand tighten the bolts and allow the sealant to cure for 1 hour before torquing down)
After the one hour I tightened down my exhaust flange not following any torque specs as I could only find 1 by Yamaha for 15 foot pounds but I did as tight as I could before I felt the nut would strip.
(Image 10 and 11)
I then began spreading the RTV sealant around the part of my exhaust which goes into my flange, and the inside lip as well which will seat inside the flanges lip inside as well. Then reinstalled the right bend half of my exhaust, smacked the arm bolt with a hammer to get the exhaust bracket back in place, replaced the 13MM nut and tightened down and then put the straight piece of the exhaust back on, reinstalled the body piece, and silencer.
After the quad is fully put back together allow the sealant 1 full day (obviously 24 hours) to fully cure and solidify to allow best sealing.
After 24 hours you may start your quad and recheck for the exhaust leak. If still present repeat the process but put a thicker layer of sealant.
(EDIT DONT DO WHAT I DID AND FORGET TO REMOVE THE EXHAUST PLUG)
Let’s start things off with the tools and stuff I used.
1/2” drive ratchet
1/4” drive ratchet
10mm socket and wrench
12mm socket
13MM wrench and socket
Hammer
Screw driver with changeable bits
Awk’s Exhaust plug
Skotch brite
Bräkleen
Copper RTV sealant
Rags
Flash light
*(Most don’t have) Four wheeler lift*
(Image 1)
Before starting remember your work gloves and safety glasses! (I’ve gotten brake cleaner in my eyes before and I’m lucky to still have my vision)
(Image 2)
Starting this off I used my screw driver to remove a screw holding on part of my body piece above my wheel (previous owner must’ve lost the bolt because it was a torqes head.) Then the 10mm socket and wrench to remove the other 2 bolts holding onto the body piece
(Image 3 and 4)
Once my body piece was removed I began taking apart my exhaust into the 2 main pieces and the flange.
Removing the right bend half of my exhaust required me to use my 13MM socket and wrench to take off the nut on the bolt holding my front right arm on, then using my hammer to smack the bolt back just far enough to not remove my right arm, but to just remove the exhaust pipe. (Having the straight piece and silencer already off)
(Image 5)
After the flange was removed I fully cleaned the back until it shined with skotch brite and a oil/grease remover (I used brake cleaner)
(Image 6)
I then cleaned the outside and inside of the end of the exhaust pipe that goes into the flange until it shined with the same method as I used for the flange.
(Image 7)
I then raised my fourwheeler up with my lift, but if y’all don’t own one you can life it up on his back wheels and rest it on the wheelie bar, I inserted the exhaust plug which came with the leak down tester I purchased from user: Awk08 (definitely a recommended tool) I tightened the nut on the plug to fully seal my exhaust so no debris would get inside and I began again with brake cleaner and skotch brite to fully clean the area and prepare it for the RTV sealant.
(Image 8 and 9)
I then began to spread the recommended 1/16 of an inch of copper RTV sealant on the backside of the flange and put it back on the machine, I followed the instructions on the back of the tube which states “Hand tighten the bolts and allow the sealant to cure for 1 hour before torquing down)
After the one hour I tightened down my exhaust flange not following any torque specs as I could only find 1 by Yamaha for 15 foot pounds but I did as tight as I could before I felt the nut would strip.
(Image 10 and 11)
I then began spreading the RTV sealant around the part of my exhaust which goes into my flange, and the inside lip as well which will seat inside the flanges lip inside as well. Then reinstalled the right bend half of my exhaust, smacked the arm bolt with a hammer to get the exhaust bracket back in place, replaced the 13MM nut and tightened down and then put the straight piece of the exhaust back on, reinstalled the body piece, and silencer.
After the quad is fully put back together allow the sealant 1 full day (obviously 24 hours) to fully cure and solidify to allow best sealing.
After 24 hours you may start your quad and recheck for the exhaust leak. If still present repeat the process but put a thicker layer of sealant.
(EDIT DONT DO WHAT I DID AND FORGET TO REMOVE THE EXHAUST PLUG)
Attachments
-
 D4B3EB79-5586-4387-8A08-F90F08AFE32E.jpeg1.5 MB · Views: 257
 -
 1B54024F-1A07-402E-AAF1-CFBE4FE30BFB.jpeg2.7 MB · Views: 272
 -
 F9027DB7-2C4B-4010-ABCE-F578B5872531.jpeg3.1 MB · Views: 259
 -
 43CA499D-0B58-4652-B337-3964180D4A34.jpeg1.5 MB · Views: 281
 -
 36C320D6-0D31-4F2B-A779-DAD1737AEF64.jpeg1.8 MB · Views: 257
 -
 56D5A6B4-95B3-41FD-9067-769C41A23E88.jpeg891.5 KB · Views: 325
 -
 18B1B9EC-FE39-48E1-91CB-56439FD110B1.jpeg2.7 MB · Views: 277
 -
 27E2B89C-C1F3-4533-AF65-7399DD6388C8.jpeg1.7 MB · Views: 272
 -
 8B948D10-D15E-4BE3-BBDE-413E15651CF5.jpeg1.3 MB · Views: 251
 -
 E341EAC2-A771-4464-B3BA-A5EA63846720.jpeg1.7 MB · Views: 252
 -
 E76F4E60-9D98-41C3-BAD6-8C4758FC5D57.jpeg1.7 MB · Views: 286
