KOR Engine Assembly Vids

This is my favorite series yet. I loved the trick on heating just the inner races of the main bearings. I'm going to take the parts that came with my 04 to build an engine using the KOR video's. Has he done a video on rechambering a Blaster head?
 
This couldn't have came at a better time. I'm going to be pulling apart my first blaster motor. And I k ow this will come in handy to get is back toghter again.

My first blaster bottom end re-build too ;) I thought id freshen up my main bearings and seals, perhaps a stock length hot rods crank too which would go nice with my freshly ported KOR cylinder and head mod :D.
 
I watched this video. except for a few minor things left out. It was a excellent video and will be very usefull to a great many people.

Kudos to Ken. Nice work and thanks for taking the time to make this video for people.

Sporty
 
i agree great diy video series Ken. these should help a lot of people putting these simple little motors together. i myself have never used a crank puller and had great success

awesome stuff
 
who's smarter than a 5th grader ???? > me !!!

ken had me do this procedure when we were all there in june, doing a full rebuild on blastertruckers motor as part of the seminar he put on for us.
he sat the heated dowel on the bearing, told me to check it every 10-15 seconds by very lightly turning the dowel, until i felt the inner race getting tight, pulled the dowel, which stops the heating process, and he dropped the crank right in, which i would guess cooled it considerably and quickly.
unless you walk away from it and don't keep checking for the inner race to "tighten up" this method seems almost fool proof.
evidenced by...... this fool accomplished it first try :)
 
I personnally see the slight heating of the inner race with a seperate heated metal and put on place, a good and safe method.

The kind of heat, that would be neaed for that type of transfer to damage the inner race or cage or bearings. would mean that the seperate peice of steel would have to be almost glowing red and have to be on there for atleast a few minutes.

Im a bit bearing savy, having dealt with bearings for racing in soap box derby and cubmobile and pinewood derby bearing cars.

Not to mention, I use to work at sterling steal ball. I use to make the cam bearings for a cadillac years ago when I was much younger. and seen them heat treated n a heat treat furnace and then tumblers to polish them.

The only potential issue, is for someone to use a big heavy piece of steal and over heat it and leave it on to long.

Other than that, I feel this way, is actually a bit more at ease. then using a puller. more damage can come from a puller, than from this current tip / method.


Sporty
 
I've never had a premature main bearing failure with this type of assembly. This is how the boys at Pro Circuit do it. They won’t tell you but I just did. The bearings are loose as a goose so you have plenty of room to work with them. I don't use the stator bolts to seal the cases. The cases are lapped and dead flat. The only way the sealer will get into the threads is if you're over coating the cases. Remember, the case bond never gets hard. It's pretty easy to bench shift a transmission Civic. If the shift fork rods are moving during your assembly, something has burrs, is worn out, is a late model YZ250, or is dirty. The processes shown in the vids can apply to all engines. You can't assemble the engine, bench shift it, find out you did something wrong, and reassemble when you have a gasket between the cases unless you want to buy several center case gaskets for every engine you're assembling. Look at the other end of the spectrom. You just assembled an engine, found you have a problem, and now you have to take it apart again. What do you think that just did to the bearings? I can tell you from experience that there's a very strong possibility that one of the crankshaft bearings is going to remain on the crankshaft during the separation process. What do you do now? Remove the bearing and re-install it or replace it? The bottom line is engine assemblies are an art, not a fly by night “smack it together and see if it works”. Take the vids for what they are. You guys can do it any way you want……….See you on the podium.
 
  • Like
Reactions: speedyslyder
These builds are great quilaity... but i've done almost everything he says not to do i.e. impact wrech, hammers... and knock on wood i've gotten just as much life out of my rebuilds
 
Now that I watched them, and remember seeing all that when I was at the shop! Awesome!

I mean really, That is the best assembly video out there!

If your too stupid to watch the video and listen to what was said, then you shouldn't be working on your motor!

Nice job Ken, Thanks for sharing again!

Ride hard, Drink koolaid!
 
1zbuie.jpg

That picture looks like Chinese workers assembling gum ball machines,or perhaps koolaid machines.

In all seriousness,I would like to know how the Japanese do it,or did it at the yamaha factory.

A puller works good too, but....
People have been heating AND cooling bearings for installation since bearings were probably invented.

Both methods look like they work well. I really like how the "heated inner race" method works. We use to have "Bearing heaters at the old shop that heated the inner race before installation just like ken dose,and it always worked perfectly.

It was a coned shaped arangement that the bearing would sit on,and you would swipe it with a "heat crayon" that told you when the proper temperature was reached on the inner race of the bearing. After the bearing's inner race hit the correct temperature,you then slid it on the shaft.

Ken's method is PERFECTLY ACCEPTABLE and makes assembly a simple "No brainer". Good stuff in them video's Ken. I wish I had better lighting and a bigger SD card,so I could do longer video's. I'm working on it though.

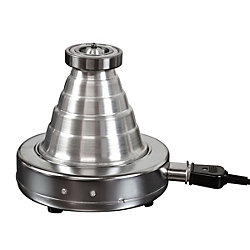
This is what is said about the Cone style bearing heater...
Proper bearing installation is essential to safeguard maximum bearing life. “Maintenance World” estimates that 27% of bearing failures can be attributed to improper installation and mounting errors. By heating the inner race to ~250°F prior to installation, the user allows the bearing to expand and slide easily onto the shaft.
Today, thousands of Cone MountTM Bearing Heaters are in use worldwide promoting bearing longevity, reducing downtime, and lowering maintenance costs. Our product(s) are simple, efficient, American made alternatives to larger more expensive induction bearing heaters.
Customer satisfaction is our primary concern. All units come with a simple instruction sheet, a 250°F temperature indicating "crayon", and a one-year warranty.

The above statement applys to ken's method.

This should help dispel any doubts about heating a bearing for installation,and any damage it will cause (NONE) when done properly at the correct and proper temperature. No brinelling will occure.

This method is used EVERY DAY in industry,because it does the job properly and efficiently.
I've used this method myself and can say that it works!

As for brinelling,it most commonly occures with high rpm's,coupled with LOTS of heat,and no lubrication.

Cone style bearing heater looks like this...
4TDK2_AS01.jpg


Here's a video of a "cone bearing heater" in action...
http://www.directindustry.com/prod/...n-heaters-for-bearing-18443-861179.html#video


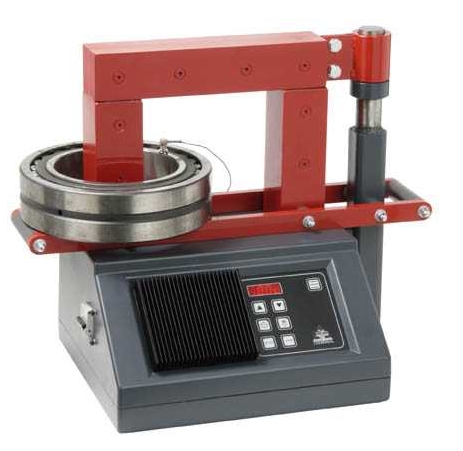
There is also the "Induction type" bearing heater that looks like this...
3820ESD20-B.jpg


Here's a video of an "Induction bearing heater" in action...
http://www.directindustry.com/prod/...n-heaters-for-bearing-19092-576590.html#video
 
Last edited:
I have a old 1980s/90s electronic convection oven that is about the size of a large microwave. Runs off a normal 110 outlet. I put case halfs and ATV diffs in there. Right at around 230-250 the bearings just drop out of the case on their own. Only 25 bucks at a yard sale. It wasn't allowed in the house due to the ugly fake wood grain panels. Also works well for valve guides. I have also had luck heating the whole bearing in motor oil before fitting it onto shafts.. not very fun though. I just put them in the small oven now. Freezing them also helps when installing in cases. Just my 10 cents. I liked the video.