I just recently bought a blaster project to build from the frame up over the next couple months. My first Yamaha Blaster. Here is what I started with and some of my progress so far.


First Blaster
- Thread starter bigcody24
- Start date
You are using an out of date browser. It may not display this or other websites correctly.
You should upgrade or use an alternative browser.
You should upgrade or use an alternative browser.
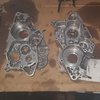


So far I've got a wiseco crank and bottom end kit. Crank is already in and cases back together. Should finish up bottom end assembly tomorrow. Oil injector delete and stainless allen head hardware kit. Wiseco piston and tusk clutch kit are on the way. Will be taking my jug to local machine shop when the piston arrives for boring and possibly some port work. I'm gonna run the vitos head gasket to increase compression. Also going to run a 14/40 sprocket set. I have to get a carb,reed valve,intake boot and exhaust. Probably run boyesen reeds. Leaning towards a full toomey b1 or pro circuit exhaust. Also planning to remove all plastics and redo the frame. Will be painted red. Once engine is finished and frame is painted I will begin addressing any runability/drivability issues. Then on to cosmetics.Cool build. What all plans do you have for it?
Last edited:
It's good to have a plan and follow it through. Just ask questions or search for answers if you get stumped, but it looks like you got a good handle on things.
Thanks alot. I appreciate that. I'm trying. Been doing a lot of google/blaster forum and you tube research. Took alot of Ken O'Connor's advice as far as bottom end assembly. Ready to get everything together and running so I can see what's next on the "to do" list.It's good to have a plan and follow it through. Just ask questions or search for answers if you get stumped, but it looks like you got a good handle on things.
If you choose to port it yourself Ken has some good DIY vids.
When all work is done, you have to wash the cylinder thoroughly, to remove all traces of microscopic particles.
I use Dawn dish soap. When a white rag comes out white it's clean. Dry it completely, then immediately oil it up good.
Also double check port chambering, especially top and bottom of the exhaust port.

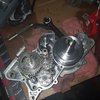
Progress update. All I need to complete the engine is head and intake gaskets and probably a new stator.
OEM is only one suggest ed
Yessir, trying to do everything the right way, all though I'm am beginning to think I made a poor decision on my crankshaft. Got the wiseco. And everything I'm seeing after the fact is discouraging.OEM is only one suggest ed
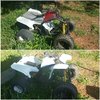
What did you do with the plastics to clean them up? I sanded mine and they look decent but lost the glossy shine. Went all the way down to 1500 grit and tried rubbing compound too
I actually just soaked them in degreaser and scrubbed them with a nylon brush. Then I painted them with a matte white paint. But if you're trying to restore your original finish I would think maybe wet sand them with like 800-1000 grit then work with a finer grit like the 1500 you were using then maybe finish with 2000 and possibly spray them with a clear coat to restore the gloss. Or if you feel.like they're smooth enough now just finish them with 2000 then clear them.What did you do with the plastics to clean them up? I sanded mine and they look decent but lost the glossy shine. Went all the way down to 1500 grit and tried rubbing compound too
Last edited:
They are smooth as a baby's butt but not as glossy as the ones I didn't sand. I would think the rubbing compound would be better than 2000 grittI actually just soaked them in degreaser and scrubbed them with a nylon brush. Then I painted them with a matte white paint. But if you're trying to restore your original finish I would think maybe wet sand them with like 800-1000 grit then work with a finer grit like the 1500 you were using then maybe finish with 2000 and possibly spray them with a clear coat to restore the gloss. Or if you feel.like they're smooth enough now just finish them with 2000 then clear them.
If the rubbing compound gets you the shine your looking for then that's great. If not I'd shoot clear over it. If they're already that smooth probably no further sanding is needed, 2000 or otherwise.They are smooth as a baby's butt but not as glossy as the ones I didn't sand. I would think the rubbing compound would be better than 2000 gritt
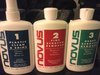
You could try Novus plastic polish.What did you do with the plastics to clean them up? I sanded mine and they look decent but lost the glossy shine. Went all the way down to 1500 grit and tried rubbing compound too
Attachments
It seems the cranks were hit or miss on run-out tolerances. Maybe they have that issue corrected.Yessir, trying to do everything the right way, all though I'm am beginning to think I made a poor decision on my crankshaft. Got the wiseco. And everything I'm seeing after the fact is discouraging.
Have had a Wiesco in my son's Banshee for about 4 yrs no problem S.
Did you get stock or 4mil?
Hopefully I'll get as lucky on mine.It seems the cranks were hit or miss on run-out tolerances. Maybe they have that issue corrected.
Have had a Wiesco in my son's Banshee for about 4 yrs no problem S.
Did you get stock or 4mil?

Getting very close. Toomey B1 full kit should be here tuesday. So hopefully I'll be firing the engine this week. Then I can do all my bearings and a banshee axle swap. Also doing banshee front shocks and 400ex rear. Then it's on to tires. 21x7-10 fronts and 20x11-8 rears. Either maxxis razr or itp holeshots.


Similar threads
- Replies
- 11
- Views
- 617
- Replies
- 0
- Views
- 695